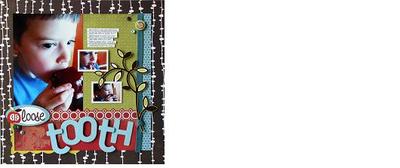
Loose Tooth Scrapbook Layout
Remember how exciting it was to feel that first loose tooth? Keep that memory safe and looking great with this quirky and kitschy scrapbook layout!
Supplies:
- BasicGrey Off beat: Novel paper
- BasicGrey Offbeat: Light Hearted paper
- BasicGrey Offbeat: Casual Paper
- BasicGrey Offbeat: Peculiar paper
- BasicGrey Ambrosia: Zest paper
- BasicGrey Urban Prairie: Hayloft paper
- BasicGrey Offbeat: Element Stickers
- BasicGrey Mellow: Alpha stickers
- BasicGrey Offbeat: Buttons & brads
- BasicGrey Elbow Chip Monogram stickers
- BasicGrey Recess Ribbon
- Craft Knife
- Photos
- Adhesive
- Scallop Scissors
- Glue Dots
Steps:
1. Cut the trim off of the bottom of the Novel paper.
2. Trim Casual paper to 10” x 10” size.
3. Trim Light Hearted paper to 10” x 1” size.
4. Trim the Zest & Peculiar paper 10” x 2 1/2” size.
5. Place the 10” x 10” sheet of paper in the center of the sheet about 1” in on all sides.
6. Using a sharp craft knife cut along the pattern as shown in the example using Peculiar paper.
7. Adhere the 5" x 7" photo to the top left hand corner of the Casual paper.
8. Adhere the Peculiar paper to the bottom of the photo just barely over lapping.
9. Glue the red Zest paper just over lapping the Peculiar paper.
10. Add to the outer bottom left had corner the Hayloft paper cut with large scallop scissors.
11. Glue light hearted paper to the right edge of the Casual paper.
12. Using glue dots adhere the ribbon tying one small knot on the bottom portion of the ribbon.
13. Using the dimensional dots add from the element sheet journal sticker with the apple on it.
14. Add the Mellow alpha stickers to that sticker as well.
15. Paint the Chosen chip alpha letters using a blue acrylic paint.
16. Using dimensional dots apply to both “T”s and one of the “O”s.
17. Using the element stickers apply the vine sticker apply over the ribbon and part of the paper.
18. Apply the button, brad combos to the indicated areas.
Read NextBaby Boy Layout

