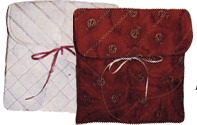
Quick and Easy Quilted Bag
This pretty quilted bag from Sulky of America is easy to create and can be used to hold your rotary cutter. These make great gifts for fellow quilters and others can use for cosmetics or other items.
Materials:
- 9" x 21" Cotton fabric for outside of case
- 9" x 21" Cotton fabric for the lining
- 9" x 21" piece of batting
- Sulky 30 wt. #2125 Variegated Rayon Thread
- 14/90 Quilting Needle
- Darning Foot
- Walking foot with Quilting Guide
- Ruler with 45-Degree Line
- Temporary Marker
- Velcro or Ribbon for Closure
- Optional Purchased bias binding (if you do not use a Serger)
- Sulky KK 2000 Temporary Spray Adhesive
Instructions:
Thread the machine with Sulky 30 wt. Variegated #2125 on the top and in the bobbin. Lay the lining wrong side up and spray it with KK 2000. Place the batting on it. Spray the wrong side of the outside fabric and place it on the batting, right side up.
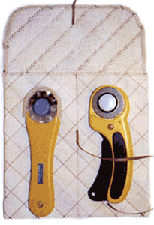
Trim off the corners of one end through all three layers to round off (see photo below). Divide the quilt sandwich into sections. From top (rounded side) measure down 4", draw a line across with a temporary marker. Stitch across this line. Measure down from this drawn line 8-1/2" and draw another line, leaving another 8-1/2" section below it.
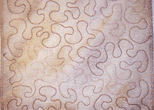
Attach a darning foot and lower the feed dogs. Free motion Stipple Stitch with a large, meandering stitch throughout the middle section.
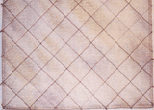
Use a temporary marker to draw a 45 degree line from top to bottom of the lower section. Raise the feed dogs and attach a walking foot and quilting guide. Set your stitch length at 3.0 to 3.5 and with your quilting guide set at 1", Crosshatch Stitch this entire section.
In the top 4" section, again using your temporary marker, draw a 45 degree line. Using your walking foot and your quilting guide set at 1", feather stitch diagonal rows across this section.
After quilting is complete, serge around the entire piece. Fold up the bottom 8-1/2" section, right sides together and use a 1/4" seam allowance to stitch the sides closed, leaving the top 4" section free.

Note: If you did not serge the edges, you could finish this flap edge with a purchased bias binding to give it a clean look. Also, fold down the top edge 1/4". Do this before sewing the case together so that you catch the binding ends inside the rotary cutter case.
Turn right side out. Mark the center line with a temporary marker and straight stich this line the entire length of the bag up to the beginning of the flap. Fold 1/4" of the top flap edge toward the inside and topstitch this edge down about 1/8" from the edge. Use Velcro or stitch one piece of 8" to 10" ribbon at the center of the flap and another piece where the flap meets the body of the rotary cutter case. Voila! A quick and easy gift.
Read NextRetro Teardrop Trivet


Thanks for your comment. Don't forget to share!
Report Inappropriate Comment
Are you sure you would like to report this comment? It will be flagged for our moderators to take action.
Thank you for taking the time to improve the content on our site.