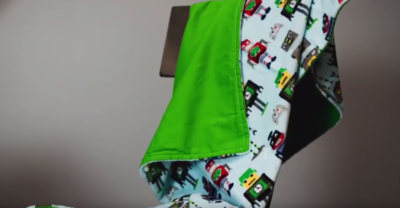
Easy Kid's DIY Blanket

This Easy Kid's DIY Blanket is going to quickly work its way to becoming your absolute favorite DIY project that you have ever tried. This is a super easy sewing project that will result in an adorable and soft handmade blanket. You can keep the dimensions the same to create this kid's blanket, or you can adjust the measurements a bit so that this wonderful cuddly DIY blanket can be all yours. Plus, this project comes with a super easy-to-follow video tutorial that you can follow along with and make a fantastic DIY gift for the holidays!
Estimated Cost$11-$20
Time to CompleteIn an evening
Primary TechniqueSewing

Project TypeMake a Project
Materials List
- Backing fabric
- Cuddle/plush fabric
- Sewing machine
- Thread
- Fabric scissors
- Pins
How to Make a Blanket
Instructions for DIY Kid's Blanket
-
Cut your fabric into 30-inch squares, and line your fabrics up as best as you can.
-
Insert pins every few inches all the way around.
-
Put the fabric underneath your presser foot and line it up with the edge.
Tip: DO NOT stitch over your pins. It can really damage your machine. Instead, when you get the pin pull it out and continue to stitch. -
When you get to a corner, stop, put your needle down, put your presser foot up, rotate 90 degrees, put your presser foot back down, and continue.
-
Stitch all the way around with an 8 inch gap for turning, and remember to leave a hole so you can turn you fabric the right way.
-
Clip your corners a couple of threads away from where you stitched, find the hole you left, put your hand in and pull the blanket out the right way. Rememper to oke out your corners.
-
Pin around all the edges one more time as you did before.
-
Sew all the way around again as you did before, but this time sew over the hole you had previously left.
-
When you reach the end sew back and forth a few times to lock your stitches in place.
-
Tack your quilt down in a couple of places to keep it from ballooning in the wash. To do this fold your blanket in thirds, and then fold it in thirds the other way.
-
Place a pin in the four corners to mark it
-
Unfold your blanket, and stitch an X where the four spots you pinned are by pulling out the pin, going forward 1 inch, back one inch, forward to the middle of the line you just made, put your needle down and rotate 90 degrees. Then, repeat the process.
-
Repeat this process for the other pin marks.
Read NextRed And Green Yuletide Quilt Pattern
Your Recently Viewed Projects
Thanks for your comment. Don't forget to share!
mulberrygalprinces s
Jun 23, 2018
Now this is an excellent project. It's written in plain language, straight forward and very easy to follow. There is a video tutorial to help you along the way too. Talk about an all around perfect project. I m not big on sewing but I am going to give this a try!
Weberme
Dec 21, 2016
I have made these blankets for infants,kids and even adults and it is so easy and fun. This is a great video for beginners or even someone who has sewn for awhile. It has some great pointers to help make this easier. I especially loved the one on tacking blanket down at the 4 points because when I washed the blanket some bunched up. I also added ribbon,lace or trim around some of mine or made decorations with the lace or ribbon too. A great way to make a handmade easy gift.
bambakes7
Nov 16, 2016
This blanket is so cute! I also love that I can follow along with the video tutorial.
Report Inappropriate Comment
Are you sure you would like to report this comment? It will be flagged for our moderators to take action.
Thank you for taking the time to improve the content on our site.