Ribbon Cupcakes
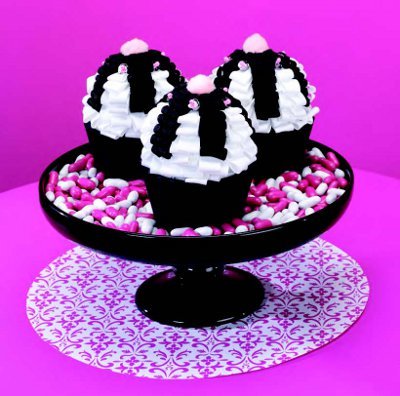
Cook up some craft cupcakes using grosgrain ribbon with the look of icing. These cupcakes from FloraCraft make a fun centerpiece for a birthday or a sweet decoration anytime. This project takes 2-hour hours to complete.
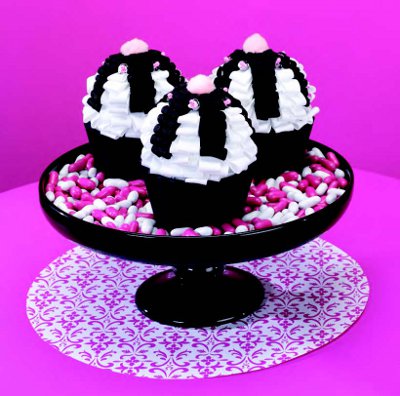
Materials:
STYROFOAM™ Brand Foam:
- 1 – 3" ball
Other Materials:
- 80 pcs – Black 3/8" grosgrain ribbon, 1.25" long
- 100 pcs – White 5/8" grosgrain ribbon, 1.5” long
- 90 – Black head straight pins
- 100 – White head straight pins
- 5 – Pink head straight pins
- 10 – Silver sequins
- 10 – Pink beads
- 1 – Pink pompom
- Paper, Pen
- Black felt scrap for bottom of cupcake (Optional)
- 1 – Plastic cupcake liner OR 10 – Paper cupcake liners (Use 10 per cupcake, do not take them apart)
Instructions:
- Draw and cut out a teardrop template approximately 2" long and 1" wide from the paper.
- To create the black frosting “drips”; use the template to trace five evenly spaced teardrops from the top half of the ball.
- Roll a piece of black ribbon into a small cylinder, with the center opening about 1/8".
- Hide the pins by inserting a black pin into the center opening of the cylinder, being sure to pin thru the loose end of ribbon to secure, and pin to the ball.
- Repeat fitting the black ribbon rolls tightly together to fill each template section. Pin rolls of black ribbon to fill in any areas at the top of the ball.
- To fill in with white frosting; fold white ribbon pieces in half, use white pins to pin thru the loose ends of ribbon. Pin the loops to the ball overlapping each slightly to hide the pins, filling in around the ball (leave bottom third of ball empty so that cupcake will sit on liner).
- Thread each pink straight pin alternately with two each of the silver sequins and pink beads, and embellish top of cupcake with sequin pins.
- Use two pins to secure pompom to top of cupcake.
- Pin small black felt circle to bottom of cupcake to finish if desired.
- Place cupcake in cupcake holder and display!
Read NextFun PVC Pipe Homemade Party Platter
Your Recently Viewed Projects
M Altenberg
Dec 09, 2016
These are super cute and would make a great party centerpiece. Looks like a task that could be accomplished with not too much trouble.
M Altenberg
Aug 26, 2016
These would be fun to make as a standard centerpiece. We could use this at a varieties of parties. Can't wait to try this.
Report Inappropriate Comment
Are you sure you would like to report this comment? It will be flagged for our moderators to take action.
Thank you for taking the time to improve the content on our site.

