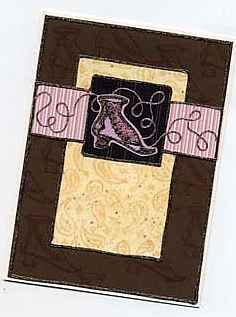
Vintage Victorian Mother's Day Card
This charming design has Victorian appeal - sweet, old-fashioned, classy. Make it for a cherished friend, your mother, grandmother, or anyone who loves old-world charm. This handmade card is the perfect way to send cheer and affection today.
Materials:
- Cream card (Halcraft Value Pack)
- Pink and brown cardstock
- Cream paisley paper (Sizzix Little Sizzles Classics)
- Striped pink paper (Bisous #P-072 Caramel Rose Stripe)
- Gold and black striped paper (Die Cuts With a View)
- Boot stamp (Stampin Up)
- Pink or burgundy stamp pad (source unknown)
- Kreinik Iron-on #16 Braid 6260
- Kreinik Iron-on #8 Braid 6120
- Teflon Press Cloth (Kreinik)
- Household iron or mini iron
- Ironing surface
- Scissors
- Glue stick
Instructions:
-
Turn your iron on to the highest heat setting and let it heat thoroughly.
-
First cut out the pieces you will need to make this card. Cut one piece of brown cardstock that is 4.75" X 5.25". Cut a strip of striped paper 4.75" X 1". Cut a piece of paisley paper that is 2.25" X 3.75". Cut a 1.5" square of the black striped paper.
-
Using your boot stamp, stamp a light pattern on the brown cardstock.
-
Attach your brown cardstock to the front of the card. Mount your paisley paper over the center of the cardstock. Next, mount your striped paper so the ends are even with the edges of the card stock, and the top of the strip is a half inch down from the top of the paisley paper. Then center the black square over the striped paper.
-
Begin to embellish with your iron-on threads (lay the thread at a starting point, cover with a Teflon Press Cloth, and press with your hot iron for several seconds until the thread adheres). Use the #16 braid to make a border around the brown cardstock, then work inward to add borders to the paisley, striped, and black papers. Next, use the #8 braid to create a swirl design across the card, centered over the striped and black papers.
- Stamp your boot shape onto the pink cardstock, and begin embellishing the design with iron-on threads. Outline first with the #16 braid, then fill in the heel and toe. Fill in the back and front with your #8 braid, zigzagging back and forth for a laced look. When finished, cut out the shape leaving a very small border around the outside edges. Adhere your boot shape to the center of your black square.
Read NextHow To Make A Paper Christmas Tree?