Personalized Chalkboard Wall
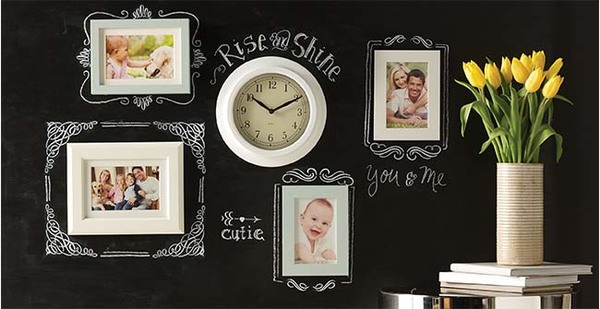
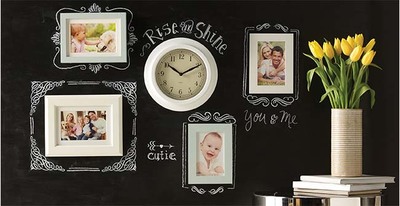
Create your own Personalized Chalkboard Wall and put your treasured photos and trinkets on display beside chalk labels and sayings. You can write directly on the wall with this tutorial, which shows you how to use chalkboard paint in this fun way. This chalkboard area would be a great addition to a classroom where the teacher and students can write comments by pictures or outstanding assignments. Of course, you can always erase anything your write or draw on chalkboards, so change up what you put on the wall any time!
Primary TechniquePainting

Materials:
- Martha Stewart Crafts ® 2oz Multi-Surface Satin Acrylic Craft Paint - Cloud, Wedding Cake
- Martha Stewart Crafts ® Roller and Tray
- Martha Stewart Crafts ® Foam Pouncers Set - 6pc
- Martha Stewart Crafts ® Large Brush Set - 4pc
- Martha Stewart Crafts ® Stencil Tape
- Martha Stewart Crafts ® 2oz Multi-Surface Chalkboard Paint Acrylic Craft Paint - Black
- Martha Stewart Crafts ® Laser-Cut Stencils - Calligraphic Corners
- Martha Stewart Crafts ® 2oz Erasable Liquid Chalk, White
- 4 Small assorted wood frames
- Small wall clock
- White chalk stick
Instructions:
- Basecoat 3 frames with Cloud. Let dry.
- Paint wall Clock and 4th Frame with Wedding Cake, Let dry.
- Tape off desired Section on wall that you would like to make chalkboard area.
- Using Roller and Black Chalkboard Paint, paint area and let dry.
- Place items in desired location on wall and chalk with stick for placement only, remove items.
- Place stencil designs as shown in photo. Repeat as desired, Using small pouncer and Erasable White Chalk Paint, Stencil designs onto wall as shown, Let dry.
- Hang frames and clock onto wall.
- Add personalization with white chalk stick.
Read NextDIY Rustic Barn Wood Sign
Report Inappropriate Comment
Are you sure you would like to report this comment? It will be flagged for our moderators to take action.
Thank you for taking the time to improve the content on our site.

