Hand Molded Christmas Ornament
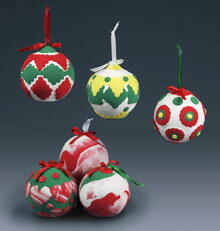
These ornaments, made from air-dry molding compound, will complete your handmade Christmas tree decoration needs! These Hand Molded Christmas Ornaments are easy and inexpensive homemade Christmas decorations that you can make for yourself or share with a friend during the season of giving.
Materials:
- 3" STYROFOAM Brand Foam Ball
- White, green, red, yellow air-dry modeling compound
- Mini scallop-edge cookie cutters of choice
- Satin ribbon, color of choice, 1/4" x 1/3 yd.
- Plastic-coated paper clip to match compound
- Rolling pin
- Straight pin
- Ruler
- Waxed paper
- Scissors
- Wire cutters
- White, thick craft glue
Instructions:
-
Spread waxed paper on work surface. Use rolling pin to roll 3" ball of desired color modeling compound to 1/8"-thick, 6"-diameter circle. Turn clay often to prevent sticking.
-
For marble look, begin with equal amounts of two or more colors of modeling compound. Roll each color into long rope. Place colors side by side; twist together. Fold twisted compound in half and roll flat; repeat. Cut circle as described in Step 1, or use for decorative cutouts in Step 4.
-
Drape 6" circle over foam ball. Press compound around ball, using scissors to trim excess. Press out air bubbles as you work; use pin to poke small hole in trapped air bubbles. Gently roll ball against tabletop to smooth fingerprints.
-
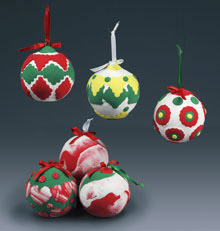
Roll remaining compound colors to 1/8" thickness. Use cookie cutters to cut out desired shapes. Using photo as guide, position cutouts on ball. Roll small balls of compound and press to ball if desired.
- Use wire cutters to cut paper clip in half; glue one half into top of ornament for hanger. Cut 6" length from ribbon. Thread ribbon through hanger; knot ends. Tie remaining ribbon into bow; glue to base of hanger.

