Mini Wine Bottle Jingle Bell Ornaments
These Mini Wine Bottle Jingle Bell Ornaments make a great addition to your Christmas tree! Made from single-serve mini wine bottles (you can also use hot sauce bottles), these adorable ornaments ring out with Christmas cheer! You could also arrange a series of these little ornaments in a hanging window arrangement or display them in a garland and drape it around your mantel. Either way, these cute Mini Wine Bottle Jingle Bell Ornaments are sure to get you in the holiday spirit in no time!

Materials:
- Generation Green (g2)™ Bottle Cutter
- 3 Discarded Miniature Bottles (single serve wine bottles or hot sauce bottles work great)
- Assorted Ribbon – Approximately 60” for 3 Bottles
- Assorted 1/2 - 1” in Diameter Glass Beads (small enough to fit through the opening of your bottle)
- Assorted Buttons (we chose white, cream, gold and blue buttons)
- 3 Small Corks
- 6 - 5/16” Screws
- Screwdriver
- Craft Knife
- E-6000®
- Scissors
Instructions:
Read and carefully following the instructions contained within the Generation Green (g2)™ bottle cutter manual.
-
Cover the work area with craft or newspaper.
-
For our bells we used a vanilla extract bottle and two single serving wine bottles. Measure up from the bottom of each 1” and mark with a Sharpie®.
-
Using the bottle cutter, follow the instructions for scoring and separating bottles. Separate jar where indicated.
-
Smooth the rough edges as instructed in the bottle cutter manual.
-
Clean your bottle inside and out with a window cleaner or for a more natural cleaner use a mixture of 1 cup of water to 2 tablespoons of vinegar. Dry glass surface.
-
Using the craft knife, shave off the sides of old wine corks until they fit the top openings in each bottle. Once you have cut the corks to fit, set the bottles aside.
-
Cut a 12” length of ribbon, using a 5/16” screw; secure the ribbon to the center bottom of the cork. Insert the cork with the ribbon into the mouth of the bottle. Allow the ribbon to hang down, slide a glass bead onto the ribbon and push the bead up inside of the bottle so it sits about mid-way down the bottle, secure in place with a knot and glue the tail end of the ribbon together.
-
Cut a 6” piece of ribbon, using a 5/16” screw; secure both ends of the ribbon to the top portion of the cork to form a loop.
-
Repeat this process for the remaining two bottles.
-
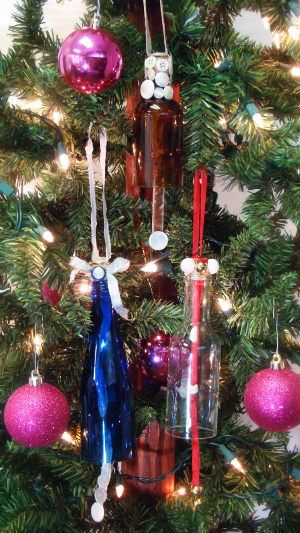
Embellish glass bells by gluing assorted buttons and additional ribbon on each bottle (see image for embellishment suggestions).
-
Add addition details by gluing on assorted buttons and ribbons. For the blue bottle, we made a bow and placed two buttons on it, then for some added winter charm, we selected 3 different sized and similarly colored buttons and glued them to the tail of the ribbon to form a snowman!
- Hang these festive bells on the Christmas tree or anywhere in the your home for some holiday charm. Tip: Avoid placing any embellishments on the body of the bell, the less you have the louder your bell will clang!
Your Recently Viewed Projects
Thanks for your comment. Don't forget to share!
Report Inappropriate Comment
Are you sure you would like to report this comment? It will be flagged for our moderators to take action.
Thank you for taking the time to improve the content on our site.