This project was submitted by one of our readers, just like you.
Embroidered Holiday Gift Tag Ornaments

Embroidered Holiday Gift Tag Ornaments
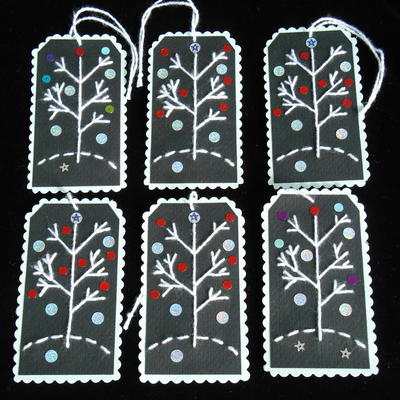
"I've started a holiday tradition. For the past few years I've made small ornaments to enclose in holiday cards. I like enclosing a little something to make my greeting memorable. I created these ornaments using my own handmade paper gifttags, and embroidered my design using white cotton threads. They can be used for ornaments, gift tags, or given as a small gift. Different designs can be used for occasions throughout the year, such as birthdays, holidays, and weddings. I hope these will inspire you to make your own!"
Estimated CostUnder $10
Time to CompleteIn an evening
MaterialsEmbroidery Thread, Paper
Primary TechniqueNeedlework

HolidayChristmas
Project TypeMake a Project
Materials List
- Strathmore colored art paper, 65 lb pad
- Pattern for ornament design (copy my design, or create your own)
- Lightweight yarn or No. 8 or 10 perle cotton
- Tapestry needle with large eye to accomodate thick threads
- Paper or fabric glue
- Paper cutter and paper scissors
- Paper edge cutting scissors
- Hole paper punch
- Holographic paper, shiny paper, or other contrasting paper for punching dots for embellishment
Instructions
-
Using paper cutter, cut out the following for ornament backs (in this example I used lighter paper for my ornament back): 2 1/2 inch x 4 1/2 inch rectangles (cut out several, to make it easy to assemble many ornaments at one time)
-
Using paper cutter cut out the following for ornament fronts: 2 inch x 3 3/4 inch rectangles - cut off the top 2 corners at an angle to make the tag shape.
-
Thread tapestry needle, making a knot at one end.
-
Prepare the tag fronts for embroidering: I recommend poking holes into the paper from the front side, before bringing the needle up from the back. If using a pattern, poke all the holes into the paper before you begin stitching. You can draw out a pattern to match the pattern in my design, or create your own design to embroider. (You could create a holiday drawing, or use a monogram initial, perhaps, for your family name, for example.)
-
Follow your pattern to embroider the design onto the tags. When all lines are stitched, take 2-3 stitches in threads on back, to secure stitching.
-
Glue front of ornament to background rectangle, center front of ornament on the background, make sure edges are secured with no gaps. I used a permanent fabric glue which created a tight bond on paper. (Let glue dry.)
-
Trim ornament edges with paper edge cutting scissors of your choice.
-
Use hole punch to create dots from holographic paper, or paper of your choice for embellishing the ornaments.
-
Glue dots onto front of ornament as shown in photo. A small dab of glue will secure the dots. Sequins may also be used if desired.
-
Wait until glue has completely dried, then create hanger for ornament, by threading yarn through top of ornament and tying a knot. If you prefer, you can use a hole punch to create a hole at the top of the tag for threading your ornament.
NotesYour ornament is now ready to gift - add an inscription on the ornament back, or add the year and/or name to the ornament front.
Be brave and create your own designs and embroider them on the tags. It is a great way to start designing your own work, and you can personalize your project even more this way.
Happy Holidays and Happy Creating! - Denise Losczyk