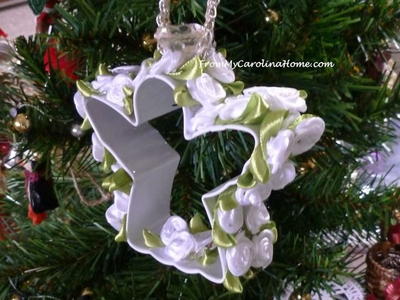
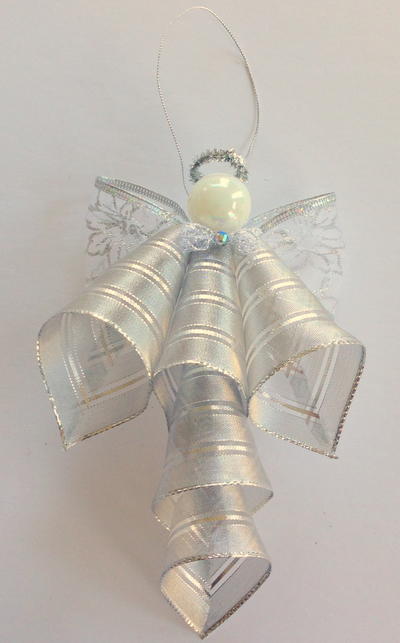
Clay Angel Ornament
Create a polymer clay angel ornament from AMACO to add a homemade touch to your next Christmas tree.This angels holds red and white candy canes for a bit of holiday color.

Materials:
- FIMO® Soft Polymer Clay (2 oz. blocks) — White (2), Cherry Red (1), Flesh Light (1), and Caramel (1)
- AMACO® Polymer Clay Template
- FIMO® Gloss Lacquer
- Heart-shaped cookie cutters or rubber stamps — 13/4" and 21/4"
- Heart cutters — 3/16" and 1/2"
- Scallop-edged scissors
- Fun Wire™ Pearlized Gold, 24-gauge
- 22-gauge floral wire
- Gold elastic cord
- Powder blush
- Eye pin
- White acrylic paint
- Ball stylus
- AMACO® PolyRoller or Pasta Machine
- Ceramic tile for work surface
- X-Acto® knife
- Club-shaped or flower-shaped canapé cutter (1/2")
- Darning needle
- Small gold beads
- Unlined index cards
- Pearlescent glitter
Steps:
- Read template instructions and tips. Write the following headings on an index card: Dress; Wing; Collar; Sleeve; Head; Neck, Hand, Feet; Candy Cane; Red Hearts; and Gingerbread Men. Leave a two inch space under each heading to place the clay balls. Tip: If you are going to make lots of angels, laminate the card for re-use.
- Cut the quantity of clay needed for specific ball sizes. This is easy with the template and drawings that come with it. With the White FIMO® Soft make the following size balls: one 11/8" ball for dress, one 11/8" ball for the wing, one 7/8" ball for the collar, two 5/8" balls for the sleeves. With the Flesh Light FIMO® Soft make one 7/8" ball for head and one 5/8" ball for the neck, hand, and feet. For the candy cane make one 5/8" ball with the Cherry Red FIMO® Soft and one 5/8" ball with the White FIMO® Soft. Make one 1/2" ball of Cherry Red FIMO® Soft for the red hearts. For the gingerbread men make one 7/8" ball of the Caramel FIMO® Soft. Place each piece of clay on the card in its place.
- Condition each piece separately by kneading with your hands to soften. Roll into a ball using the template for measuring the diameter and place back on card. Do Flesh Light first, then White, Caramel, and finally, Cherry Red. Wash hands between colors with cool water and soap.
- CANDY CANES: Roll the White ball into a log 4" long using the ruler on the template then cut in half. Repeat with the Cherry Red ball. Twist a red and white log to make cane. Smooth and curve top. Repeat with other red and white logs.
- RED HEARTS: Flatten the Cherry Red ball between your hands into a pancake. Roll out flat and cut lots of 3/16" hearts (you can use the extras in future projects).
- GINGERBREAD MEN: After flattening and rolling Caramel ball, cut lots of club shapes or flowers. If you’re using a club cutter, slice bottom stem to make legs. Make a small hole in each “arm” with a darning needle for threading the elastic cord after baking.
- Pre-bake canes, hearts and gingerbread men for 15 minutes at 265°F (129°C).
- DRESS: Flatten White ball into a pancake a little larger than the heart stamp or cookie cutter then roll out to about 1/8" thick. Press stamp or cutter into clay then cut out with scissors. Top of dress is the point of the heart. Make small box pleat to gather upper part of dress slightly.
- SLEEVE: Roll each White ball into a long cone shape (21/4"). Press fatter end of cone on work surface gently to flatten end. Trim off narrow end so sleeve is 13/4" long. Lay along heart with narrow end at top of dress.
- COLLAR: Flatten White ball into a pancake a little larger than the 13/4" stamp then roll out. Press stamp or cutter into clay then gently lift from work surface and cut out with scallop-edged scissors. Lay heart-shaped collar over dress and shoulders, folding point of heart 3/4" over to back of dress. Press the pre-baked heart in place.
- NECK, HANDS, FEET: Flatten and roll out the Flesh Light ball then cut out four 1/2" hearts. Roll three into three separate balls. Place the fourth underneath the indentation at dress bottom, leaving curves to show as toes. Press dress firmly onto feet. Press one ball down to flatten slightly then press onto collar to form neck. Set the other two balls aside.
- HEAD: Re-roll Flesh Light ball to soften. Push a one inch piece of florist wire into head where it will join the neck. Gently lift the angel and press the head down onto the neck making firm contact. Pierce two holes for eyes. TIP: If you are right-handed, make the left eye first for ease in alignment. Powder cheeks with blush.
- HAIR: Cut ten 21/2" lengths of Pearlized Gold Fun Wire™. Bend each into a “U” shape, cross wires over and pull ends in opposite directions. This will form a loop like a seagull. Hold the middle loop between your thumb and index finger of your left hand. With your right hand, smooth wires down to meet and form bottom of heart. Twist ends together and cut off excess. You only need a 1/4" tail. Make ten or more. Why more? They won’t all be the same size and if you have more, you can choose the five that are most alike. Press them into head, placing the most nearly perfect one on top.
- HALO: Cut a 41/2" length of Pearlized Gold Fun Wire™ and bend it around the bottle of FIMO® lacquer to shape. Draw wire together tightly. Hold wires together and turn bottle, not the wires, to form tail. Trim tail to 1/4" and insert into head about 1/4" back behind the top wire heart. Trim the eye pin to 1/2" and push into head just behind the halo. Turn the opening of the eye pin so that the elastic will thread through from side to side and angel will hang straight.
- WINGS: Follow step 8 for dress, but omit pleat. Press four pre-baked hearts into wing. Lift angel onto wings, placing head in center of heart. Gently press head to make firm contact with wing. Slide X-Acto® knife gently under whole sculpture to ease it off the work surface. Press bottom of wing to make contact with back of collar. Lay angel down.
- HANDS: For gingerbread angel, press a small ball of Flesh Light FIMO® Soft to bottom of each sleeve. Pinch ball at free end to flatten and create fingertips. Twist darning needle into hand to make a hole for threading through garland. For candy cane angel, press a small ball of Flesh Light FIMO® Soft to bottom of each sleeve. Place two candy canes on dress. Lift sleeve across canes to hold them in place. Press hand onto candy cane. Second hand is just like gingerbread angels’, but with no hole.
- Bake angels at 265°F (129°C) for 40 minutes. Turn oven off but leave angels in until they are thoroughly cooled.
- Use White acrylic paint and ball stylus or end of small paint brush to make dots on cheeks, toes, and hands. Decorate gingerbread men as shown in photograph. Re-dip for each dot so they will each be the same size.
- Glaze gingerbread men with FIMO® Gloss Lacquer. When dry, thread them onto gold elastic cord in this order: gold bead, man, two beads, man, two beads, man, last bead. Thread one end of cord up through one hand and the other end up through the other hand. Make an over hand knot in the cord, guiding the knot down close to the top of the hand using the point of the darning needle. Trim excess cord. Thread piece of gold elastic through the eye pin as a hanging loop.
- Sprinkle glitter onto wax paper. Brush back of angel with lacquer and lay the angel down onto the glitter to coat back and hide any imperfections. Let dry; apply another coat of lacquer to seal glitter. NOTE: Never use clear nail polish on polymer clay. Within a few months it will become very sticky.
We have plenty of additional angel crafts in our free eBook 11 Angel Crafts to Make: Homemade Christmas Ornaments & Decorations. You'll want to download it today!
Your Recently Viewed Projects

Thanks for your comment. Don't forget to share!
Judy01
Nov 11, 2011
Love this angel - looks so professional. Where can you buy the proper stamps and cookie cutters?
JennyBee1
Nov 02, 2011
@phjohnson 7421419, The template comes with the clay that is purchased for this project. I hope this helps! --Editors of FaveCrafts
phjohnson 7421419
Oct 31, 2011
I would like the templete to make tis project. where do I get it?
Member 3750563
Aug 11, 2011
Esta lindo!!!!!! No creo que se necesite molde, voy a intentar hacerlo. Muchas gracias.
craftysue
Apr 11, 2011
The directions mention a "template", but I am not the only one who cannot locate it. WHERE is it??
loudmama
Nov 07, 2010
Does anyone know where this craft originally appeared? (magazine, year) I remember there being more photos.
jdfowler1947
Nov 05, 2010
http://www.amazon.com/Amaco-Polymer-Clay-Template/dp/B000XAJBWK is where you can buy this item. It is for making the correct size of balls needed. I would like to know where ot find the press for the design on this item.
CDowdle2
Oct 29, 2010
That is so cute!! Thank you for sharing with us Cindy @ http://thepurplefroggieclaystuff.blogspot.com/ Over at my blog I'm having a Giveaway and Review on a Paper Shower 6pk and a Paper Shower T-Shirt.. Stop by and sign up to win if you get a chance.. Thank you !!
traceyleigh
Oct 24, 2010
I keep reading "template" in the directions but I can't seem to find a template or see a link to a template. This is a real cute project I would like to try. Can anyone help me with the template part? Thanks! Traceyleigh
Report Inappropriate Comment
Are you sure you would like to report this comment? It will be flagged for our moderators to take action.
Thank you for taking the time to improve the content on our site.