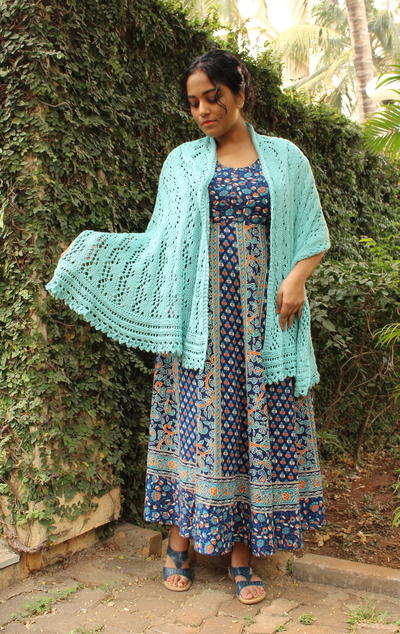
Forget-me-not Rolled Neck Tee

From the designer: "I’ve always loved flowers, but as a teen, I was especially fond of pressing them in the pages of my favorite books. I don’t know what it is about forget-me-nots, but that’s how I always think of them: pressed flat and tucked away for safe-keeping. It’s that pressed flower imagery that inspired this design, but with an abstract and somewhat retro feel. The eyelets sit flat against a background of subtle texture, in a similar way that flowers might be pressed flat on a type-filled page. This mod top shines in a linen rayon blend that lends drape and elegance for a night out. I love this one for days when the weather is just starting to turn—still warm, but with a whisper that fall is on the way."
Skill: Advanced Beginner
Construction
This textured tee is knit bottom-up in the round to the underarms and features eyelet details on a body of reverse stockinette stitch. The upper bodice is worked flat to the shoulders, which are seamed afterward using horizontal mattress stitch. The neckline features a short, rolled funnel with elegant drape to dress up the design. The fit is relaxed—you don’t want it to cling. The eyelet details are prominent in the recommended fabric, so you may want to wear this over a camisole or tank.
Sizes:
S (M, L, XL, 2X, 3X, 4X, 5X, 6X)
Fit Advice
Designed to be worn with approximately 3–4 in (7.5–10 cm) positive ease.
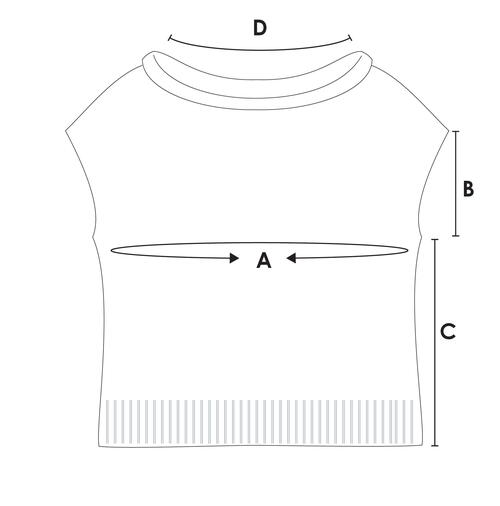
Finished Measurements:
A) Bust Circumference: 34.5 (38.5, 42.25, 46, 51.75, 55.75, 59.5, 63.25, 67.25) in / 86.5 (96, 105.5, 115.25, 129.5, 139.25, 148.75, 158.5, 168) cm – blocked
B) Armhole Depth: 6.5 (7, 7, 7.5, 7.5, 8, 8.5, 8.5, 9) in / 16.5 (17.75, 17.75, 19, 19, 20.25, 21.5, 21.5, 22.75) cm – prior to blocking
C) Underarm to Hem: 13 (13, 13, 14, 14, 15, 15, 15, 15) in / 33 (33, 33, 35.5, 35.5, 38, 38, 38, 38) cm – prior to blocking
D) Back Neckline Width: 10 (10, 10, 10.5, 10.5, 10.5, 11, 11, 11) in / 24.75 (24.75, 24.75, 26.5, 26.5, 26.5, 27.25, 27.25, 27.25) cm – blocked
ABBREVIATIONS:
[ ] - brackets indicate a repeat
Bet - between
BO - bind off
BOR - beginning of row/round
CO - cast on
Dec - decrease/decreases/decreased
Inc - increase/increases/increased
K - knit
K2tog - knit two stitches together (dec 1)
P - purl
PM - place marker
P2tog - purl 2 sts together (dec 1)
Rep - repeat
rnd/s - round/rounds
RS - right side
Ssk - slip one st knitwise, slip the next st knitwise, then return the two sts back to the left needle and knit the two together through the back loop (dec 1)
st/s - stitch/stitches
WS - wrong side
Yo - yarn over (inc 1)
Materials List
-
Yarn
DK Weight | Erika Knight Studio Linen | 85% Rayon, 15% Linen | 131 yards (120 meters) in 1.76 oz (50 grams) | 810 (859, 910, 965, 1042, 1125, 1215, 1312, 1417) yards / 740 (785, 832, 882, 952, 1028, 1111, 1199, 1295) meters
-
Color:
Pomegranate
Note:
Variations in yarn choice or row/round gauge may impact yarn consumption. If in doubt, round up to the nearest skein. -
Needles:
Body:
US 5 (3.75 mm)* 24–40-in (60–100-cm) circular needle
Lower Ribbing:
US 4 (3.5 mm) 24–40-in (60–100-cm) circular needle
Neckline:
US 4 (3.5 mm) 16-in (40-cm) circular needle
*Or size needed to achieve gauge. Adjust other needle sizes accordingly.
-
Notions:
- Stitch markers (including locking markers)
- Waste yarn or spare needles, for holding stitches
- Blocking mats
- Darning needle, to weave ends and seam shoulders
INSTRUCTIONS:
Gauge
25 sts and 32 rows/rounds in 4 in (10 cm) in texture pattern with largest needle, blocked—row gauge is less critical but may affect yarn consumption.
Forget-me-not Rolled Neck Tee Pattern
With US Size 4 (3.5 mm) 24–40-in (60–100-cm) circular needle—or one size smaller than needed to achieve gauge—CO 216 (240, 264, 288, 324, 348, 372, 396, 420) sts using cable cast-on method. Do not join in the rnd yet. (Note: The cable cast-on begins your work immediately on the RS.)
-
Set-Up Row (RS): [K1, p1] rep bet brackets to end. PM and join to work in the rnd, being careful not to twist your sts.
-
Ribbing Rnd: [K1, p1] rep bet brackets to end. Rep this rnd until work measures 3 in (7.5 cm) from cast-on edge.
Transition to US Size 5 (3.75 mm) needle—or size needed to achieve gauge—and p 2 rnds. -
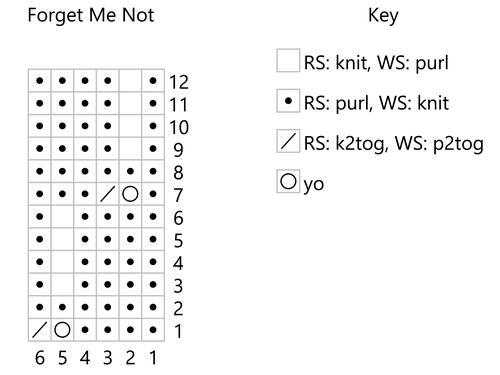
Next Rnd: Work Forget-Me-Not Chart (beginning with Rnd 1 of chart or written instructions, worked over 6 sts per repeat) to end.
Continue working the lower body in the rnd as established, repeating the lace chart rnds in order, until your work measures approximately 13 (13, 13, 14, 14, 15, 15, 15, 15) in / 33 (33, 33, 35.5, 35.5, 38, 38, 38, 38) cm from cast-on edge, ending with an even-numbered right. -
Upper Bodice
Going forward, you will separate the front and back bodice sections and work back and forth on each section, flat, beginning with the front. You will return to work the back afterward.
Tip: As you begin working flat, be sure to keep your edges tidy. To do this, work the first st tighter than usual, then insert the tip of your needle into the second st, and pull the working yarn tight again to draw the first st a little tighter. Then proceed with the remainder of the row with normal ten- sion. Do this at the start of every row (RS and WS) for nicer edges that will be easier to finish later. -
Lace Note (Working Flat): Because of the way the pattern splits to work flat, you may not have enough sts to work the full lace repeats to the selvedge. If you cannot complete the full inc/dec of the lace repeat, work that portion in reverse stockinette st instead.
-
Next Row (RS): Work 108 (120, 132, 144, 162, 174, 186, 198, 210) sts in established pattern, stop.
Slide remaining 108 (120, 132, 144, 162, 174, 186, 198, 210) sts onto a long separate needle or waste yarn. You will work back and forth (flat) on the front section (only) for now. -
Front
Next Row (WS): P2, work in established pattern to last 2 sts, p2.
Next Row (RS): K2, work in established pattern to last 2 sts, k2.
Rep these two rows continuing in established pattern until your flat section measures approxi- mately 6.5 (7, 7, 7.5, 7.5, 8, 8.5, 8.5, 9) in / 16.5 (17.75, 17.75, 19, 19, 20.25, 21.5, 21.5, 22.75) cm from where you began working flat, ending after a WS row (ready to work a RS).
Front Shoulder and Neckline Shaping
-
Next Row(RS):BO4(5,6,7,8,9,10,11,12)sts knitwise, then work 27 (32, 37, 40, 48, 53, 58, 62, 67) sts in established pattern—this is the left front shoulder. BO next 46 (46, 46, 50, 50, 50, 50, 52, 52) sts knitwise for center front neckline. Work 31 (37, 43, 47, 56, 62, 68, 73, 79) sts in established pattern to end—this is right front shoulder.
Place the first 27 (32, 37, 40, 48, 53, 58, 62, 67) sts of left front shoulder sts onto a holder; you will return to work them later. You will now work only on the right front shoulder and neckline dec as you proceed in this section. -
Right Front Shoulder
Next Row(WS):BO4(5,6,7,8,9,10,11,12) sts purlwise, work in established pattern to end.
Next Row (RS): K1, ssk, work in established pattern to end—1 st dec.
Rep these two rows 4 times more (for a total of 5)—6 (7, 8, 7, 11, 12, 13, 13, 14) sts.
Next Row (RS): BO remaining sts knitwise.
-
Left Front Shoulder
Return left front shoulder sts to your needles and rejoin working yarn, ready to work a WS row.
Next Row (WS): P1, p2tog, work in established pattern to end—1 st dec.
Next Row (RS): BO 4 (5, 6, 7, 8, 9, 10, 11, 12) sts knitwise, work in established pattern to end.
Rep these two rows 3 times more (for a total of 4)—7 (8, 9, 8, 12, 13, 14, 14, 15) sts.
Next Row (WS): P1, p2tog, BO remaining sts in purl (including the first two sts). -
Back
Return back sts to needles and join working yarn, ready to work a RS row—108 (120, 132, 144, 162, 174, 186, 198, 210) sts.
Next Row (RS): K2, work in established pattern to last 2 sts, k2.
Next Row (WS): P2, work in established pattern to last 2 sts, p2.
Rep these two rows until your flat section measures 6.5 (7, 7, 7.5, 7.5, 8, 8.5, 8.5, 9) in / 16.5 (17.75, 17.75, 19, 19, 20.25, 21.5, 21.5, 22.75) cm and is the same length as the front section from where you began working flat. End after a WS row (ready to work a RS).
-
Back Shoulder Shaping
Note: As you BO, transition to reverse stockinette (and skip the lace pattern) when you are within 12 sts of the bind-off edge of the row.
Next Row (RS): BO 4 (5, 6, 7, 8, 9, 10, 11, 12) sts knitwise, work in established pattern to end.
Next Row(WS):BO4(5,6,7,8,9,10,11,12) sts purlwise, work in established pattern to end.
Rep these two rows 5 times more (for a total of 6)—60 (60, 60, 60, 66, 66, 66, 66, 66) sts.
Next Row (RS): BO remaining sts knitwise.
-
Shoulder Finishing
Seam the shoulder sts together on each side to the neckline, ensuring that the front, back, and shoulder bind-off sections line up perfectly. See seaming and grafting tutorials on my website here: oliveknits.com/grafting.
Neckline
With US Size 4 (3.5 mm) 16 in (40 cm) circular needle—or one size smaller than needed to achieve gauge—pick up and knit all available sts around the neckline. PM and join to work in the rnd.
-
Next Rnds: Work 3 in (7.5 cm) in stockinette stitch, then BO knitwise on the next rnd. (If you prefer a shorter rolled edge, simply work fewer rnds until it’s the length you prefer.)
Tip: You can adjust the size and feel of your neckline by doing one of the follow- ing: For a looser neckline, pick up available st and ensure that your bind off is not too tight. If your neckline is too loose or open, try picking up slightly fewer sts—such as 5 of every 6 available sts—and/or binding off a little more tightly. Necklines like this one are very easy to adjust with just a few simple changes to your technique. -
Sleeves
There is no finishing necessary for the sleeves.
Finishing
Weave in ends and wet block for best results, soaking in lukewarm water with a splash of fiber wash for 20 minutes to gently cleanse and relax the fiber. Press out excess water, and lay flat, pat- ting the garment into place (rather than pinning). Draw the edges taut and ensure that the neckline is pulled gently upward and patted flat to dry. (It will drape like a loose, rolled funnel when it’s dry.) In the recommended yarn, pinning is not advised; it’s likely to snag the fiber. Turn as needed for even drying.
Chart Written Directions
-
Chart Written Directions (Rnd)
Rnd 1: [P4, yo, k2tog] rep bet brackets to end.
Rnd 2: P to end.
Rnds 3–6: [P4, k1, p1] rep bet brackets to end.
Rnd 7: [P1, yo, k2tog, p3] rep bet brackets to end.
Rnd 8: P to end.
Rnds 9-12: [P1, k1, p4] rep bet brackets to end. -
Chart Written Directions (Flat)
Row 1 (RS): [P4, yo, k2tog] rep bet brackets to end.
Row 2 (WS): K to end.
Row 3 (RS): [P4, k1, p1] rep bet brackets to end.
Row 4 (WS): [K1, p1, k4] rep bet brackets to end.
Rows 5–6: Rep Rows 3–4.
Row 7 (RS): [P1, yo, k2tog, p3] rep bet brackets to end.
Row 8 (WS): K to end.
Row 9 (RS): [P1, k1, p4] rep bet brackets to end.
Row 10 (WS): [K4, p1, k1] rep bet brackets to end.
Rows 11-12: Rep Rows 9–10.
Credit:
Reprinted with permission from Knitting Light by Marie Greene. Page Street Publishing Co. 2024. Photo credit: Annie Loaiza.
Read NextBig Knit Easy Blanket Sweater