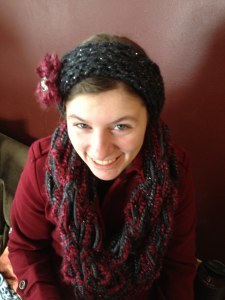
Fast Finger Knit Headband
 Visit Betsy at Aim Happy.
In just one hour, you can start and complete this Fast Finger Knit Headband. Finger knitting projects are perfect for anyone who doesn't have a pair of needles on hand. You can make a headband anywhere at anytime - all you need is yarn. This project is completely customizable, all you have to do is adjust the rows to make it bigger or smaller. This is a great project for a baby, child or adult - it's completely up to you.
You can find this project, as well as many other fabulous blogger projects, in our new eBook, The Best Blogger Craft Ideas 2014: Decoupage, Sewing, Jewelry Making, and More free eBook. Download your own free copy today!

Materials:
- Skein of Lion Brand Yarn Thick and Quick
- 3 yards contrasting color Lion Yarn Homespun
- The Crochet Dude Bloom Loom
- Yarn Needle
- Large button
Instructions:
- Using Lion Yarn Thick and Quick Yarn finger knit 28 rows using four fingers. This chain is the first column.
- Knit back on the first column, picking up the last stitch with your pinky finger. For this and the remaining rows in this column your pinky finger will have two loops to thread over the new stitch. Continue on with the column remembering to pick up the stitch behind with your pinky finger before looping the row.
- For the 3rd column you will stitch back only this time using the index finger side having two loops to thread over the new stitch on your index finger.
- At the end of the 3rd column you will need to loosen the end stitches on the other two columns placing one stitch on the index finger and one on the middle finger. Loop your yarn and knit one row.
- Continue creating a chain knitting 10 more rows. This chain becomes the part under the hair line.
- Connect the chain to the other side of the headband. Loosen the 4 stitches at the end of the side of the band. Thread them over your fingers. Loop your yarn and knit one row.
- Starting at the pinky finger unloop the yarn, then thread the loop on the ring finger through the first loop off. Follow with the loop on the middle finger through that loop and finishing up with the index finger loop through the 3rd loop. You should have one loop remaining. Cut your yarn leaving a one foot tail. Thread the tail through the final loop and pull tight. Tie the ends together securely hiding the knot on the inside of the headband. Cut off the excess yarn.
- Take your 3 yards of contrasting yarn and create a flower using the Crochet Dude Bloom Loom. Sew up the flower middle using the yarn needle and remove from loom. Decide where you want the flower placed and thread the tail ends of of the flower through a couple of stitches on the topside of the headband and tie securely on the underside. Snip the excess yarn.
- Using an excess piece of yarn and the yarn needle sew button into the center of the flower knotting in place.
Read NextKnitting Stitch #20