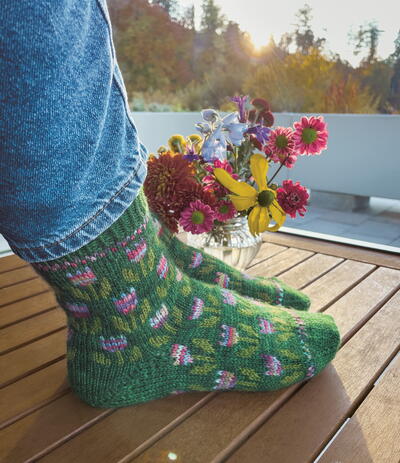
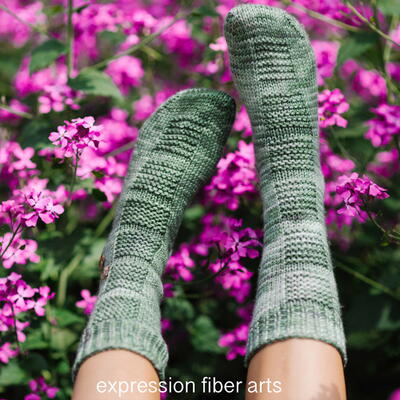
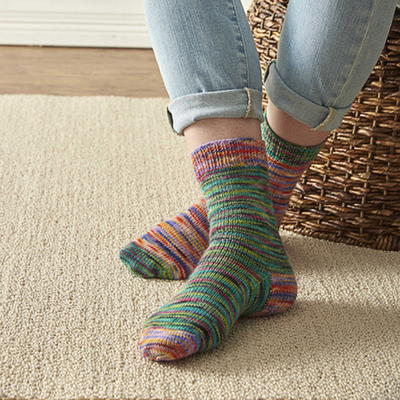
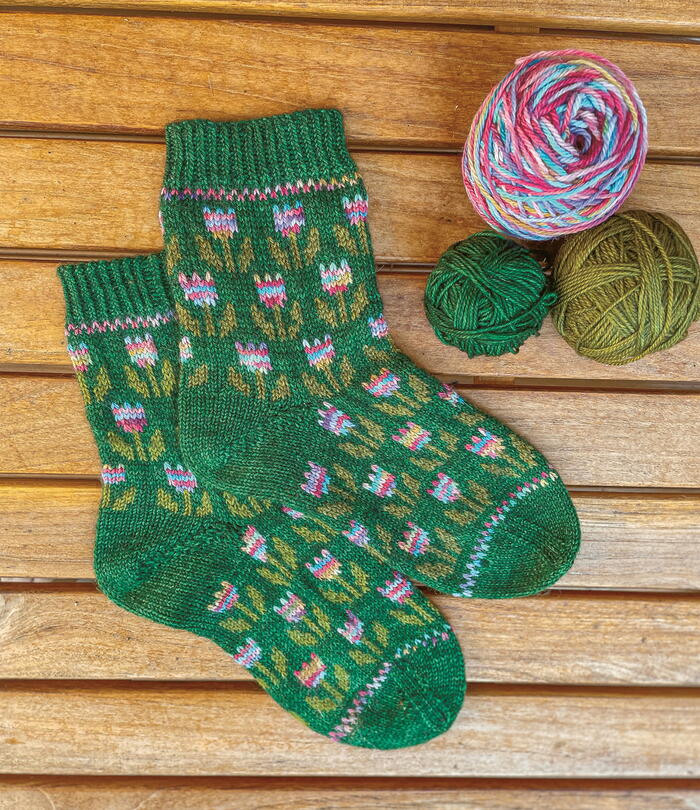
Tiptoe Through the Tulips

I love tulip displays with their many amazing colors. They are one of the first signs that spring is in the air and that flowers, color and life will soon appear again in the garden. I find they are such a welcome treat as winter starts thawing and their green shoots start appearing through the snow. I wanted to celebrate this flower by creating a pair of socks using multi-colored variegated “tulip” color yarn to honor them and that feeling of hope that winter is finally ending and the light of spring is returning.
Construction Notes
Using three colors, these socks are knit from the top down with a ribbed cuff and include a simple decorative colorwork pattern by the cuff and the toe. The tulip motif flows throughout the leg and foot. These socks are knit with a short row heel.
Sizing
1 (2, 3)
To fit (foot circumference): 7 (8½, 9½) inches /17–19 (20.5–23, 23.5–25) cm
Finished circumference: 6 (7½, 8½) inches /14.5–16.5 (18–20, 20.5-23) cm
Recommended ease: Approximately 1 inch (2.5 cm) of negative ease.
Leg/foot length can be easily adjusted. See instructions for details.
Sample shown is knit in size 2 for shoe size US 8.5(EU 39, UK 6), foot circumference 8¾ inches (22.5 cm).
Materials List
-
Yarn
MC and CC2: Fingering weight, Yarn Love Cinderella Fingering (80% superwash BFL wool, 20% nylon), 370 yds (338 m) per 100-g skein
CC1: Fingering weight, Yarn Love Galadriel Sock (80% superwash Corriedale, 20% nylon), 370 yds(338 m) per 100-g skein
Shown in
MC: Conifer (1 skein)
CC1: Cosmos (1 skein)
CC2: Martini (1 20-g mini skein)
-
Needles
For ribbing, heel and toe: US 1 (2.25 mm), 32-inch (80-cm) circular for magic loop, or DPNs, or two circulars or a 9-inch (23-cm) circular needle (as preferred).
For colorwork: US 1.5 (2.5 mm), 32-inch (80-cm) circular for magic loop, or DPNs, or two circularsor a 9-inch (23-cm) circular needle (as preferred).
Important note: Do check your gauge for fit. Additional sizes can be achieved by going up or down needle sizes.
-
Notions
Stitch markers
Scissors
Tapestry needle
-
Gauge
34 sts x 38 rnds = 4 inches (10 cm) for colorwork.
36 sts x 44 rnds = 4 inches (10 cm) for stockinette and ribbing.
Directions
Cuff
Cast on 56 (64, 72) sts with MC and US 1 (2.25 mm) needle. Divide sts evenly over the two needles. For DPNs, place half of your sts on one needle and divide the other half over two needles. PM for BOR. Join to work in the rnd, being careful not to twist sts.
Ribbing Rnd: *K1tbl, P1; repeat from * to the end of the rnd.
Work Ribbing Rnd for a total of 13 rnds, approximately 1¼ inches (3 cm).
Leg
-
With MC and US 1.5 (2.5 mm) needle (or needle size to achieve gauge in colorwork), work increase rnd:
Size 1: *K14, M1L; rep from * to the end of rnd. 4 sts inc’d. 60 sts total.
Size 2: *K8, M1L; rep from * to the end of rnd. 8 sts inc’d. 72 sts total.
Size 3: *K6, M1L, rep from * to the end of rnd. 12 sts inc’d. 84 sts total.
-
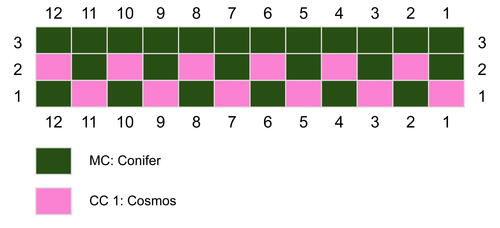
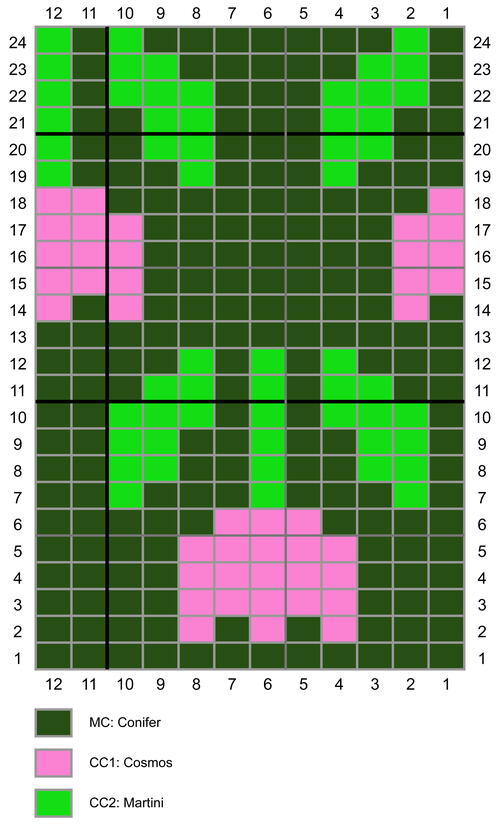
Work rnds 1–3 of Colorwork Chart B, joining CC1 where shown. The chart repeats 5 (6, 7) times around the sock. The chart is worked from right to left, from bottom to the top. Now work rnds 1–24 of Colorwork Chart A, joining CC2 where shown. The chart repeats 5 (6, 7) times around the sock. Knit rnds 1–13 once more and then continue on to the Short Row Heel instructions.
Short Row Heel
Using MC, size US 1 (2.25 mm) needle and Needle 1 only, you will now work the heel instructions for your size.
-
Size 1 only (30 sts on Needle 1):
Row 1 (RS): Sl1, [K12, K2tog] twice, turn work to the WS (leaving 1 st unworked). 2 sts dec’d. There are now 28 sts for the heel in total.
Row 2 (WS): Sl1, P25 (leaving 1 st unworked at the end), turn work to the RS.
Row 3: Sl1, K24 (leaving 2 sts unworked at the end), turn work.
Row 4: Sl1, P23 (1 st before the gap), turn work.
Row 5: Sl1, K22 (1 st before the gap), turn work.
Row 6: Sl1, P21 (1 st before the gap), turn work.
Row 7: Sl1, K to 1 st before the gap, turn work.
Row 8: Sl1, P to 1 st before the gap, turn work.
Repeat Rows 7 and 8 five more times.
Row 19: Sl1, K to 1 st before the gap, turn work.
Row 20: Sl1, P7, turn work.You should have 8 purl sts in the center and 10 unworked sts on each side.
The heel now needs to be worked back and forth, closing the gaps that have been created from turning the work.
Row 21 (RS): Sl1, K6, SSK (working together 1 st on either side of the gap), M1L, picking up under the SSK (do not twist the st). Turn work.
Row 22 (WS): Sl1, P7, P2tog, M1Lp, picking up under the P2tog st (do not twist the st), turn work.
Row 23: Sl1, K8, SSK, M1L, turn work.
Row 24: Sl1, P9, P2tog, M1Lp, turn work.Continue in established pattern for 14 more rows.
Row 39 (RS): Sl1, K24, SSK, M1L, turn work.
Row 40 (WS): Sl1, P25, P2tog, M1Lp, turn work.
Row 41 (RS): Sl1, [K13, M1L] twice, K1. 2 sts inc’d. Turn work. There are now 30 sts on Needle 1.
Row 42 (WS): Sl1, P29.
Continue to the Foot section.
-
Size 2 only (36 sts on Needle 1):
Row 1 (RS): Sl1, [K6, K2tog] 4 times, K2, turn work to the WS (leaving 1 st unworked). 4 sts dec’d. There are now 32 sts for the heel in total.
Row 2 (WS): Sl1, P29 (leaving 1 st unworked at the end), turn work to the RS.
Row 3: Sl1, K28 (leaving 2 sts unworked at the end), turn work.
Row 4: Sl1, P27 (1 st before the gap), turn work.
Row 5: Sl1, K26 (1 st before the gap), turn work.
Row 6: Sl1, P25 (1 st before the gap), turn work.
Row 7: Sl1, K to 1 st before the gap, turn work.
Row 8: Sl1, P to 1 st before the gap, turn work. Work rows 7 and 8 five more times.
Row 19: Sl1, K to 1 st before the gap, turn work.
Row 20: Sl1, P11, turn work.
You should have 12 purl sts in the center and 10 unworked sts on each side
The heel now needs to be worked back and forth, closing the gaps that have been created from turning the work.
Row 21 (RS): Sl1, K10, SSK (working together 1 st on either side of the gap), M1L, picking up under the SSK (do not twist the st), turn work.
Row 22 (WS): Sl1, P11, P2tog, M1Lp, picking up under the P2tog st (do not twist the st), turn work.
Row 23: Sl1, K12, SSK, M1L, turn work.
Row 24: Sl1, P13, P2tog, M1Lp, turn work.
Continue in established pattern for 14 more rows.
Row 39 (RS): Sl1, K28, SSK, M1L, turn work.
Row 40 (WS): Sl1, P29, P2tog, M1Lp, turn work.
Row 41 (RS): [K8, M1L] 4 times. 4 sts inc’d. Turn work.
There are now 36 sts on Needle 1.
Row 42 (WS): Sl1, P35.
Continue to the Foot section. -
Size 3 only (42 sts on Needle 1):
Row 1 (RS): Sl1, [K5, K2tog] 5 times, K3, K2tog, turn work to the WS (leaving 1 st unworked). 6 sts dec’d. There are now 36 sts for the heel in total.
Row 2 (WS): Sl1, P33 (leaving 1 st unworked at the end), turn work to the RS.
Row 3: Sl1, K32 (leaving 2 sts unworked at the end), turn work.
Row 4: Sl1, P31 (1 st before the gap), turn work.
Row 5: Sl1, K30 (1 st before the gap), turn work.
Row 6: Sl1, P29 (1 st before the gap), turn work.
Row 7: Sl1, K to 1 st before the gap, turn work.
Row 8: Sl1, P to 1 st before the gap, turn work.Work rows 7 and 8 six more times.
Row 21: Sl1, K to 1 st before the gap, turn work.
Row 22: Sl1, P13, turn work.
You should have 14 purl sts in the center and 11 unworked sts on each side.
The heel now needs to be worked back and forth, closing the gaps that have been created from turning the work.
Row 23 (RS): Sl1, K12, SSK (working together 1 st on either side of the gap). M1L, picking up under the SSK (do not twist the st), turn work.
Row 24 (WS): Sl1, P13, P2tog, M1Lp, picking up under the P2tog st (do not twist the st), turn work.
Row 25: Sl1, K14, SSK, M1L, turn work.
Row 26: Sl1, P15, P2tog, M1Lp, turn work. Continue in established pattern for 16 more rows.
Row 43 (RS): Sl1, K32, SSK, M1L, turn work.
Row 44 (WS): Sl1, P33, P2tog, M1Lp, turn work.
Row 45 (RS): Sl1, [K5, M1L] 6 times, K5. 6 sts inc’d.
There are now 42 sts on Needle 1.
Row 46(WS): Sl1, P41.
Foot (All Sizes)
Join back in the round with MC, CC1, CC2 and US1.5 (2.5 mm) needle (or needle size to achieve gauge in colorwork). Beginning with Needle 1, resume knitting Colorwork Chart A, starting with rnd 14 and ending on rnd 24. Continue to repeat Colorwork Chart A until the sock is approximately 1¾ inches (4.5 cm) from the desired finished length, stopping after rnd 13. If necessary, knit a few more rnds with MC to get to this length.
Cut CC2.
-
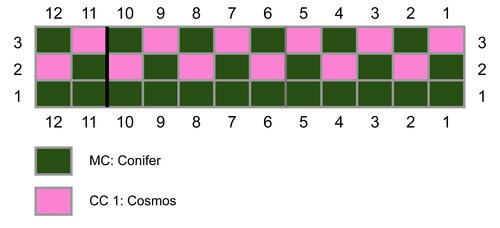
Work rnds 1–3 of Colorwork Chart C. The chart repeats 5 (6, 7) times around the sock.
Cut CC1. -
Toe
With MC and using the US 1 (2.25 mm) needle, work decrease rnd:
Size 1: *K13, K2tog; rep from * to end of rnd. 4 sts dec’d. 56 sts in total.
Size 2: *K7, K2tog; rep from * to end of rnd. 8 sts dec’d. 64 sts in total.
Size 3: *K5, K2tog; rep from * to end of rnd. 12 sts dec’d. 72 sts in total.
Your stitches should now be placed equally on Needles 1 and 2. Remove the BOR stitch marker. Needle 1 is holding 28 (32, 36) sts at the bottom of your foot. Needle 2 is holding 28 (32, 36) sts at the top of your foot.
With MC and Needle 1, knit 14 (16, 18) sts. Place the BOR st marker after these sts. This should be in the middle of the sts on Needle 1.
Setup rnd: Knit 1 more rnd with MC to the BOR marker.
Rnd 1 (decrease rnd):
Needle 1: Knit until 3 sts remain, K2tog, K1.
Needle 2: K1, SSK, knit until 3 sts remain, K2tog, K1.
Needle 1: K1, SSK, knit to BOR. 4 sts dec’d
Rnd 2: Knit all sts.
Repeat rnds 1 and 2 until there are 20 sts remaining on each needle (40 sts in total).
Continue working only rnd 1 (dec every rnd) until 10 sts remain on each needle (20 sts in total).
Remove BOR stitch marker. Knit 5 stitches to reach the side of the sock. With 10 sts on each needle, join remaining stitches using Kitchener stitch.
Finishing
Weave in all ends. Soak and block. Repeat instructions for the second sock
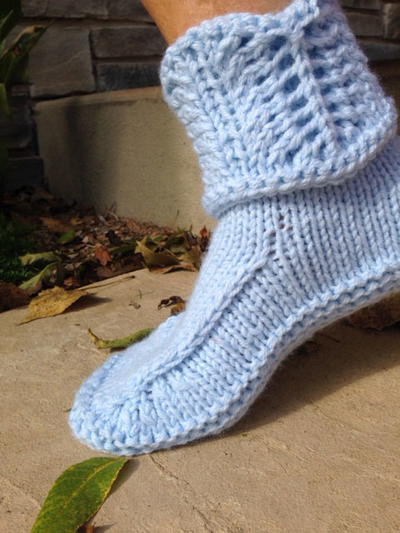
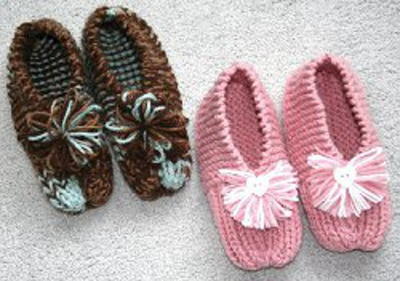
Read NextGrandma's Knitted Slippers