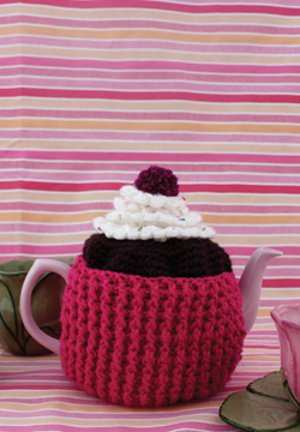
Sweet Cake Tea Pot Cozy
Keep your tea nice and warm with this Sweet Cake Tea Pot Cozy. Made to look like a cupcake, this tea pot cozy makes a great gift for anyone with a bit of a sweet tooth. Serve tea in this cozy with a platter of cookies or cupcakes for a sweet and adorable presentation that everyone is sure to love.
Materials:
- 1 ball Patons Canadiana (100 g/3.5 oz; 187 m/205 yds) yarn in Raspberry (main color)
- 1 ball Patons Canadiana (100 g/3.5 oz; 187 m/205 yds) yarn in Timber (A)
- 1 ball Patons Canadiana (100 g/3.5 oz; 187 m/205 yds) yarn in Winter White (B)
- 1 ball Patons Canadiana (100 g/3.5 oz; 187 m/205 yds) yarn in Deep Orchid (C)
- Sizes 4 mm (U.S. G or 6) and 6 mm (U.S. J or 10) crochet hooks or size needed to obtain tension
- Assortment of multi-color bugle beads
Gauge: 17 sc and 18 rows = 4" [10 cm] with smaller hook.
Instructions:
For a 4-cup tea pot.
Cupcake Liner (Make 2 Alike)
Ch 3 at beg of row counts as dc throughout.
-
With smaller hook and MC, ch 36.
-
1st row: (RS). 1 dc in 4th ch from hook (counts as 2 dc). 1 dc in each ch across. Turn. 34 dc.
-
2nd row: Ch 3. (1 dcfp around next st. 1 dcbp around next st) 16 times. 1 dc in last dc. Turn.
-
Rep 2nd row 10 times more.
- Fasten off.
Cupcake Top
-
With smaller hook and A, ch 2.
-
1st rnd: 6 sc in 2nd ch from hook. Join with sl st to first sc.
-
2nd rnd: Ch 1. 2 sc in each sc around. Join with sl st to first sc. 12 sc.
-
3rd rnd: Ch 1. (2 sc in next sc. 1 sc in next sc) 6 times. Join with sl st to first sc. 18 sc.
-
4th rnd: Ch 1. 1 sc in first sc. (2 sc in next sc. 1 sc in each of next 2 sc) 5 times. 2 sc in next sc. 1 sc in last sc. Join with sl st to first sc. 24 sc.
-
5th rnd: Ch 1. (2 sc in next sc. 1 sc in each of next 3 sc) 6 times. Join with sl st to first sc. 30 sc.
-
6th rnd: Ch 1. 1 sc in each of next 2 sc. (2 sc in next sc. 1 sc in each of next 4 sc) 5 times. 2 sc in next sc. 1 sc in each of next 2 sc. Join with sl st to first sc. 36 sc.
-
7th rnd: Ch 1. (2 sc in next sc. 1 sc in each of next 5 sc) 6 times. Join with sl st to first sc. 42 sc.
-
8th rnd: Ch 1. 1 sc in each of next 3 sc. (2 sc in next sc. 1 sc in each of next 6 sc) 5 times. 2 sc in next sc. 1 sc in each of next 3 sc. Join with sl st to first sc. 48 sc.
-
9th rnd: Ch 1. (2 sc in next sc. 1 sc in each of next 7 sc) 6 times. Join with sl st to first sc. 54 sc.
-
10th rnd: Ch 1. 1 sc in each of next 4 sc. (2 sc in next sc. 1 sc in each of next 8 sc) 5 times. 2 sc in next sc. 1 sc in each of next 4 sc. Join with sl st to first sc. 60 sc.
-
11th rnd: Ch 1. (2 sc in next sc. 1 sc in each of next 9 sc) 6 times. Join with sl st to first sc. 66 sc.
-
12th rnd: Ch 1. 1 sc in each of next 5 sc. (2 sc in next sc. 1 sc in each of next 10 sc) 5 times. 2 sc in next sc. 1 sc in each of next 5 sc. Join with sl st to first sc. 72 sc.
-
13th rnd: Ch 1. (2 sc in next sc. 1 sc in each of next 11 sc) 6 times. Join with sl st to first sc. 78 sc.
-
14th to 16th rnds: Ch 1. 1 sc in each sc around. Join with sl st to first sc.
- Fasten off.
Icing
-
With larger hook and holding 2 strands of B tog, ch 71.
-
1st row: 1 sc in 2nd ch from hook. 1 sc in each ch across. Turn. 70 sc.
- 2nd row: Ch 1. 1 sc in each of next 2 sc. Draw up a loop in each of next 2 sc. Yoh and draw through all 3 loops on hook – sc2tog made. (1 sc in each of next 5 sc. Sc2tog) 3 times. (1 sc in each of next 4 sc. Sc2tog) 3 times. (1 sc in each of next 3 sc. Sc2tog) 3 times. (1 sc in each of next 2 sc. Sc2tog) 3 times. Fasten off.
Finishing
-
Sew Icing into spiral shape as pictured. Sew Icing to Cupcake Top.
- With WS of Cupcake Liner pieces tog, sew side edges tog at top corner and along last row only, leaving openings for spout and handle. Sew Cupcake Top to Liner as pictured. Sew beads in random pattern to Icing as shown in photo.
Pom-Pom (Make 1)
- Wind C around 2 fingers approx 30 times. Remove from fingers and tie tightly in center. Cut through each side of loops. Trim to a smooth round shape. Attach to top of Icing spiral.