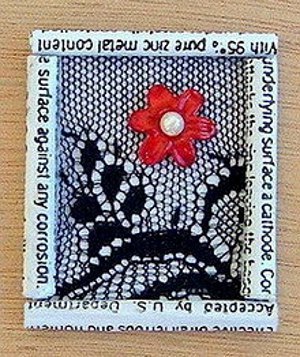
Paper Frame Brooch
Turn some leftover paper into a beautiful work of wearable art with this Paper Frame Brooch. With some old book pages and a floral embellishment of your choice, you can create your very own pin that's perfect for adding some color and style to your hat, coat, purse, or sweater.

Materials:
- 2 strips of a book page which has text on one side (front) and nothing on its back side (cut one of the paper strips 4.92 inches long and 1.55 inches wide and the other one 3.1 inches long x 1.55 inches wide)
- Scrap piece of a lacy design, color black, dimensions: 1.77 inches x 1.55 inches
- Toothpick
- Glue
- Brooch pin
- Small square piece cut from the flaps of a cardboard box, length: 1.37, width: the same as the length of the brooch pin you are using
- Small red flower (any material)
- Protective varnish spray (for paper)
- Ruler
- Pencil
- Scissors
- Craft knife, optional
Instructions:
-
Take the longer paper strip first and turn it to its back side. Use your ruler and pencil to mark 2 squares (one at both ends of the strip) 1.55 inches x 1.55 inches each. You should be left with a middle rectangle, 1.77 inches x 1.55 inches.
-
To continue, take the shorter strip and draw a line (using your ruler and pencil) dividing it in half, lengthwise. Cut on the line with the scissors – you have 2 identical squares.
-
Hold one of these two squares back side (blank) up and roll it up, tightly, with the help of the toothpick. You should have made a paper tube, with the black text showing on its outer side. Pull the toothpick out of the paper tube. Repeat the process with the other paper square.

-
Glue the lacy design on the rectangle of the first strip. Trim, if necessary. Wait till the glue dries.
-
After the glue has dried, trim (very little and carefully) both ends of the paper tubes you have made. Glue the tubes to the left and right side of the rectangle you’ve just covered with the black lace. Wait for the glue to dry completely.

-
When the glue has hardened, roll up (using the toothpick again) both sides of the longer paper strip, to form the top and bottom paper tubes of your frame brooch. You need to roll them up tightly till they rest on the other two paper tubes you’ve made and glued before. Glue them in the right place, without leaving gaps – readjust, if needed, before using your glue. Wait for the glue to harden.
-
Now, turn your paper frame brooch to its other side (back) – the back side of your brooch must be the side with the text on it. Use your scissors (or craft knife), your ruler and your pencil to cut the small square rectangle from the cardboard box flap and, then, glue this cardboard piece onto the brooch’s back – it is necessary to make the paper brooch sturdy.
-
I cannot stress enough the importance of waiting for the glue to dry completely in all steps of this project.
-
Add the brooch pin you have bought from a craft supplies store.

-
After the glue you’ve attached the pin with has hardened, turn your brooch to its front side. Glue the red flower on the lacy design (wherever you think it looks best) and wait for the glue to harden.
- For the final touch: Spray the paper frame brooch with protective varnish. You could wear it with your casualwear, pin it on a tote bag, or give it to a friend as a keepsake.
Read NextLeather Dangle Earrings