This project was submitted by one of our readers, just like you.
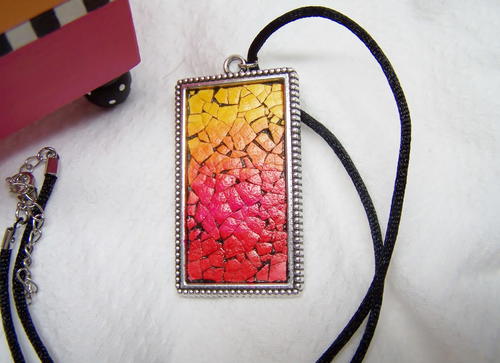
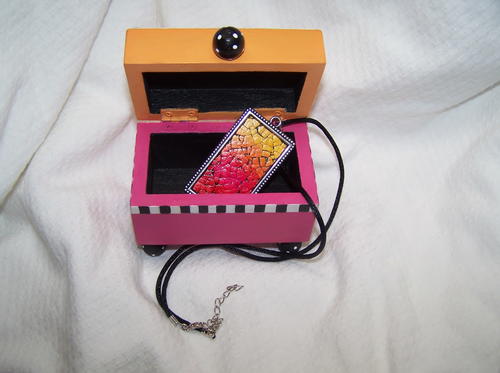
Eggshell Mosaic Pendant and Gift Box

Eggshell Mosaic Pendant and Gift Box
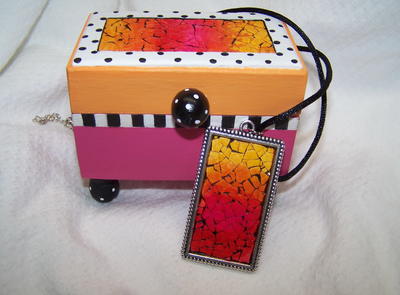
"Who wouldn't appreciate a handmade pendant tucked inside a matching hand painted gift box? Real eggshells colored with alcohol inks are the star of this project! You don't have to be a painter to doll up a plain wooden box to match this pendant. Keep supply cost down by changing up the colors to use whatever inks and paints for you have on hand. Tailoring the mosaic to other shapes of bezels and boxes is easy-peasy! "
Project TypeMake a Project
Time to CompleteIn an evening
Bead Technique UsedMetalwork
Bead Project TypeNecklace

Materials List
- Art Minds Trinket Box from Michaels (3x2x2.5”) or box of choice
- Jewelry Shoppe Ornate Rectangle Bezel-Antique Silver from Hobby Lobby
- Bead Landing 18” black necklace or bezel style necklace of choice
- Jacquard Piñata Alcohol Inks: #004 Chili Pepper, #011 Senorita Magenta, #002 Sunbright Yellow, #003 Tangerine
- DecoArt Americana Multi-Surface Satin Acrylic Paint: Black Tie, Pumpkin Patch, Fruit Punch, Cotton Ball
-
Royal Soft Grip Brushes: Shader Series SG150: #4, 12
Royal & Langnickel Soft Grip Embossing & Stylus Set SG95
-
DecoArt Multi-Purpose Sealer
DecoArt Triple Thick Brilliant Gloss Glaze
- Lara’s Crafts ¾” Finial Dowel Caps #11042
- Jewelry Shoppe Findings: heavy gage 6MM silver jump rings
- Clean white eggshells
- Misc.: Sandpaper, Rubbing alcohol, Small disposable container, Wax paper or piece of tin foil, Craft stick, Small hack saw, 2 pairs needle nose pliers, Black card stock (optional), Wood filler, E-6000 or similar strong glue, White Glue, Painter’s tape
Instructions
-
There are two methods to choose from to making the mosaic for the recessed area of the box top. You may apply glue and shells directly to the box or you can apply them to card stock then glue the cardstock into the recessed area of box top. The cardstock method allows for mistakes and also can be used for practice.
-
Preparing the box and bezel: Use saw to remove the turned area of the dowel cap. Sand the rough edge of the remaining ball (will become handle on lid). Remove the hinge from the front of the box and discard or recycle. Fill holes with wood filler. Sand wood filler when dry. Apply Multi-Purpose Sealer to all wood areas. When dry sand lightly and remove dust. Wipe the inside of the bezel with rubbing alcohol. Use Black Tie to base coat the inside of the bezel, recessed area of the box lid (or the card stock), and the feet and handle. Use Cotton Ball to under paint the pink and orange areas of the box.
-
Painting the box: Apply painter’s tape to the checked and dotted border areas. Burnish edge top edge of tape with finger to prevent paint from seeping. Use Pumpkin Patch to base outside of box top and Fruit Punch to base outer bottom of box. Remove tape promptly. Use the chisel edge of the clean brush to remove any seeped paint. For stubborn, dried paint use a touch of rubbing alcohol on a brush. Let dry. Use the #4 brush and Black Tie to paint the stripes. Use large ball stylus and Black Tie to paint dotted pattern on top of box. Use small ball stylus and Cotton Ball to paint dots on handle and feet. Use E-6000 to glue the handle and feet in place.
-
Preparing the eggshells: Crack eggs in half carefully with edge of knife. Rinse with warm water then soak in warm water and antibacterial soap for several hours. Locate a piece of the membrane and pull off of shell. The idea is to pull the entire membrane off the shell. This is tricky and takes some practice. Turn shells upside down on a paper towel to dry. They are very brittle at this point so handle with care. Break an eggshell half into pieces the size of a nickel or slightly larger. Be sure to keep them face up on your work surface.
-
Use a paint brush to apply a fairly generous amount of white glue to the center of the area to be covered. Place a piece of shell face up on the glued area. Use the craft stick to push down gently and break the shell up into smaller pieces. Avoid using your fingers to manipulate the shells. Use a stylus to spread pieces of shell apart slightly so the black background shows. Use a brush to smooth out excess glue as needed. Repeat this process until the area is covered with shell. Use small fragments of shell to fill in small spaces as needed. Use the corner of the brush with some glue on it to pick up and place the small fragments. When finished, apply a thin coat of glue over top of your mosaic to seal and protect it. Let dry.
-
Inking the shells: Pour some rubbing alcohol into a disposable container. Apply several drops of each color of Piñata Inks onto wax paper or foil taking care not to allow them to run together. Visually divide your mosaic into layers or strata. There are four layers of colors in the bezel (yellow, orange, pink, and red) and seven layers on the box top (yellow, orange, pink, red, pink, orange, and yellow). When applying the inks you need to work quickly as they set up quickly. Use a brush to apply Sunbright Yellow to one end of the mosaic and cover two layers. Use the dirty brush and pick up a small amount of Tangerine. Lay the brush at the bottom of the yellow area and begin blending upward about halfway creating a gradation of color. Quickly rinse brush in rubbing alcohol and pat on paper towel. Pick up Senorita Magenta and apply to bottom of the next layer blending upward into the Tangerine area and overlapping slightly. This will create a third color where the pink and orange layers meet. It’s important not to over blend to you will lose one color. Use the dirty brush to add a tiny amount of Chili Pepper to the bottom of the next layer and blend upward into the pink layer. The Chili Pepper color is dark and intense so do not overdo this color. Set aside to dry several hours or overnight. Clean your brush thoroughly in rubbing alcohol when finished. Blot the brush often on a paper towel and continue rinsing in rubbing alcohol until the brush is clean. If using the card stock method measure, cut your mosaic to fit the recessed area of the box top. Apply white glue with a brush to the box top then lay mosaic in and gently press down to secure. You may need to weight the mosaic down with something to keep it level.
-
Topcoat for mosaics: Place mosaics on a level surface. Brush off any dust or debris. Apply Triple Thick to the mosaic area with a brush. Additional coats may be added when dry.
-
Finishing the pendant: Use both pairs of needle nosed pliers to hold a jump ring with its opening facing top/center. Hold one pair of pliers steady and pull the other pair toward you to open ring. Insert the bale of the bezel and the necklace cord into the open ring. To close jump ring reverse step one.