This project was submitted by one of our readers, just like you.
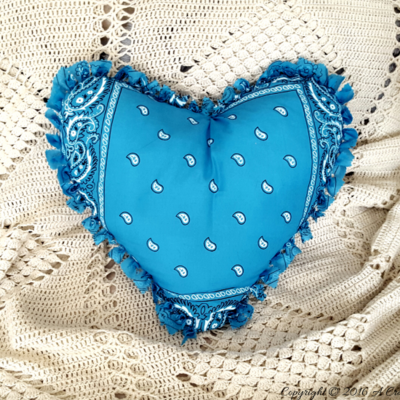
Retro Chinese Hexagon DIY Pillow

Retro Chinese Hexagon DIY Pillow
"Celebrate Chinese New Year by making this gorgeous applique cushion using a popular Michael Miller retro Chinese fabric. This is project is a great introduction into hexagon patchwork"
Project TypeMake a Project
Time to CompleteIn an evening
Sewn byHand

Materials List
- Fat Quarters - China Doll by Michael Miller (a fat quarter of each colour way should give you enough fabric for several cushions)
- Rotary cutter or scissors, pins needle and thread.
- Ruler and double sided sticky tape.
- 3 inch Paper hexagon squares. These can be bought cheaply on-line or you can cut your own.
- IKEA Gurli 50cm X 50cm cushion cover. Any plain cushion cover will do.
How to Sew the Retro Chinese Hexagon DIY Pillow
Instructions
-
Stick the paper hexagons to your fabric. Using the rotary cutter and the ruler cut 7 fabric hexagons per cushion with a 1cm seam allowance.
-
Tack your fabric to the paper hexagons. Secure your paper hexagons to the fabric with pin. Fold your fabric edge over the paper hexagon and using a contrasting thread tack the folded fabric edge to the paper hexagon. Continue round the whole hexagon folding the fabric over the paper as you go round. When finished don’t knot the end of your thread as you will be pulling this out later.
-
Decided on how you want your 7 hexagons to fit together, one on the inside and 6 round the edge. Using your arranged design as your guide whip stitch the hexagons together. You will be stitching at the very edges of the hexagons, just going through the fabric and not the paper hexagons.
-
You should now have a neatly sewn fabric panel consisting of seven hexagons. Carefully pin this to the cushion cover.
-
Start the applique with the middle fabric hexagon. Using a thread that matches your fabric and a small running stitch neatly sew the hexagon to the cushion cover. Your stitches should go all around the very the edge of the hexagon.
-
You will need to eventually remove the paper hexagons. However it is easier if you can keep the paper hexagons in the patchwork panel as long as possible. As the panel keeps its shape better and is easier to work with. That means on the outer hexagon the paper stays in until you have appliqued all but the last side.

Read NextPampa Wall Hanging