Fabric Scraps Chicken Wall Art
Use fabric scraps to create a custom chicken wall art piece for home decorating or gift giving this spring. Designer Chasity Gordon recommends making a chick in spring color fabrics for Easter. Three different finished examples included.


Materials:
- Fabric scraps
- 4"x6"picture frame with smooth surface
- Modge Podge
- Brush
- Fusible interface
- Heat and bond lite
- Scissors
- Marking tool
- Ruler
- One button
- Sewing machine(optional)
- Needle
- Thread
- Chic pattern
Instructions:
1. cut frame fabric. cut for strips of fabric to cover your frame. Mine measured 2@2"x8" and 2@2"x6" to cover a frame that's surface is 1 1/4" X5/8" deep. ...

I have stash of clearance sale frames I keep for quick gifts.
I think the best way to find out the measurement for your frame is to lie the fabric on the frame and cut a little longer than the depth but cut exactly the width.

The 4 corners will overlap on the flat part of the frame.

but will not over lap on the sides; making it easier to fold over neatly.

2. Attach the fabric to your frame .I like to use a big Ol' bowl when I am using modgepodge. I pour a little in the bowl then coat the strips using a brush in the bowl.

I applied my fabric on the longest sides first, then the shorter ones.

I did it like that to match up the strips in the ticking fabric.

I made sure to try and keep any excess on one side so it would trim easily. I trimmed while it was still wet ...very carefully WITH CRAFT SCISSORS!! that I immediately washed.

Set the frames aside to dry, you might prop them as I did on little rocks.
3. Print the chic pattern. Just click and drag it to your desktop and print image to "scale". This chic fits nicely into a 4x6 frame. If your using a bigger or smaller frame adjust your chic accordingly.
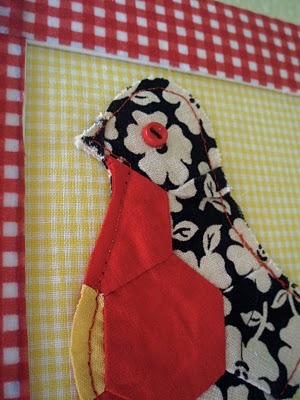
4. Make your fabric chics. For the red chic I used a damaged vintage quilt square. For the other I made a small patchwork and cut my chic from it. You could also cut a chic from a single scrap of fabric and make this a no-sew project.

a. To make your own patchwork simply cut 4 , 2" x3" squares of fabric that are eye pleasing in combination.

Stitch them together to make one 4"x6" rectangle and press.

b. Next for whichever method you are getting your chic; attach fusible interface, then heat and bond to the back side.

c. Arrange and trace your chic. Make sure your chic is on your fabric so that you get the look you want.I suggest if you are using the a patchwork fabric , to make sure the legs are not on a seam, this just make for neater chicken legs!

Trace the chic on the back side directly on the heat and bond paper , it won't bleed through.

5. Cut a background. You can use the paper that came with the frame as the template for your background or trace one if you don't have that. I cut my background from one piece of fabric but you could sew together a background as well.

...like this one I made for Cinda with a bi-color field behind the chic sort of like a horizon line.(sorry about the glarey photo)

6. Attach your chic to the background. First lay the frame over the background and decide the placement of your chic before you adhere it .

I like to add a top stitch around the edge of the chic, but the heat and bond will be enough if you do not want to stitch.

I also like to attach a flat button at this point, as a little peeper.

7. Frame and hang your scrappy chic art!

Your Recently Viewed Projects
Thanks for your comment. Don't forget to share!
Mixed Kreations
Feb 18, 2012
These are really cute. I agree with allieg1941 these would really be cute in other shapes too. Thank you for sharing your cute tutorial.
allieg1941
Apr 26, 2011
I think this would be cute for other shapes too.., like a heart or patchwork flowers etc. If you are creative..you can think of other ways to make fabric frames too, using heavy cardboard or template pastic and polyester stuffing. My creative juices or flowing right now lol.
petunia501
Apr 03, 2010
I'm thinking of making placemats from this sweet design....thank you for the inspiration!
luz
Apr 02, 2010
these pictures are absolutely adorable. I will make them for my grandaughter Just lovely thanks
Report Inappropriate Comment
Are you sure you would like to report this comment? It will be flagged for our moderators to take action.
Thank you for taking the time to improve the content on our site.