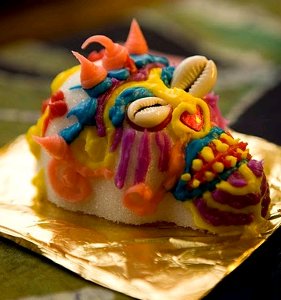
Day of the Dead Sugar Skulls
Use sugar and henna paste to make these spooktacular Day of the Dead sugar skulls from Kara Jones. These skulls make great Halloween decorating craft ideas too!
Materials:
- 10 lb. bag of plain old, white, granulated sugar
- powdered meringue
- water
- large mixing bowl
- skull molds
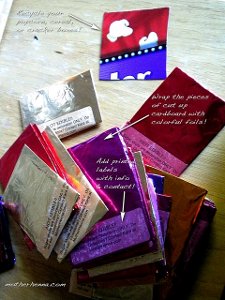
- recycled cardboard boxes, cut up into squares
- colorful foils
- labels
- icing
- pastry bags
- cellophane
- rubber bands
- cookie sheets
Instructions:
- Molds come in sheets of several skulls. You can cut them up to be individual. You'll want to cut up your old cereal or cracker or popcorn boxes ahead of time. Cut the cardboard into palm size squares and put them in a pile near where you'll be mixing and pressing skulls.
- So in the large mixing bowl, I mixed sugar, meringue, and water following the recipe from Mexican Sugar Skull. Basically it is 5 cups of sugar to 1/4 cup meringue to 3 tablespoons water. I find that it sometimes takes a bit more meringue and/or a bit more water to get the right consistency. It maybe that the ratio varies due to environment. I'm usually compensating for extra damp conditions here in the NW. And for mixing it all together and getting a feel for the consistency, it is best to just dive your hands right into the bowl! This is no time for neat fussy stuff!
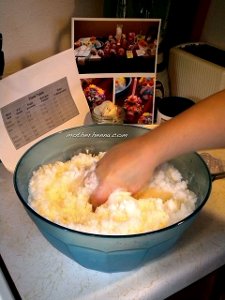
- I keep the extra water nearby so that as I'm mixing I can just dip my fingers and sprinkle a few more drops of water into the bowl. Then just keep scooping and mixing with your hands. Get messy. It's part of the fun!
- Then, you can keep sort of scooping up and squeezing handfuls of the mix as you test consistency. You sort of want the feel of wet sand that sticks together to make sand castles. But it's also that you want the mix to stick together like when you pack a snowball and it all stays together.
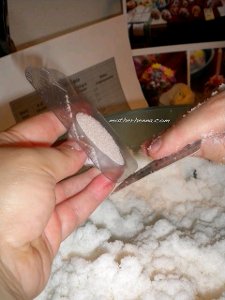
- Once you get that consistency, you can begin pressing the skulls. So scoop a handful of mix with one hand, and hold the mold with the other hand. You can see here how I've cut the sheets of molds to make the individual. You pack the mold to overflowing full and press to make sure every nook and cranny of the mold is getting filled with mix.
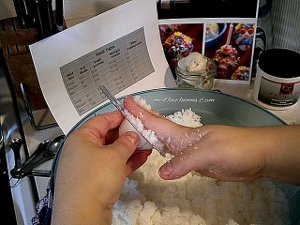
- Then using one of the cardboard squares, run the flat edge of the cardboard across the back of the mold to make the packed mix flat.
- As you scrape to make the back flat, just let the extra mix fall back into the bowl.
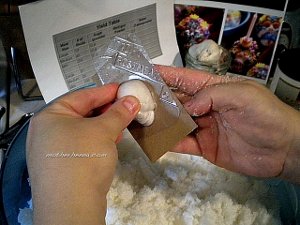
- You want the back of the mold to be very flat. This need to be flat so that when you turn the pressing out, the skull will stay together evenly.
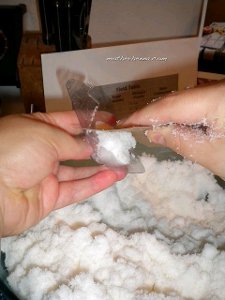
- Once it's flat, then turn the piece of cardboard to be flat against the back of the mold sheet and turn the mold over to dump the pressed skull out on the board.
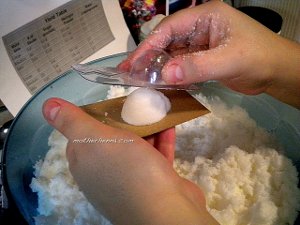
- You should be able to just sort of lift the mold off gently, leaving the pressed skull setting on the board. After several pressings, you might find the skull sticking inside the mold and not wanting to drop out. Just stop then and go to the sink to wash out the mold of all stickiness. Dry it really, really well, and try again. You should find that you can once again sort of lift the mold gently off the board, leaving in-tact skull behind.
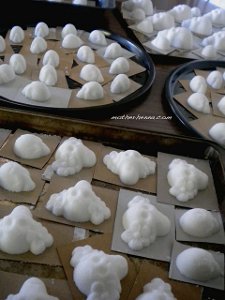
- Then, again gently, lay the cardboard and skull down onto a cookie sheet. The cardboard will help wick the moisture away from the pressed skull so it dries and hardens in one piece. It also makes it easy to put down the skull by holding the edges of the board and not touching the skull at all.
- As you fill the cookie sheets, move them to safe, flat, warm space. You want them to dry and harden without being disturbed.
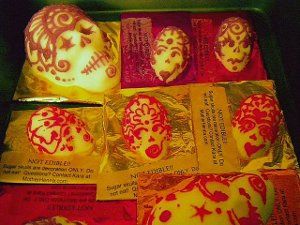
- After you've pressed all your skulls and sheets are safely drying, you can move on to creating pretty display for the skulls to eventually inhabit. Take more of your cardboard squares and wrap them up in colorful foil. I take the additional step of adding a label to the foiled boards telling people the skulls are NOT EDIBLE. I mean technically, they are edible as long as I use icing and not henna paste to decorate them. But after the mix has been man-handled in that way of pressing, I just think it is not very sanitary to eat them. Also, I'm not making them in a commercial kitchen, so if we are selling the skulls afterward, I want to be especially certain to say they are for *decoration only* and not edible!!
- Once those are done, I move on to play with the icing. You'll find other people do this differently. But being a henna artist, I have my own weird way of doing this. So first I make or buy Royal Icing. Again, you'll find recipe for it on Mexican Sugar Skull site. But I find you can also buy regular old cake icing, add a bit of meringue and water, and wa-la, it dries just like royal icing.
- Once I have icing the way I want it, I spoon it into large pastry bags. Then I cut cellophane into squares, and hand roll the cello squares into cones. I do this so that I can roll cones with very fine tip openings. I can make the tips exactly the size I want.
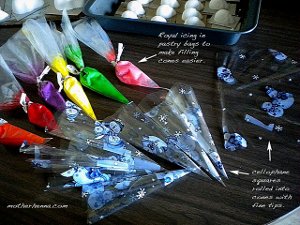
- Once the cones are taped and ready, I fill them by squeezing icing out of pastry bag into the small cones. I use rubber band or elastic hair things to close the twisted top of the cones after they are filled. I leave a little icing in the large pastry bags because you can splooge a bunch of icing on the foiled board pieces and place the dried skull on top of it. When the icing dries, it acts like glue holding the skull in place in the middle of the foiled board.
- Once the skull is sort of glued onto the foiled board like that, I can hold onto the edges of the board and move the skull around to any angle. And then I can decorate it using my fine tipped cones and get into the very edges of the skulls easily. Decorating the skulls is also a very individual process. You'll find that everyone does it differently.
- You can use henna paste to get a most interesting stain and bleed from the oils in the paste. Make the sugar bleed with a coppery color. You can get the same color from chocolate icing, but you won't get the copper bleed.
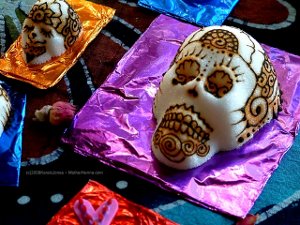
- After the skulls are decorated the way you like, set them back into the cookie trays. You need to give the icing a change to dry and harden. So again, place them all some place safe, stable, and warm.
Read NextLacey Beaded Holiday Wreath Ornament
Your Recently Viewed Projects

Thanks for your comment. Don't forget to share!
Report Inappropriate Comment
Are you sure you would like to report this comment? It will be flagged for our moderators to take action.
Thank you for taking the time to improve the content on our site.