Batty Bat Halloween Crafts
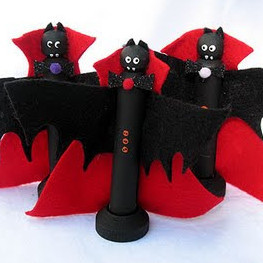
Waltz around your creepy castle with these cute Batty Bat Halloween Crafts. These adorable Halloween craft ideas are easy to create and fun to display. All you really need are a few clothespins, different-colored felts, and some spooky Halloween spirit. Line these little guys up along your windowsill or set them up in a creepy bat circle on the table. These also make good Halloween craft ideas for kids because they are cute and (with a bit of mom or dad's help) easy to make.
Primary TechniqueGeneral Crafts

SeasonFall
Materials:
- Wooden clothespins or doll pins
- Round wooden doll pin bases
- Acrylic paint: black, white and orange
- Felt: black, red, and glitter
- Black miniature pom poms in festive colors of your choice (red, purple, green, white)
- Scissors
- Toothpick
- White craft glue
- Acrylic sealer (optional)
- Pattern
Instructions:
- Paint bases and clothespins with black acrylic craft paint.
- Set aside to dry, then repeat if needed.
- Use the handle end of a paint brush to dot on the whites of the eyes.
- Use the bristle end of the paint brushy to add white fangs.
- Use a toothpick to add the black dots on the whites of the eyes.
- Use the handle end of a paint brush to dot on three orange buttons in the center of the body of the clothespin.
- Use a toothpick to dot on the button holes.
- Let all paint dry completely before handling.
- Spray with acrylic sealer (this step is optional but will help your craft last longer).
- Cut out patterns: red for the cape, black for ears and wings, and glitter black for the bow ties.
- Cut slit on top of wing where dotted line indicates.
- Insert wings, flat side up, through the opening in the clothespin.
- Slide wings upward until the slit fits snugly against the clothespin.
- Glue the wings in place, you may need to hold it in your fingers for a few minutes while the glue dries.
- Glue the ears to the back of the bat’s head so that they stick out and can be seen from the front.
- Glue the bow tie onto the front of the bat at the top of the clothespin body, just before it curves in at the neck.
- Glue a miniature pom pom to the center of the bow tie.
- Glue the red cape to the back of the bat, lining up the collar with the neck.
- Glue around the sides of the neck so that the collar appears to be standing up.
- Glue the clothespin body into the base and let dry.
Read NextDIY Easy Halloween Magnets