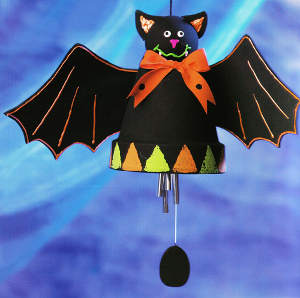
Bat Wind Chime
Use a clay pot to create this adorable bat wind chime for Halloween designed by Heidi Borchers of Inspired at Home. Welcome trick-or-treaters to your home with this fun Halloween accent.

Materials:
- Aleene’s® Super Thick Tacky Glue™
- Drill with 1/8” drill bit
- 2” diameter wooden ball
- 4-1/4” diameter clay pot
- Acrylic paint: black, orange, lime
- Paintbrush
- Pop-up craft sponge
- Waxed paper
- Dimensional paint: white, black, pink, green, orange
- Small wind chimes
- Black craft foam
- 9” (5/8” wide) orange ribbon
- Pattern
Instructions:
Drill hole through wooden ball. Paint ball and clay pot black. Let dry. Transfer triangle pattern to pop-up sponge and cut 2. Dip each into water to expand and wring out excess water. Pour separate puddles of orange and lime paints onto waxed paper. Dip each sponge into 1 color of paint and blot excess paint on side of waxed paper. Continue to blot until color is evenly distributed on sponge. Do not oversaturate the sponge. Press sponge on rim of pot and lift. Alternate colors. Let design dry. Wash sponge throughly and store for future use.
Paint facial features on wooden ball with dimensional paints. Let dry.
Apply glue to top of windchimes. Working from inside pot, thread wind chimes hanger through hole in bottom of pot. Pull wind chimes up to pot and glue in place. Let dry. Thread wind chimes hanger through hole in wooden ball head, working from bottom to top and pushing head down onto pot bottom. Glue head in place on pot. Let dry.
Transfer patterns to foam and cut 1 wings and 2 ears. Trim bottom edge of each ears to fit curve of head. Glue ears in place on head. Let dry. Referring to photo, paint inner ears and details on wings with orange dimensional paint. Let dry. Glue wings to back of pot. Tie ribbon into bow. Glue bow to front of pot, just below head. Let dry.
Heidi’s designer tip: Practice stamping design on side of waxed paper several times before stamping onto pot. If your design doesn’t stamp in its entirety on bag, simply load sponge with paint again, re-align stamp and re-stamp design. Also, remember when using dimensional paint that you continue to shake the bottle contents down to avoid air bubbles while applying.
Your Recently Viewed Projects


Thanks for your comment. Don't forget to share!
Nemo 15
Oct 09, 2010
I love this! What a great idea and you can do so much with just the basic concept! Off the top of my head, I think with a few changes this could also be made into a cute angel or even a dragon! So many possibilities! What fun!
Report Inappropriate Comment
Are you sure you would like to report this comment? It will be flagged for our moderators to take action.
Thank you for taking the time to improve the content on our site.