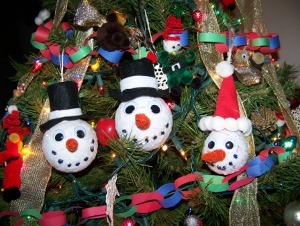
Glitzy Snowman Ornaments
Use toilet paper tubes and a burned out light bulb to create cute snowman Christmas ornaments with a touch of glitter. These are a great low-cost Christmas activity to do with the whole family.

Materials:
- Burned out lightbulb
- White paper
- Decoupage glue
- Brush
- Water to rinse brush
- Glitter and or snow material
- Trays (or paper plates) and small mouthed glass
- Orange pipe cleaner
- Chop stick or pencil
- Scissors
- String
- Tape
- Felt white & black
- Toilet paper tube (used)
- Squiggly eyes
- Glitter glue pen
-
Glue gun
Instructions:
-
Tear white paper into small pieces.
-
Set up water to rinse brush (rinse accordingly).
-
Wipe bulb off.
-
Dip brush into glue.
-
Start painting the bulb with glue. Tip: don’t paint the glue where you need to keep your fingers. I use a small mouthed glass to set the bulb on and do one side at a time.
-
Add pieces of paper a little at a time gluing them down as you go.
-
Allow the glued paper side to dry. After it has dried; repeat step 4–7. Once both sides have been covered with paper & have dried.
-
Check to make sure no spots were missed reapply glue and paper where needed and allow to dry.
-
Use brush to cover half the bulb with glue
-
Place over a tray or paper plate and sprinkle glitter on thick.
-
Sprinkle extra glitter onto the tray.
-
Then over another tray sprinkle the glitter from the other tray over the bulb again.
-
Allow to dry.
-
Repeat steps 10-14 until bulb is fully covered with glitter and dry.
-
Cut string long enough.
-
Use tape to tape down string on two sides of the bulb screw in top.
-
Secure with glue gun, waiting till glue is set.
-
Glue squiggly eyes in place, allow to set.
-
Wrap orange pipe cleaner around a chop stick or pencil to desired length for nose, cut tuck in the ends.
-
Use glue gun to secure nose in place.
-
TIP: it is easier to work with the bulb when setting on top of a glass or hanging from a banana tree.
-
TIP: if you get hot glue on your fingers place them in the rinse water.
-
Cut used toilet paper roll to desired height of hat.
-
Cut black felt to fit around the tube.
-
Cut a circle from black felt to fit the top and punch a hole through the center for the hanging string.
-
Cut a larger circle from black felt for the bottom of the hat.
-
Cut a white band for the hat from the white felt.
-
Use glue gun to assembly all parts of hat.
-
Thread the string through the top of the hat, glue to bulb if desired.
- Use glue pen to make dots for the mouth, allow to dry watching for drips.