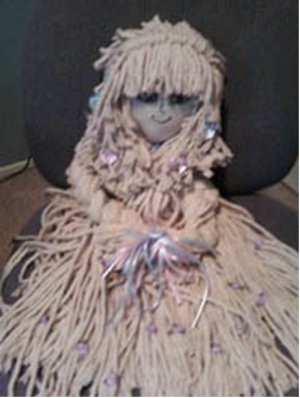
Easy Mop Doll
This Easy Mop Doll is a great country craft idea. Make it unique by adding beads, ribbons, and bows. This makes a great cuddle toy because it's made of soft material, so babies will love it!
Materials:
- 24 inch mop or if you would like to add color you can use yarn
- Iron
- Scissors
- 1/4 yard muslin or broadcloth for head
- Craft sticks
- Fiber fill stuffing
- Sewing machine or can be stitched by hand if thread is strong enough
- Hot glue gun and glue sticks
- 9 inch straw hat or can make a bonnet
- Doll hair or use left over mop material
- Beads, Flower or Ribbon and lace ( for decoration)
- 3/8 yards printed material, for clothes
- Iron on face, found at craft store or I like to draw my own face for character
Instructions:
- First thing to do is make a circle from the muslin or broadcloth. 6 inches, make a neck piece at the bottom, about 1/2 inch large than the craft stick. Cut out 2 of these. Stitch around, leaving open the neck edge. Clip edges at angle around circle,(this is to help the turning) Now, turn the circle inside out, press. Iron on the face features. This also can be done before the sewing (can be done by hand or with sewing machine) or the turning. I like to do it after. Gets the face more centered.
- Lightly stuff the head with the fiber fill. Do this a little filling at a time. Push it up into the head with the eraser end of a pencil. Should be rounded, but not stuffed too much. Now insert the craft stick into the neck opening and glue to hold in place.
- Lay the mop on a flat work surface. Have the sewn on band in the middle, hold the band and pull out 6 of the stings, just a tug and they will come out. These will be used to tie off ends later. Now across the top, divide the upper portion to use for arms. Braid to the end of each side, or leave free. Tie with one of the saved strings. Right below the band of the mop use another string and tie around tightly to form a waist. Leave the rest of the mop to form a skirt or divide to make legs. If making legs, braid each side and tie off with the saved strings as in the arms.
- Braiding the arms and with top sections braid arms.
- Tie the braid to secure using reserved strings.
- Trim the ends to about 2 inches.
- With end of the craft stick, glue the head to the band in the center of the mop. Cover this with material, lace or ribbon. Make a skirt, using elastic, glue at waist. Glue doll hair around head. Add a hat, bows, beads, flowers or whatever you choose.
Read NextUkulele Upcycled Patriotic Wall Art
Your Recently Viewed Projects


![19 Temperature Blanket Ideas and Alternatives [FREE Patterns]](http://irepo.primecp.com/2022/11/540664/Temperature-Blanket-Ideas_Large400_ID-4977917.png?v=4977917)
Thanks for your comment. Don't forget to share!
Weberme
Dec 01, 2016
I Love Love Love her and I feel like all the people below. I can not follow these instructions without getting confused. Can Someone make this into a video please? She is so beautiful and looks so soft. I too would like to make one from yarn but do not know if it would look as pretty as this. I mean this mop doll is so stunning and any girl would love to have one. I wish I had one growing up. She reminds me of something a little girl would have way back in the old days. Anyone ever have a mop doll?
skysky239
Jun 05, 2015
I'm really having problems trying to understand what exactly needs to be done. I want to be able to make her so badly. If there was any way of doing a video or picture tutorial, I think that would be awesome!!! Also, I know that I personally would probably use yarn instead of a mop, and I'm sure others will want to do that as well. I was just thinking about possibly showing and/or describing the yarn option in another/the same post. She's so cute and I can't wait to try making her!!
bforrester
Jun 04, 2015
I really want to make one for my nieces, but I'm getting confused on making the head and attaching it, maybe some pictures to clear it up would help please??? (Brain is in "simplify mode" to make things easier for special needs son)
bforrester
Jun 04, 2015
Sorry I'm confused I want to make one for my nieces, but I keep getting confused, maybe add some pictures showing what to do especially around the head directions and the attaching part of it? (Brain is in "simplify mode")
cgj 2570022
May 20, 2014
I'd love to make one of these, but steps 4 & 5 seem to be reiterating the braiding of the arms. I'm thinking there were some typos here and there should be other directions in these steps? Could someone help?
FaveCrafts Editor JL
May 21, 2014
Hi there, There does appear to be a typo in the fourth step, but it seems you should simply braid the arms in the same way you braid the legs. We will update the project to make this more clear. Thanks!
Report Inappropriate Comment
Are you sure you would like to report this comment? It will be flagged for our moderators to take action.
Thank you for taking the time to improve the content on our site.