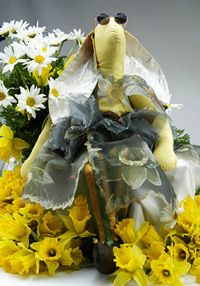
Homemade Rabbit Doll
The Daffodil Queen from Jacquard Products really captures my heart and makes me grin whenever I look at it. No one here at Jacquard can resist a smile when walking by Bert. We had the funny bunny doll blank in our boxes of stuff and I thought it would be cool to dress this bunny up for Easter!
I’d been dreaming up ideas for ExtravOrganza for some time (it’s my new favorite product!) and it’s perfect for this application.
Materials:
- Jacquard’s ExtravOrganza: 13 sheets
- Jacquard Neopaque: Brown
- Jacquard Lumiere: Pearl White, Sunset Gold, Metallic Olive Green
- One yard of 3" wide ribbon (I used a piece of Chinese Dupion painted with brown Jacquard Dye-Na-Flow)
- Bunny doll blank
- Thread
- Paintbrushes
- Needle
- Optional: Doll-sized spectacles, beads, narrow masking tape
Steps:
- Printing Images: For this project I used a copy machine to create the images on ExtravOrganza, but you could use a scanner and work with the images in Photoshop if you prefer. I gathered the quintessential flowers of Easter (daffodils and narcissus), tossed them on the copier, put in a sheet of ExtravOrganza, set to “photo” and hit start. Be sure to place a large sheet of paper or white fabric behind the flowers before you begin as you won’t be able to close the lid of the copier without squishing the flowers. The result is a wonderful image. Use any flowers you like. I can imagine so many projects using this one technique. Continue making copies of flowers loading the ExtravOrganza one sheet at a time. I used a total of 13 sheets: 5 sheets underskirt (copier set to enlarge at 200%), 5 sheets skirt top layer, 1 sheet for the neck piece (copier set to reduce at 75%) and 2 sheets for the sleeves (copier set to enlarge at 200%). Play around with reducing and enlarging the image to fit the size of doll you are working on. Do tests on plain paper first, writing the copier settings on them for reference as you go, so that you conserve the ExtravOrganza.
- Underskirt:
Remove paper backing from the 5 sheets of ExtravOrganza for the underskirt.
Crinkle the edge of the fabric and cut deckle edge as shown.
Paint edge with Lumiere in a color that compliments your flowers. I used Lumiere Pearl White tinted with Sherrill’s Sorbets Lemon and then accented the edge further with Lumiere Sunset Gold.
Highlight a flower with Lumiere. I decided to bring more attention to the daffodil so I used my combination of Pearl White/Lemon for this. Set aside. NOTE: I paint my ExtravOrganza on pieces of scratch paper. It’s very important to lift the ExravOrganza off the paper right away. The paints dry very quickly and could make the paper stick to the ExtravOrganza when you try to lift it off.
- Skirt-top layer:
Remove paper backing from the 5 sheets of ExtravOrganza for the top layer of skirt.
This layer of skirt is done as a flounce, rather than simple gathering. It adds more of a tutu effect which I find quite whimsical. To create this simple flounce fold the ExtravOrganza in half and then in half again.
Cut a small ¼ circle at the folded edges then cut open from one edge. The size of the circle dictates how dramatic your flounce will be. Experiment with some scraps of fabric.
Fringe the straight edges of the skirt pieces. I usually like tidy fringes but on this project I took a page out of Kim’s book and made them rather wild.
Paint the flower accents. I accented all the flowers on this layer using the same three Lumiere colors: Sunset Gold, Pearl White and Pearl White/Lemon. Set aside.
Sleeves and neck piece. The sleeves are made by enlarging the flower image, the neck piece by reducing the image. BEFORE removing the paper backing, cut out the large flower or selection of flowers. I find it easier to see the edges of the flower shape before I take it off the paper and I can get more precise detail. (I recently did another project and forgot to leave the paper on—it was SO much harder to cut out!) It’s always a good idea to leave more flowers, only trimming away what you’re sure you don’t need at this time and check it on your doll form, you can always cut more away if you need to. When you are happy with these pieces pull the paper backing off and paint accents with Lumiere. Set aside.
- Paint the bunny. NOTE: Let each color dry before applying next color.
Start by painting the bunny from the waist up. I used Sherrill’s Sorbets Lemon for this but you can choose any color that compliments the flowers you printed on the ExtravOrganza. Remember that you can thin the paint up to 25% with water if it’s too thick right out of the bottle. Paint the outside of the ears with the body color and use a contrasting color for the inside (My choice: Lumiere Pearl White).
Paint the feet with Neopaque Brown or other color of your choice.
Paint the stripes on the legs. My colors were Lumiere Sunset Gold and Metallic Olive Green. I painted the stripes free hand, but here are a few tips to make things easier: begin by painting the legs one color up to the waist and to the brown at the feet. It would probably be a good idea to test your color choices to find out which one should go on top, as one may cover better than the other. When the first layer is dry mask the stripes with tape and paint the second color. Let dry and remove the tape. Create a decorative edge (like a scallop or a point) where the stripes meet the feet at the ankle. You don’t need to do anything special at the waist since it will be covered by the skirt and a ribbon applied at the end.
- Sew on the skirt. Do one layer at a time, this adds more poof at the waist which in turn increases the overall whimsy of the project.
Using the 5 pieces for the underskirt, run a gathering stitch (by hand or machine) on each piece of ExtravOrganza. I gathered mine by hand on the short edge for a longer underskirt.
Whip-stitch the bottom layer of the skirt onto the bunny at the waist.
Do the same for the 5 pieces of the top layer, running the gathering stitches on the edges where you cut the circles and whip-stitching to the doll at the waist.
- Sleeves and neck piece:
Hand stitch the large ExtravOrganza flowers for the sleeves at the shoulders.
Hand stitch the small ExtravOrganza flowers for the neck piece at the shoulders and in the back.
- Embellishments:
Attach the ribbon at the waist by gathering and sewing beads at even intervals to cover the whip stitching. Tie a big bow in the back.
Sew bead accents on the toes.
Attach spectacles by hand stitching at the ears.
- Now Bert, our Daffodil Queen, is all ready for the Easter Parade!!!
Read NextDIY Paint Pen Coffee Mugs
Your Recently Viewed Projects

Thanks for your comment. Don't forget to share!
Marilyn B
Mar 10, 2017
Has anyone made this adorable bunny? A friend of mine created a similar bunny sewing a plain muslin body and then a pinafore dress apron over it. The body was similar to this one, but this one has a lot more embellishment! The instructions are great and involve some wonderful creativity! Thanks so much for sharing!
Report Inappropriate Comment
Are you sure you would like to report this comment? It will be flagged for our moderators to take action.
Thank you for taking the time to improve the content on our site.