Custom Explosion Boxes
 Check out these custom explosion boxes you can use to hold a present for a birthday or special occasion. Put a surprise inside for an explosive gift!
Materials:
- The Ultimate Crafter's Companion
- Piece of cardstock (varies depending on size of box)
- Scissors and/or paper trimmer
- Glue
- Decorative paper or extra cardstock
Preparations:
- The first thing we’ll need to figure out is what size explosion box you would like to create. The easiest box to make is a cube and is recommended for this project, but as you get a little more experienced you can play around with odd shaped boxes as an alternative.
- Using these supplied directions you can create explosion boxes as small as a 1” cube all the way up to a 3 1/2” cube in 1/2” increments.
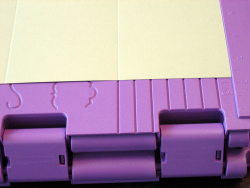
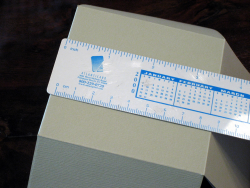
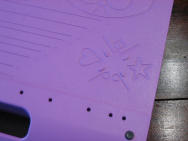
- We will be making a 3 1/2” cube explosion box in this project example. We will be using the “Box Lid” portion on the box making side of the Ultimate Crafter’s Companion Tool. See picture to the right. If you were to measure the spacing between each of these lines, you would notice that they are exactly 1/2” from each other and exactly 1/2” from the edge. This will be important to know as we decide which line to use when scoring our box and matching lid. See example to the right. with measurements shown for each score line.
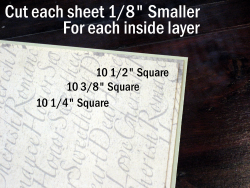
- Now that you know what size box you want to create, here’s how you figure out what size cardstock to start with. It’s really quite easy. To figure out the starting cardstock size just take the size boxyou want to make and multiply this number by 3. So, if you want to make a 2” cube box you would start with a piece of cardstock that is 6” Square (2” x 3 = 6”). I’ll be making a 3 1/2” box, so I am going to start with a 10 1/2” square piece of cardstock (3 1/2” x 3 = 10 1/2”)
Step 1
Once you’ve figured out what size piece of cardstock to start with you will then need to decide how many inside layers you will want. I’ll be making 2 additional inside layers, so I will need 2 additional sheets of paper or cardstock. I’ll also be using paper instead of cardstock because I liked what I had laying around design-wise and the outside piece I’ve cut using cardstock will give my box stability.
Take one of these sheets and cut it down to 1/8” smaller than your original sheet of cardstock (10 3/8” Square). Take the last sheet and cut it down to 1/4” smaller than your original sheet of cardstock (10 1/4” Square). You should now have 3 sheets of paper or cardstock that are 1/8” different in size.
Step 2
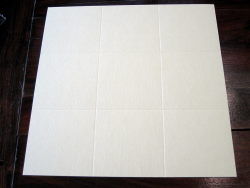
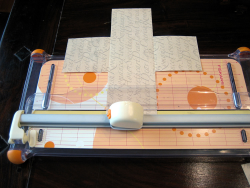
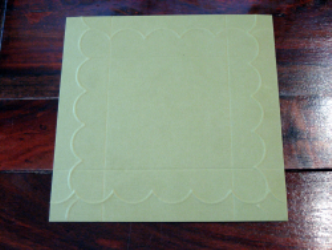
Since we are making a 3 1/2” cubed explosion box, we will now need to score the outside layer of our box (10 1/2” square sheet of cardstock) so that we end up with 9 equal sections (3 1/2” per section).
To do this, line up your piece of cardstock up against the top of the board labeled “Box Lid” and score using the 7th line down. The 7th line down is exactly 3 1/2” from the edge of the board (1/2” x 7 = 3 1/2”). Score the same line on all 4 sides of your paper. Take the remaining 2 sheets of paper or cardstock you are using and repeat this same process, using the 7th line down.
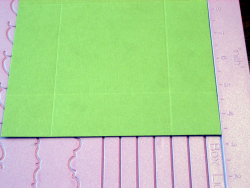
Step 3
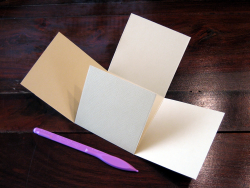
Your 3 sheets of paper or cardstock should now look exactly like the picture to the right, comprised of 9 sections, similar to a tic-tac-toe board.
Step 4
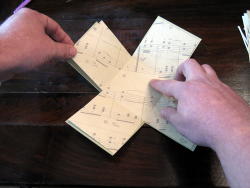
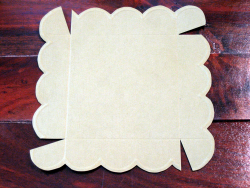
Using the scored lines as your template, cut out the corners of all 3 sheets of your paper or cardstock.
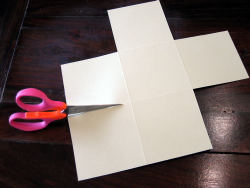
You should end up with 3 pieces that resemble plus signs.
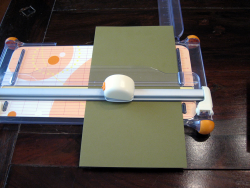
Step 5
Using scissors or a paper trimmer, cut 1/8” off the 4 ends of your 10 3/8” piece and 1/4” off the 4 ends of your 10 1/4” piece of paper or cardstock.
You should now have a graduated stack of paper or cardstock, with each subsequent layer being 1/8” less than the one below.
Step 6
Fold in each of the corners on all 3 sheets of paper or cardstock
Step 7
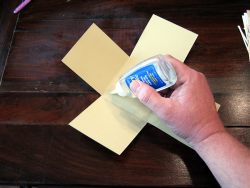
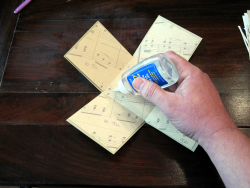
Apply glue to the middle square of your outside piece of cardstock. (10 1/2” piece)
Step 8
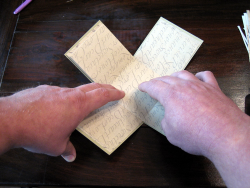
Adhere your second piece of paper or cardstock to the first. (10 3/8” piece)
Step 9
Apply glue to the middle of this assembly.
Step 10
Adhere your last piece of paper or card-stock to your other two assembled pieces. (10 1/4” piece)
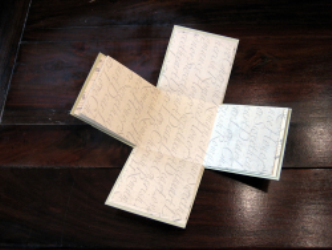
Step 11
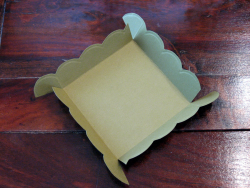
Your finished box should now look like this.
Step 12
If you measure the bottom of your box you will notice that it is exactly 3 1/2”. This is the size lid you will want to create.
Step 13
To figure out what size cardstock to use for the lid, you will need to ask yourself how deep you want your lid to be; or in other words, how far down you want your lid to hang over the top of the box. In this project I want it to hang down 1 1/2”.
To figure out what size piece of cardstock to start with I will need to add the size of my box base (3 1/2”) to the depth of the box lid, multiplied by 2 (1 1/2” x 2 = 3”). I’ll then add 1/16” to this final number to give my lid a bit of breathing room. Here’s the formula to make it easy for any size square lid:
(Size of the base of your box) + (Depth of your lid x 2) + 1/16” ie. (3 1/2”) + (1 1/2” x 2) + 1/16” = 6 9/16” Square.
Armed with this information I will now cut a piece of cardstock.
Step 14
Since we have decided to make our lid 1 1/2” deep we will now need to score lines on all 4 sides of our cardstock at exactly 1 1/2” from the edge. Knowing that each line on the “Box Lid” side of our board are exactly 1/2” apart we now know that we will need to score the 3rd line down.
Step 15
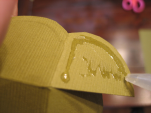
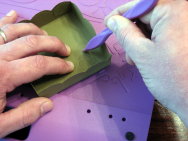
To add a little interest to our lid I have decided to add a decorative embossed edge. To do this I’ll flip the board over to the card making side and dry emboss each of the 4 sides as shown.
When you’re finished, your lid should look something like this.
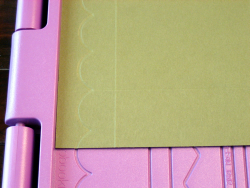
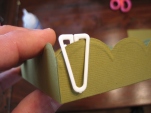
Step 16
Trim out a relief in each of the 4 corners as shown to the left using the scored lines from step 14 as your guide. Detailed instructions for assembling a box lid are located in the instruction manual if you need further information.

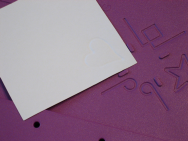
Step 17
Now, using the decorative embossed edge as your guide, use a pair of scissors to cut just to the outside of your embossed design. Your finished piece should look like the one shown to the right.
Step 18
Fold along all of your score lines, including the flaps that will fold in to secure the edges of your box.
Step 19
Tuck in the flap on each edge and inspect how they meet up with each other.
If the flap shows through the edge of the box, take a pen or pencil and mark the excess.
Using a pair of scissors, trim just inside the marking you just made.
Once you have fitted all of your flaps, use a wet adhesive as shown to put your box together.
It’s also a good idea to use paper clips in the corners while your glue sets.
Step 20
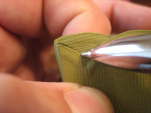
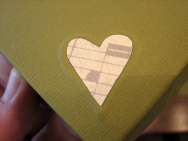
As a final touch to my box lid I decided to add an embossed heart with a paper insert. To do this I flip my board over to the envelope making side of the board.
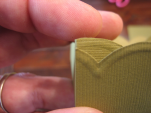
Put a corner of your lid into the upstands for the heart and dry emboss.
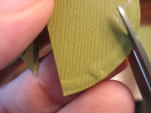
Next, I took a piece of scrap paper left over from one of the layers of my box and embossed the same heart.
Using a pair of scissors cut this embossed heart out, being sure to cut inside the embossing. This will allow it to fit inside the embossed heart you made on your lid. Use a wet adhesive to glue it on and you’re done! I also used some extra cardstock and paper to add a message on the top of the box as well as another larger embossed heart inside.
Final Note:
To make explosion boxes bigger than what I’ve detailed previously you will still need to follow the basic rule of tripling the finished cube size of your box (ie. To make a 4” cube box you need to start with a piece of cardstock that is 12” Square (4 inches x 3 = 12 inches)). The next all important step is to make sure that a scoreline exists on the board to score the dimension in “Step 2” of these directions. In the case of a 4” box, you would use the line labeled “Half-Fold 8x8” on the card making side of the board.
Read NextNo Sew Fabric Bookmarks
Your Recently Viewed Projects
Thanks for your comment. Don't forget to share!
artfully altered
Jul 20, 2010
why is there never a picture of the finished project.?? it is so frustrating!
Crafter 4052413
Apr 10, 2010
I have been making these for years and they are just as much of a presentkeepsake as the gift inside. I really enjoy using contrasting bright colors for kids and funkier patterns for teens. This box is so much fun, I have even tried and succeeded with other shapes too! I never called them the explosion box but that does work, since when they are opened up they just fall away.
armanarocks
Apr 01, 2010
This project won't be used as you don't have a picture of what the finished project is supposed to look like. We can't read your minds. Creative people are usually visual learners and won't attempt things without a good illustration. The last bits of instructions need pictures too.
Crafter 3942735
Apr 01, 2010
the pictures from 9 through the end didn't show up. they would have helped I am sure.
Report Inappropriate Comment
Are you sure you would like to report this comment? It will be flagged for our moderators to take action.
Thank you for taking the time to improve the content on our site.

![Pill Bottle Crafts: Reuse Pill Bottles [15 Ideas]](http://irepo.primecp.com/2017/06/334076/PILL-BOTTLE-CRAFTS-Header_Category-CategoryPageDefault_ID-2274135.jpg?v=2274135)