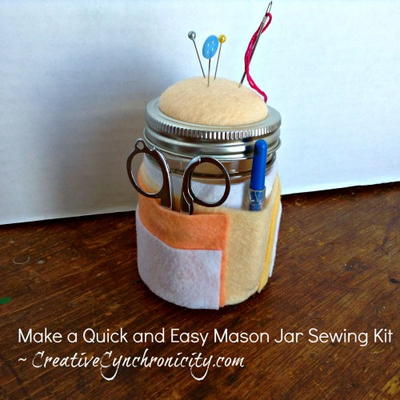
DIY Mason Jar Sewing Kit
This sewing kit in a jar will make your life so much easier.

Learn how to make a pincushion jar and use it for all your on-the-go sewing needs. This stunning project is the perfect gift for a bride or for Mother's Day.
Mason jar crafts like this one are easy to make and eye catching! You'll work with felt to create pockets for easy storage, and you'll learn how to make a homemade pin cushion that attaches to the lid.
Whether you need to make a quick repair to a garment or you want to hand sew a quick project, this darling DIY travel sewing kit is a handy option for your crafting needs.
Watch the video tutorial:
Time to CompleteUnder an hour
MaterialsFelt, Glass, Recycled Materials
Project TypeMake a Project
Materials List
- Felt or fabric
- A bit of polyester stuffing
- Mason jar with lid and ring
- Glue or needle and thread (or use a sewing machine)
- Scissors (a pair of tiny ones can come in handy for trimming and a rotary cutter can be great for cutting out the pockets)
Instructions
-
Wrap your first piece of felt around the Mason jar to get your basic measurement for the sleeve. (You can use measuring tape too if you'd prefer.) Cut to size for your base piece.
-
Create one long pocket that goes all the way across the sleeve. This is a great place to store little threads or packets of needles. Glue along the sides and bottom edge.
-
Create smaller pockets to adhere to the outside of the sleeve. These pockets can be different sizes and can store things like little scissors or your seam ripper. Experiment with the layout of where you want your pockets to go on the sleeve, then glue them down on the side edges and bottom edge.
-
Note: If you're sewing the pockets instead of gluing them, make sure you start with the outside layers and work your way in so you don't accidentally stitch down the middle of the big pocket.
-
For the pincushion lid, add a wad of polyester filling to the top of the lid, then take a piece of felt that's a bit larger than you need and wrap it around the filling and the lid. This will create the shape of your pincushion. Then take the ring that comes with the lid and shove the felt, filling, and lid base into the ring to create the pincushion. Trim the felt down so there is only a slight bit of excess, then glue this felt to the back of the lid to hold everything in place.
Find more projects from Cyn at creativecynchronicity.com.
Why You'll Love This Recycled Craft
Are you ready to dive into the world of mason jar crafts and sewing? Here are the top 3 reasons why you should make the DIY Mason Jar Sewing Kit:
1. Practical and Portable: This craft project is not only stylish, but it's also functional! The mason jar serves as a convenient storage container for all of your sewing essentials, while the attached pin cushion makes it easy to quickly grab a pin when you need it. Plus, the compact size makes it perfect for on-the-go sewing needs, whether you're traveling or just working on a project in a different room.
2. Personalized Gift Option: Looking for a thoughtful and handmade gift idea for a bride-to-be or for Mother's Day? Look no further than the DIY Mason Jar Sewing Kit! You can customize the colors and fabric patterns to suit the recipient's style, making it a unique and special present that they are sure to love. It's a great way to show your loved ones that you care by giving them a practical and beautiful gift.
3. Easy and Budget-Friendly: With just a few simple materials and a little bit of time, you can create your very own Mason Jar Sewing Kit without breaking the bank. This project is perfect for crafters of all skill levels, from beginners to experienced makers. Not only is it a fun and rewarding project to work on, but it's also a budget-friendly option for those who want to create something unique and useful without spending a lot of money.
So what are you waiting for? Gather your materials, watch the video tutorial, and get ready to create your very own DIY Mason Jar Sewing Kit today!
Who first taught you how to sew?
Read NextCitrus Bath Salts Gift in a Jar
Your Recently Viewed Projects
Thanks for your comment. Don't forget to share!
Delphine Bryant
Nov 07, 2018
This is a great last minute gift project. I like the use of the felt because it makes the assembly so much easier. However I do not think it will stand the test of time with use. The items included in this photo can easily be found at the local dollar store so this would be something for a group project to complete on an assembly line process.
Morehouse17
Oct 31, 2018
I love mason jars and each new post I run across with a reason to use them I jump right on it. I have a stash that seems endless and being able to put them to use makes me happy. Right now a lot of my mason jars are empty because I did not do any canning this year so this is a great chance to use a couple of them.
msdeb21
Mar 13, 2018
I love this idea for a mason jar. I am going to make this for a family member who just bought a new house. She is planning on making one room her sewing room, and this would make a cute house-warming gift that she would use. Thanks for such a clever idea!
Report Inappropriate Comment
Are you sure you would like to report this comment? It will be flagged for our moderators to take action.
Thank you for taking the time to improve the content on our site.