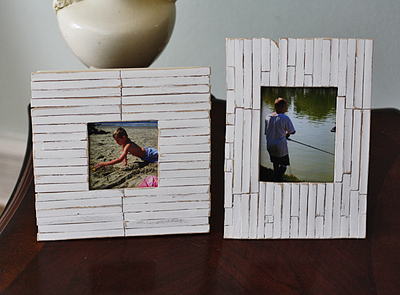
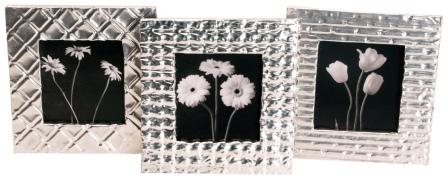
Embossed Metal Frames
In this picture frame craft, embossed sheets of aluminum cover a piece of foam core board for a lighter frame with textured metal designs. Create a grouping of three with different embossing designs for a mantle or table.
Materials:
- Walnut Hollow® Creative Metal Lt. Aluminum Metal Roll, 2 Sheets #27997
- Walnut Hollow® Creative Metal™ Design Sheets- A #28074
- Walnut Hollow® Creative Metal™ Mats- 8x10” #28009
- Walnut Hollow® Texture Tool #28079
- Walnut Hollow® Creative Metal™ Tape #28016
- Walnut Hollow® Creative HotKnife™ #26035
- Walnut Hollow® Glass Mat #25653
- 1 Sheet Foam Core Board (enough to cut 3 – 5” square pieces)
- 1- 12” Sheet Cardstock
- Other Supplies: 3 photos, aluminum foil tape (used for sealing duct work), blue painter’s tape, craft knife, metal ruler, pencil
Instructions:
- Use pencil and ruler to draw three 5” squares onto foam core board. Measure 1” from each edge of square and again mark with pencil.
- Attach HotKnife blade into the Creative HotKnife™. Plug in the HotKnife™ and turn switch to “On”. Either place foam core board on glass mat or hold board in one hand and cut with the other. Cut on traced pencil lines creating a frame shape with opening. When finished, turn switch “Off”. Unplug tool.
- Use scissors to cut three 5” aluminum squares the same size as the cut foam core squares.
- Use blue painter’s tape or masking tape to hold one Metal square onto Design Sheet. Using the Texture Tool, rub over the Metal to reveal the image. The Metal can be turned back and forth on the Acrylic Mat, embossing and debossing the image until the desired effect is achieved.
- To adhere embossed Metal square on foam board frame, use Metal Tape. Cut Tape into pieces that are the same length as each edge. Affix Tape to back of square, remove backing from Tape and press onto the foam board frame.
- Use craft knife to cut an X through metal within the frame opening. Bend metal to the back side of frame, and secure with Tape. Trim ends if necessary.
- Center photo to the back of frame and adhere with Metal Tape.
- Wrap raw edges of frame with aluminum foil tape.
- Cut three 4 ½” pieces from cardstock and adhere to the back of the frame.
- Repeat steps 1-9 using the remaining Design Sheets.
Read NextDistressed Painted Frame