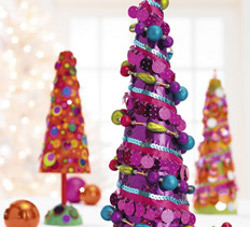
Dazzling Christmas Centerpiece
Create this Dazzling Christmas Centerpiece using Styrofoam and glitzy garlands. Take your Christmas party up a notch with fun Christmas crafts. The fun colors and unexpected design will bring so much holiday cheer into your home. If you're looking for Christmas decorations to make for a party, this is the perfect project. Sequins bring the tree to life and add a bit of holiday sparkle to any space. Best of all, there are two kinds of trees you can make, so once you finish one, you can make another one that's completely different and unique. No matter what, you'll have a fun and exciting time creating your centerpiece.
Materials:
Garland trees:
- Two 12" craft foam cones
- Wrapping paper
- 3-4 ft. ribbon & sequin garland to coordinate with paper
- 1" sequins to coordinate with garland
- 3-4 ft. beaded garland in coordinating colors
- Two sets of 3 round beads in graduating sizes
- Optional: 1" round punch
Sequin tree:
- Craft foam shapes*: 9" cone, 4" ball
- Fabric fat quarter
- Scrap green fabric
- Flat round sequins to coordinate with fabric: 1", 3/4", 1/2"
- Round-headed straight pins in various colors
- 7/16" X 5" wooden dowel
- Red acrylic paint
- Green acrylic paint to coordinate with fabric*
- 1" paintbrush
- Compass
- Serrated kitchen knife
For Both:
- Craft pins
- White craft glue
- Low-temp hot-melt glue gun & glue sticks
Instructions:
Garland Trees
- Cover cone with paper. Trace and cut pattern from wrapping paper. Use white craft glue and craft pins to attach paper around cone. Fold down excess at top and glue in place. Option: For a more finished look, punch out one 1" circle from remaining paper and glue to top of cone.
- Add garland. Attach end of ribbon & sequin garland to top of cone with pins. Wind around cone to the bottom, pinning as you go to cover cone. Cut excess from end, being sure to tie off cut ends. Glue top and bottom ends securely with hot-melt glue.
- Fill in spaces. To fill in any blank spaces on cone, pin and glue on additional large sequins or garlands.
- Finish. Use hot-melt glue to attach a stack of three beads to top of cone.
Sequin Tree
- Preparation. Use serrated knife to cut 4" craft foam ball in half. Use pattern to cut out green fabric. Glue in place to cover one half. Set aside other half for a future project. Option: Paint one half-ball with green acrylic craft paint. Paint dowel with red acrylic craft paint. Set aside base and dowel to dry.
- Cover cone with fabric. Use pattern to cut out fabric of your choice. Leaving about 1/2" at top, wrap fabric around 9" craft foam cone and attach with white craft glue and craft pins. Fold, glue, and pin fabric to cover top of cone. Glue excess fabric to bottom of cone. For bottom, cut out a 3 1/2” circle of fabric. Fold in half and cut small hole in center of folded edge for dowel. Unfold fabric and glue to bottom of cone.
- Add base. Use hot glue to glue dowel into bottom of cone and center of base, leaving a 2 1/2" piece showing between pieces.
- Finish. Use straight pins to attach sequins as you like. Layer smaller sequins on top of larger sized sequins for interest.
Read NextDiy Dollar Store Mickey Cake Plate
Your Recently Viewed Projects

Thanks for your comment. Don't forget to share!
Marilyn B
Nov 08, 2017
This project is quite impressive, I really like the look of it! You can get some really pretty paper at thrift shops and one of a kind close out shops, or even use remnants of pretty wallpaper or fabrics! I could also see gluing on some pretty crystal or rhinestone buttons as ornaments! Add a battery strand of tiny rice lights for more sparkle.... Looks great!
Shari Elaine
Dec 09, 2010
These are so cool, they remind me of the store displays in the 60's. Thanks.
Report Inappropriate Comment
Are you sure you would like to report this comment? It will be flagged for our moderators to take action.
Thank you for taking the time to improve the content on our site.