This project was submitted by one of our readers, just like you.
Turkey Pudding Cups

Turkey Pudding Cups
"These Turkey Puddings are a fun dessert idea to display on a Thanksgiving table. Plus, they are so easy to make, kids can help too!Pudding cups like these make the perfect holiday treat because they are inexpensive to make and best part – they are sealed. That means you can make them ahead of time!My kids truly enjoy making these fun crafts and in the end, they are left with a fun treat too. It’s a win-win!"
Primary TechniqueGeneral Crafts

Materials List
- Butterscotch Snack Pack Pudding Cups
- Pencil
- Brown Foam Paper
- Red Foam Paper
- Yellow Foam Paper
- Orange Foam Paper
- Googly Eyes
- Hot Glue
- Scissors
Instructions
-
Start by taking your red and yellow foam paper and trace a hand print on each one. Try using small hands like children’s hands and if you can, use two different hands to make two different sizes.
-
Now, cut out both hand prints and glue the smaller one on top of the bigger one. This will be the turkey’s tail.
-
Next, cut out two feet with three toes on each with the orange foam paper.
-
Take your brown foam paper and cut out a peanut shape. This will be our turkey’s head and neck.
-
Now you will want to cut out a small circle shape with a teardrop shape hanging on one side of the circle using red foam paper. This will be the turkey’s gobbler.
-
Then take some yellow foam paper and cut out an upside down teardrop shape. This will be the beak.
-
Now to assemble the head, start by gluing the red beak part onto the brown peanut shape in the center of the upper half of the shape where the head would be. Then glue the yellow upside teardrop on top of the red beak part. Then glue two googly eyes above the beak.
-
Finally, it’s time to put the whole thing together. Start by taking your pudding cup and glue the two orange foam paper feet along one of the edges of the top of the cup (turn the pudding cup upside down so the opening is at the bottom). Make sure they stick out over the edge a bit.
-
Now flip the cup over and glue the handprint tail feathers onto the back of the cup opposite side of the feet.
-
Finally, glue the head and neck part onto the front of the cup above the feet.

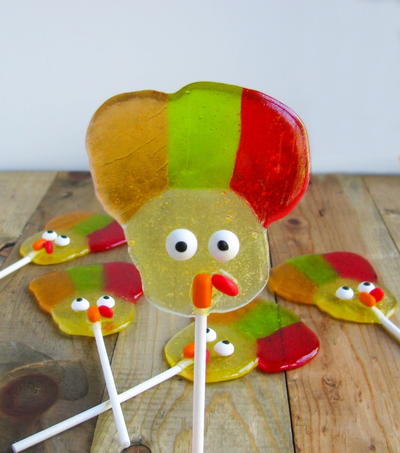
Read NextTurkey Suckers