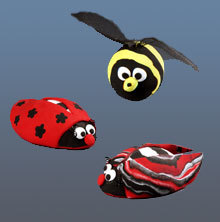
Clay Magic Bugs
Don't squish these bugs. Your kids can help you craft these magic clay bugs. Using clay and modeling compound you can have your decoration in a few steps. For more great summer crafts for kids, check out our Free Summer Crafts for Kids eBook.
Materials:
- STYROFOAM™ Brand Foam Products:
- Eggs, one each: 4" (ladybug); 3" (bee)
- Air-dry modeling compound: black; red; white; yellow
- Window screening, 3" x 7"
- Serrated knife
- Plastic-coated craft wire, Black
- Mini flower clay cutter
- Pencil
- Paraffin or candle stub
- Plastic-coated paper clip, Black
- Ruler
- Rolling pin
- Scissors: regular and/or decorative-edge (optional)
- Wire cutters
- White, thick craft glue
Instructions:
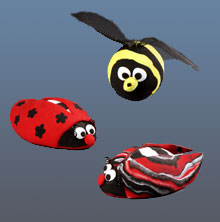
Ladybug
- Wax serrated knife with candle stub or paraffin. Cut 4" foam egg in half lengthwise; set aside one half-egg. (NOTE: This step is not for children; an adult should be available to cut with a serrated knife.)
- Use rolling pin to roll 2" ball of red modeling compound to 1/8" thickness, turning several times to prevent sticking. Place one half-egg cut side down on compound; cut compound slightly larger than egg.
- Roll four 1" balls of black compound and three 1" balls of white compound; roll each ball into a log. Beginning with black, place alternating logs close together on work surface. Press logs together and roll to 1/8" thickness, large enough to cover top of egg. Drape compound over egg; trim excess. Press edges together to seal.
- For flowered wings, roll 2" ball of red and 1" ball of black to 1/8"-thick circles. Use clay cutter to cut several flowers from each circle; replace cut-outs in red compound with black cut-outs. Gently press compound together.
- For marbled wings, roll 1" balls of white, black and red into logs; twist together. Fold in half and repeat until desired effect is achieved. Roll compound to 1/8"-thick circle.
- Cut one end from wing circle, then cut circle in half. Refer to photo to press wings to body, slightly separated and leaving head exposed.
- For face, roll small amounts of white and red compound into tiny balls for eyes and nose as shown; press to head. Add small black dots to eyes; press to secure.
- Cut two 3" wire lengths; wrap wire around pencil to curl. Glue wire ends into head for antennae; let dry. When dry, spot glue eyes and nose to head to secure as needed.
Bee
- Repeat ladybug Step 3, using yellow compound in place of white. Roll compound out large enough to wrap around entire 3" foam egg.
- Beginning at wide end (face), wrap compound around egg. Do not stretch compound too tightly; it will shrink during drying process. Press seam together; use scissors to trim excess. If any foam is visible at small end of egg, add circle of black compound; press to foam.
- Refer to photo. Repeat ladybug Step 7 to create face, using yellow compound in place of red.
- Fold screening in half. Use decorative-edge or standard scissors to cut teardrop-shaped wing on fold. Unfold wings. Cut paperclip in half; dip ends into glue. Use paperclip to attach center of wings to body.
- If necessary, spot glue eyes and nose to head to secure.
®™ Trademark of The Dow Chemical Company ("Dow") or an affiliated company of Dow. For more project ideas, please see styrofoamstyle.com.