DIY Window Clings for Kids
My kids love all of those craft kits you can pick up at Michael's or Target. I love them too, until it's time to pay for them, those puppies can be expensive! One such favorite activity is making window clings.
Follow this quick and easy tutorial that will not only save you money, but let your kids' creative juices flow.

Materials:
- White glue
- Ziploc baggies
- Food coloring
- Coloring book pages
- Plastic slide-in page protectors
- Scissors

Steps:
- Fill the corner of your baggie with glue and add a few drops of food coloring.

- Seal the baggie and begin to squish the glue and food coloring together to mix. The kids especially like this part! (Don't worry if the color is a bit pastel, the glue dries clear so the color will be more brilliant once dry.)

- Here are our mixed colors:

- Choose a coloring book page with a simple design (or use a design you draw yourself) and slide the page into the plastic page protector.

- Snip the very corner of the baggie with your scissors.

- I like to begin with a black outline first...(BUT I'm not a squirmy 7 year old who needs immediate gratification in the crafty projects. If you choose to move ahead before it's dry, the world won't come to an end.)

- Now cut the corners from your other colors and fill in the spaces by squeezing the glue into the black outline. This doesn't have to be perfect! Swirl it! Drip it!

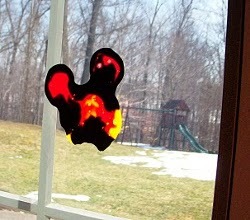
- Allow your cling to dry overnight. Once dry, peel the glue design off the plastic page protector and place it on your window! Ta da! (And I believe you might be out less than 2 bucks. Bonus!)
Read more about Jennifer, a Featured Craft Designer at FaveCrafts!
Read NextRainbow Perler Bead Pattern
Your Recently Viewed Projects
Thanks for your comment. Don't forget to share!
cyrillanicholson
Feb 13, 2012
This did not work... what did I do wrong? It just dried up and curled off the paper. I am so upset I wasted 3 large bottles of glue and countless drops of food coloring.
mychompers
Apr 14, 2010
This is Sooooo cool. My girls class will love this! and we can now make our own decorations for the windows. Thanks Missy
another northern c rafter
Apr 14, 2010
This looks like fun and will not be too difficult for young children. I think we'll give this a try at our 4-H camp. Thanks for the idea. We're always trying to find crafts that the children will enjoy but are not too expensive.
Report Inappropriate Comment
Are you sure you would like to report this comment? It will be flagged for our moderators to take action.
Thank you for taking the time to improve the content on our site.