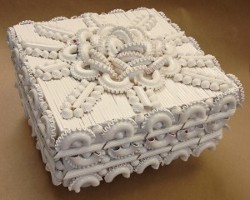
Keepsake Storage Box
Photo and memento storage can be beautiful with a few inexpensive supplies and rich colors of spray paint. This project from Krylon is great for anyone!

Materials:
- Krylon Indoor/Outdoor Paint - Georgia Clay (#53531)
- Krylon Indoor/Outdoor Paint - Hosta Leaf (#53541)
- Krylon Leafing Pens - Copper (#9903)
- Krylon Spray Adhesive - Clear (#7010)
- Square papier mache box with lid
- Tissue paper
- Copper colored decorative buttons
- Brown kraft paper
- Tag board or other heavy paper
- Decorative edge scissors
- Scissors
- Ruler
- Pencil
- Craft knife
- Low temp glue gun
Steps:
- With craft knife, cut through two adjacent corners on box lid so one side on lid resembles a flap. Flap should move easily. If stiff, carefully slice paper on inside of lid. This flap later creates a hinge.
- Crumple tissue paper then open flat. (Do not smooth out creases). Spray box and lid with Adhesive. Press tissue paper onto sprayed areas, creating a textured surface on box. Use small pieces (ripped, not cut) to cover all edges.
- Spray box and lid with Hosta Leaf, getting paint into all creases created by crumpled tissue paper. Let dry.
- Place lid on box. Using glue gun, glue only the flap on the lid to the box. Lid should lift with flap acting as a hinge.
- To make ribbon, cut piece of kraft paper twice the width you want the finished ribbon. For length, measure around box and add 4". Spray paper with Georgia Clay. Let dry. Fold in both long sides of paper to desired ribbon width. Open up folds and coat inside with Spray Adhesive. Fold back; press down flat. Fold over one short end of ribbon about 1/2"; glue in place. Use Leafing Pen to edge all folds on right side. To make bow, cut kraft paper same width as before, the length twice as long as you want the finished bow. Follow directions above for ribbon, but do not fold over the ½" edge. Bring each end to the center, overlapping ends approximately 1/2". Secure ends with hot glue, then glue to center of bow. Turn bow over to the right side. For center of bow, cut a piece of kraft paper half the width of ribbon, long enough to wrap around center of bow. Spray, fold and trim edges as above. Wrap around center of bow and glue. Set aside.
- Open lid. Glue ribbon down center front of box, wrap around bottom and over lid. Fold under inside of lid and glue, leaving a tag 1" to 1 1/2" long hanging down. Glue bow to tag. Glue buttons to bow and ribbon.
- To make corners, measure one side of lid. Cut four pieces of tag board twice the width of the lid’s edge. For example, if the edge is 1/2" wide, cut four pieces 1" square. Score each piece into quarters. Cut out one quarter on each piece. Use decorative edge scissors to trim remaining three quarters; color with Copper Leafing Pen. Glue to each corner of lid. Leave cut edge open on back corners so lid will open.
For more project ideas, please visit www.krylon.com/projects.
Notes:
To make this free craft pattern, we recommend the following materials. They are available for a discount at CutRateCrafts.com.
Read NextTin Can DIY Organizer