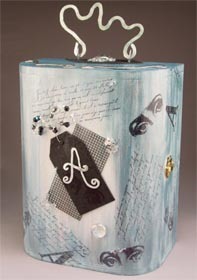
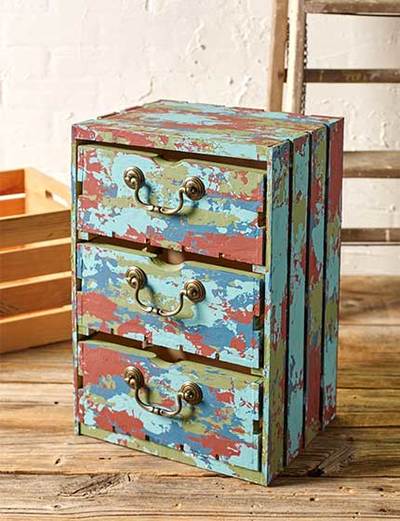
Treasure Box
Create an altered art treasure box from AMACO, made with embossed metal, stamp art and wire form.

Materials:
- AMACO® Rub ’n Buff® — Antique White, Pearl Blue
- AMACO® ArtEmboss® Pure Metal Sheets — Matte Black, Light
- AMACO® WireForm® Woven Metal Mesh — Modeler’s Mesh – Black Aluminum 8 Mesh
- AMACO® WireForm® WireRod Modeling Wire — 1/16" and 1/8" Diameter
- AMACO® Fun Wire™ — Clear/Silver (24 Gauge)
- AMACO® Metal Stamp Art Ink Pad — Black
- AMACO® ArtEmboss® Tool Set
- Therm o Web: Peel and Stick Double-Sided Tape Sheet
- Rubberstamps: Hero Arts: Old French Writing (#H2365), Large Eyes (#8002E) , Reverse A2 (#8595F)
- Nicole™ Domed Wood Box (#WOD11040S)
- Clear Embossing Powder
- Acrylic Spray Sealer, Matte Finish
- Drill Equipped with 1/8" Drill Bit
- Soft Cloth
- Hammer
- Round Nose Jewelry Pliers
- Wire Cutters
- Small Crystal Clear Glass Bead Mix
- Clear Glass Gem
- Ruler or Craft Stick
- Scissors
- 1/16" Hole Punch
- Heat Gun
- Card Stock
- E6000 Glue
Steps:
- (Handle) Bend 1/8" WireForm® WireRod Modeling Wire to shape a handle. Cut excess wire then hammer flat. Drill 1/8" diameter holes in top of box; coordinating with handle ends. Lightly sand. Wipe wood with tack cloth. Create “eye” hooks to attach handle to box using a 6" length of 1/8" modeling wire. Bend a loop at each end, hold at center and hammer loops only. Cut at center to create the two “eye hooks” as needed. Slip onto looped ends of handle.
- Apply Antique White Rub ’n Buff® to box, inside and out, then buff. Lightly apply Pearl Blue highlights. Buff again then let dry. Spray with acrylic sealer.
- (Stamp box) Cut a 2" x 41/2" piece of card stock. Clip corners on one end to create tag shape. Cut a 21/2" x 5" piece of Black ArtEmboss® pure metal sheet (1/2" larger than tag used). Stamp metal, apply embossing powder, shake off excess powder, then heat to emboss. Apply double-sided tape sheet to one side of cardstock tag. With sticky side down, center tag on back side of stamped metal. Beginning at corners, fold metal edges around tag. Punch a 1/16" hole at top.
- (Embellish) Cut a 7" length of Clear/Silver Fun Wire™, insert through punched hole in tag and twist to secure. Slip beads on remaining wire lengths; bending a loop at ends to secure beads. Bend 1/16" modeling wire to create your first initial (shown here “A”), hammer flat then glue onto tag. Lay flat until glue sets.
- Cut a WireForm® Black mesh piece same size as tag. Glue to front of box with tag on top. Apply thick dots of glue at corners of mesh then coat by sprinkling bead mix onto the adhesive. Press beads lightly into glue to ensure good contact. Lay flat until dry.
- (Finishing touches) Cut a WireForm® Black mesh square large enough to cover holes drilled at top of box when placed askew. Open box. Bend mesh over back of box and around inside box edge. Apply dot of glue to each “eye” hook end, insert through mesh and drilled holes at top of box. Use jewelry pliers to bend “eye” hook ends on inside of box to secure. Apply thick dot of glue to center of mesh then adhere glass gem and bead accents. Glue bead accents randomly on box.
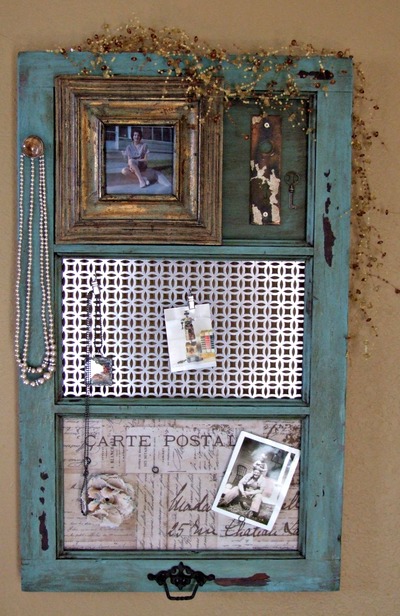
Read NextDIY Vintage Window Frame Organizer