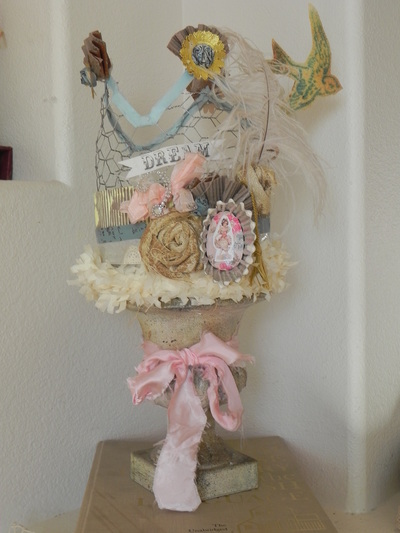
Dreamy Chicken Wire Crown DIY Craft Project
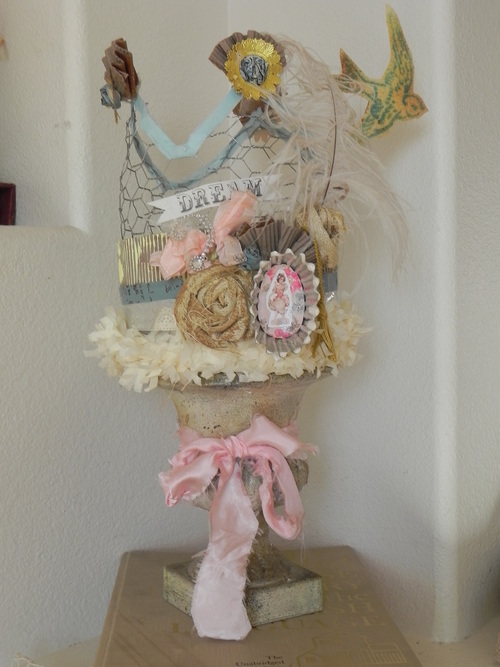
This Dreamy Chicken Wire Crown DIY Craft Project would be perfect for a little girls birthday party. This can be displayed as a party centerpiece or used as decor to add some pizzazz to a home. Create your own fun DIY craft projects and discover how fun it is to create dreamy craft projects. To complete this project, you will need Little B tapes, Fairfield Stiffen material, Stencil One stencils and MD Hobby and Craft metals. Arts and crafts ideas like this one serve as a great remind that it's okay to dream a little dream or even dream big! Turn your home into a royal escape with this fabulous craft project and discover your inner queen.
Primary TechniqueGeneral Crafts

SeasonSpring
Materials List
- MD Hobby and Crafts Chicken Wire and Gloves
- Fiskars Amplify Scissors
- Little B tapes: Baby Blue, Silver Lace and Corrugated Cardboard tape
- Stencil One Swallow Stencil
- Fairfield World Products: Stiffen Material
- Vintage: Cupcake Tin, Paper garland, Dresden.
- Misc. Washi tape, acrylic paint, spray ink (Clearsnap), Image of Dancing Girl (The Graphics Fairy), Upholstery strips, Feather, Ribbon, Tacky Glue (Aleenes), Glitter (Clearsnap by Donna Salazar).
Instructions
-
Wearing and using MD Hobby and Crafts gloves cut the chicken wire top into the shape of a crown. Trim metal pieces as necessary with Fiskars mixed media Scissors.
-
Adhere Little B washi tape to the crown top by wrapping around the top edge. This serves a dual purpose; for decor purposes but also to help hid sharp edges that may protrude.
-
Next, adhere vintage paper trim, silver lace washi tape, misc. script washi tape and corrugated cardboard tape to the base of the crown using Tacky Glue. Add a bit of acrylic paint to cardboard tape if desired.
-
Make fans from corrugated cardboard tape. This is easy to do because the corrugated tape is self adhesive. Add to the top of each crown point using tacky glue and add a fan to the base (leaving room for the cupcake tin).
-
Make three washi tape flowers by wrapping and twisting the tape around into a flower/rose shape. Add one to each side point along with the dresden. Add last one to the base. Make fabric flowers from upholstery strips.
-
Print dancing girl image and cut her out. Adhere to the center of the cupcake tin. Dip the cupcake tin into tacky glue and then into glitter. Glue tin onto base of crown and allow to dry.
-
Print word Dream and adhere. Add letters FLY to top of crown and add a circle of patterned paper if you desire. Embellish the base with ribbon and other delights you desire, ie. bling, feather, ribbon, tassel, etc.
-
Stencil the swallow bird onto a piece of Stiffen material using Clearsnap Smooch Spritz. Cut out bird. Take a piece of wire and wrap around a pencil providing a spiral type of effect. Attach the wire to the bottom of the base using wire. Adhere the bird stencil to the tip . . . thus making the bird look as if it's in flight.