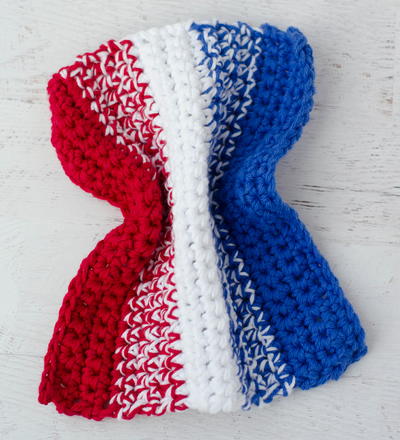
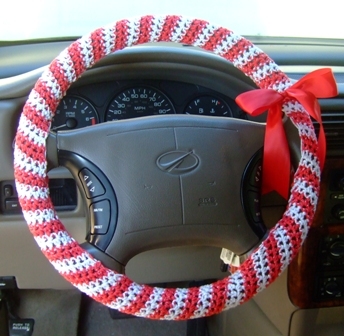
Crochet Candy Cane Steering Wheel Cover
Show your holiday spirit even while you're driving down the street. Use this free crochet pattern and make a candy cane steering wheel cover. It'll make your hands warm while driving, too. This Crochet Candy Cane Steering Wheel cover also makes a great gift for a new driver or a stocking stuffer for any teenager who loves to drive. Easy to crochet in any color combination you'd like, this steering wheel cover is a quick and fun weekend project for anyone who has the itch to crochet this weekend!

Materials:
- 1 skein Bernat Holiday Sparkle in Red
- 1 skein Bernat Holiday Sparkle in White
- Size H / 5.00 mm Crochet Hook
- 1 yd. of satin ribbon 1½“ to 2” wide
- Tapestry Needle
Abbreviations:
- Ch = chain
- Sc = single crochet
- Scd = single crochet decrease
- WS = wrong side RS = right side
- Finish Off = cut yarn and pull through loop snuggly
Notes:
- First measure the circumference of your steering wheel and follow the pattern below until your cover is 5 inches shy of this measurement.
- Example: Mine was 49” and I crocheted a length of 44” un-stretched. Pattern is worked diagonally so it has a lot of stretch. My finished width and length was 3½” wide by 44” long.
- You’ll be crocheting this at a diagonal so that the stripes will look more candy cane like and it will have lots of stretch. My thickness dimension for the hand grip size was 3½” wide. If yours is thicker/thinner you will need to add/subtract 1 to 2 stitches to/from the directions below. Just crochet a swatch first to be sure. It should fold almost around the thickness, but pull easily to seam.
Instructions:
- Row 1: (WS) Ch 13, sc in 2nd ch from hook and *sc to the last 2 stitches (chains for first row) and then work a single crochet decrease by pulling up a loop in first sc, then pull up a loop in last sc, yarn over and pull through all three loops on hook. Ch 1 and turn.* = 11 sc total
- Row 2: (RS) Sc in each stitch across to last sc, then work 2 sc in that last stitch. When working the last sc and you have 2 loops on your hook, drop the white yarn (don’t cut, just leave attached) and join in the red yarn, ch 1 and turn. = 12 sc total TIP: When turning on this row and starting row 1 again, it’s easy to miss that first sc, just be sure and check your stitch count at rows end. You’ll always be decreasing at the end of row 1 and increasing and changing color at the end of row 2.
- Remember to alternate dropping white/red yarn on row 2 each time. You’ll be carrying the dropped yarn up one side of your work. Be sure it isn’t tight, but not too loose either.

- Continue and repeat row 1 * to * and row 2 until the length will go around your steering wheel, minus about 5 inches. (for a snug fit)
- Now is a good time to trial fit it to your steering wheel. Test the length and amount of stretch before seaming the two short ends. It should stretch around your steering wheel and should be very snug after it’s seamed. So hold it around and pull the ends until you think after seaming it will be snug. Take out or add rows as needed. In this photo you can see that I held it together temporarily with crochet stitch markers to test the fit.

- When you are sure of fit fold this long piece and seam the two short ends together by whip stitching the cast on row and ending row.


- Now using a long length of yarn the circumference of your steering wheel + half again (about 2 yds.) of that measurement, (either the red or white) sew it on to your steering wheel. Leave about a 6” tail for tying a bow at the end. I started at the 3 o’clock position and seamed around counter clockwise. When you reach the part of the steering wheel that is flat, just drag the yarn at the back and come back up where you need to start seaming again. When seaming use your tapestry needle and sew through the holes made by crocheting your rows. This will make it easier to remove the yarn later!


- Once you get back to the beginning tie a bow with the 2 ends of your yarn and smoosh the yarn bow up and under the back side. This way all you have to do when you need to wash your cover or take it off to use again next year, is untie the bow and pull out the long length of yarn you used to seam it to the steering wheel.
- Now take your ribbon and tie a pretty bow to the side and you’re done!
Read NextCoastal Granny Square Bag
Your Recently Viewed Projects
Thanks for your comment. Don't forget to share!
princess6860504
Jun 01, 2017
What an awesome craft fair idea. You know why? Your materials are CHEAP and you can make probably 2 from those same balls. SO you get maximum dollar for your minimum dollar. And it's darling, to boot! Not everyone thinks of something like this on their own. But when you gift it, they will be loving it and everyone will be commenting and asking where you got it from. I have never seen a pattern for a steering wheel cover. I always wanted to use the holiday sparkle cotton yarns and this is the perfect project.
pld
Apr 14, 2016
A friend is looking to replace the one he has, made out of a plush fabric that does not shift. They do wear out over time and need to allow for where handles cross the steering wheel.
Shrpclw55
May 29, 2015
I saw this pattern today and had to make it. I had some cotton yarn that was perfect self striping. The kids in the neighborhood was wondering what I was doing sitting in my car with some yarn. It fits tight no slipping. My steering wheel has hand grips so it is not going to move around.
Lorena W
Dec 06, 2012
This also looks great for keeping hands cool -- summer sun can make steering wheels _hot_. I may make one in different colors for my husband. Also, has anyone actually used this? I'd be worried about it stretching or slipping and becoming a hazard.
bagibird
Dec 10, 2012
You're right, Lorena. I made a similar cover for my husband many years ago and made sure it was as tight as possible. I used cotton rather than yarn so that there was much less stretch. He almost wrote the car off a few days later when the cover slid round the steering wheel and the wheel itself didn't turn! Sorry, but, from personal experience, I can't recommend a crochet steering wheel cover.
blacktearz89 41274 70
May 14, 2012
For rows 3 til the end, you say repeat rows 1 and 2 however ending the 1st row you say to insert the hook into each of the last scs, its a easy to do int he first row but the 3r row its quite difficult. Am I doing it wrong or how am I supposed to decrease it?
mountainbutterfly 6874569
Sep 15, 2011
What a great idea! No more freezing fingers while driving in the winter. I think that I will make it in colors to match the interior of my car though, and skip the bow.
Member 6961174
Sep 14, 2011
oh my god.. i saw this and its perfect for a friend of mine who would have christmas stuff up all the time if she could
dwood5356 7445664
Sep 11, 2011
This is a wonderful ideal. Can't wait to make it. Thanks for the pattern. Debbie
charlierickman
Jan 26, 2011
this is a very nice alternative to these wheelskins that i got. Maybe this is something my wife can use for her car.
jvgolden 5530187
Dec 28, 2012
V Golden, great idea, but I canged the yarn closure and sc along the long ends over elastic, fits snuger,and less chance of slipping. Husband loved it, may do same fore summer,only different colors. Thanks.
Report Inappropriate Comment
Are you sure you would like to report this comment? It will be flagged for our moderators to take action.
Thank you for taking the time to improve the content on our site.