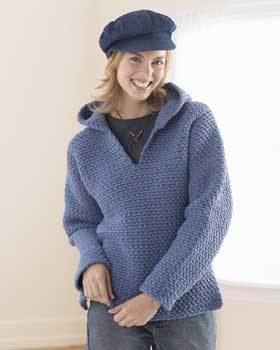
Sand Dunes Jumper

This sweater is a classic. It is one of the first patterns I’ve ever designed and one of the most popular. I had to give it a spot in the book! Minimalistic and elegant, this sweater works great in all settings. Wear it with shorts in the summer for a nice beach look or pair it with jeans and sneakers for a casual day out and about. In this pattern you’ll learn how to combine lace stitches with regular stitches, and you’ll also have the option to learn how to crochet in the round.
Construction
This sweater can be made in two ways: flat in rows or in the round. Both ways are explained in the pattern, and you can choose which one you prefer. If you haven’t tried to work in the round before, then this is a great time to learn! If you choose to make it by working flat in rows, you will make two equal pieces (front and back) and two sleeves. You will then sew the sides of the sweater, the shoulders, the sleeves and finally attach the sleeves to the sweater.
If you choose to work in the round, you will begin with the body piece, working it all the way up until it is time to create the armholes by splitting the body into a front and a back section. You will then sew the shoulders and attach your yarn in one of the armholes, working the sleeves in the round straight on the sweater. This is great since you can try on your sweater while making the sleeve and therefore easily know if you need to adjust the width or length of the sleeves.
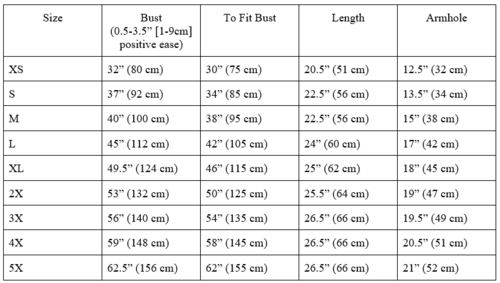
Sizing
XS (S, M, L, XL) (2X, 3X, 4X, 5X)
Finished bust: 32 (37, 40, 45, 49.5) (53, 56, 59, 62.5)" / 80 (92, 100, 112, 124) (132, 140, 148, 156) cm, blocked.
Materials List
-
Yarn
Merino Extra Fine from DROPS Design® (100% Wool), 115 yds (105 m) per 50-g skein. DK / 3-weight yarn.
-
Yardage/Meterage
10 (10, 12, 13, 15) (16, 18, 19, 19) skeins or 1040 (1150, 1310, 1480, 1640) (1800, 1970, 2080, 2130) yds / 950 (1050, 1200, 1350, 1500) (1650, 1800, 1900, 1950) m
-
Shown In
Light Grey Mix 05 colorway and Spray Blue uni color 23 (for step-by-step pictures)
Any DK / 3-weight yarn can be used for this pattern, as long as it matches gauge.
-
Crochet Hook
US G-6 (4 mm)
or the one you meet gauge with
-
Notions
Scissors
Measuring tape
2 locking stitch markers
Tapestry needle to sew and weave in ends
-
Gauge
15 hdc x 13 rows = 4 x 4" (10 x 10 cm), blocked.
Abbreviations
Ch: chain
Dc: double crochet
Dc4tog: double crochet four stitches together
Hdc: half double crochet
Hdc2tog: half double crochet two stitches together
Rs: right side
Sc: single crochet
Sc-FLO: single crochet front loop only
Sc-BLO: single crochet back loop only
Sk: skip
Sl st: Slip stitch
Sm: stitch marker
St(s): stitch(es)
Ss: same stitch
Ws: wrong side
Yo: yarn over
Special Techniques
Dc4tog: Yo, insert hook in the next stitch, yo, pull up a loop, pull through 2 of the loops on hook (2 loops left on hook). Repeat for next 3 sts. Yo and pull through all 5 loops on the hook.
To Check Your Gauge
We make the gauge swatch wider to avoid measuring the edges.
Ch 20
Row 1: In the back bump of the 3rd ch from the hook, hdc. Hdc in every st across. Ch 1. Turn. [18 sts]
Row 2: Hdc in every st across. Ch 1. Turn.
Rows 3–13: Repeat row 2.
Measure your gauge and adjust hook size accordingly.
Notes
Use the hook size you reached gauge with. Stitch count is noted for the first row and then for any changes. Turning chains do not count as stitches. You can choose to work this pattern flat in rows or in the round. It includes instructions for both.
Sizing Chart
-
Recommended Ease: This sweater is designed with approx. 0.5 to 3.5 inches
(1 to 9 cm) of positive ease.
INSTRUCTIONS
Working It Flat In Rows
-
Body—Make 2.
Leave a tail of around 30" (75 cm) and then ch 62 (71, 77, 86, 95) (101, 107, 113, 119).
Row 1: In the back bump of the 3rd ch from the hook, hdc. Hdc in every st across. Ch 1. Turn. [60 (69, 75, 84, 93) (99, 105, 111, 117) sts]
Row 2: Hdc in every st across. Ch 2. Turn.
Repeat row 2 until the front section is 3.5" (9 cm) shorter than preferred length, for example, 17 (19, 19, 20.5, 21) (22, 23, 23, 23)" / 42 (47, 47, 51, 53) (55, 57, 57, 57) cm. Do not fasten off, continue with the pattern section. -
Pattern Section
Row 1 (RS): Dc in the first 2 sts, ch 1. Sk next 2 sts. *4 dc in the ss, ch 1, sk next 2 sts* repeat across until two final sts. Dc, dc in the final st. Ch 2. Turn. [95 (110, 120, 135, 150) (160, 170, 180, 190) sts]
Row 2 (WS): Dc in the first 2 sts, ch 2. Sk the ch sp. *Dc4tog, ch 2 (step 6 and 7 picture), sk the ch sp* repeat across until two final sts. Dc, dc in the final st. Ch 2. Turn. [60 (69, 75, 84, 93) (99, 105, 111, 117) sts]
Rows 3–4: Hdc in every st across. Ch 1.
Turn.
Rows 5–7: Repeat rows 1–3.
Row 8: Hdc in every st across. Fasten off, leaving a tail of around 16" (40 cm) for sewing the shoulders. -
Sleeves—Make 2.
Ch 28 (31, 32, 32, 34) (35, 37, 37, 37).
Row 1: In the back bump of the 3rd ch from the hook, hdc. Hdc in every st across. Ch 1. Turn. [26 (29, 30, 30, 32) (33, 35, 35, 35) sts]
Row 2: Hdc in every st across. Ch 2. Turn.
Row 3–Increase row: 2 hdc in the ss. Hdc in every st across until final st. 2 hdc in the ss. Ch 1. Turn. [28 (31, 32, 32, 34) (35, 37, 37, 37) sts]
Rows 4–63: Repeat row 2, adding increase rows (as according to row 3) every 5 (5, 4, 3, 3) (3, 3, 3, 3) rows until your st count is 48 (51, 58, 64, 68) (71,73, 77, 77) sts. Fasten off, leaving a tail of around 40" (100 cm) for sewing.
Note: Add more or less rows to adjust the length of the sleeves and more or less increase rows to adjust the width. -
Ribbing of the Sleeve
Attach your yarn to row 1 (your initial chs) with a slip knot, ch 1.
Row 1: Sc-FLO in every st across. Ch 1. Turn. [26 (29, 30, 30, 32) (33, 35, 35, 35) sts]
Rows 2–4: Repeat row 1.
Row 5: Sl st across (if this makes the sleeve too tight, skip it!). Fasten off, leaving a tail of around 40" (100 cm) for sewing the sleeve. -
Sewing
Place the body sections on top of each other, right side facing out. Use the tails you’ve left for sewing.
Begin with the sides. Place a sm 7 (7, 7.5, 8, 9) (9.5, 10, 10, 10.5)" / 17 (18, 19, 20.5, 22.5) (23.5, 24.5, 25.5, 26) cm from the shoulder down the side; this will be your opening for the sleeve. Starting from the bottom up, sew the sides (step 10 picture), using the mattress stitch, until the sm. Do not fasten off in case you need to adjust the seam when attaching the sleeves.
Sew the shoulders using the mattress stitch, leaving an opening for the neck. It is best to try it on to see the width of the opening (you can use stitch markers first to close it), but between 8 to 9" (20 to 22 cm) is a good opening. -
Attaching the Sleeves
Begin by sewing and attaching one of the sleeves, that way it is easy to adjust the other if you need to. Fold the sleeves in half, lengthwise, and sew the sides from the bottom up using the tail you left in the beginning. Attach your sleeve to the body section by sewing around the sleeve opening. Do you find the sleeves to be too short or too long? Detach the sleeves and open a bit of the seam you’ve made. Add or remove rows before you sew that part and attach the sleeve to the sweater again.
Weave in all ends. Block to correct measurements.
Working It In The Round
When working in the round, it is important where you put the stitches in the beginning and end of the round. It is easy to make an extra stitch in the end and therefore increase the stitch count every round. To avoid this, mark the first stitch of every round with a sm. That way you easily know that is the first stitch, which is the stitch to join to. Check out the video on how to join in the round on my Youtube: YouTube.com/coffeeandcrocheting.
-
Body
Ch 120 (138, 150, 168, 186) (198, 210, 222, 234). Join to the first ch with a sl st. Ch 1. Turn.
Round 1: Hdc in every st around. Join to the first hdc of the round with a sl st. Ch 1. Turn. [120 (138, 150, 168, 186) (198, 210, 222, 234) sts]
Round 2: Hdc in every st around. Join to the first hdc of the round with a sl st. Ch 1. Turn.
Repeat round 2 until the body is 14 (15.5, 15, 15.5, 15.5) (16, 16.5, 16, 16)" / 35 (39, 37, 39, 39) (40, 41, 40, 40) cm. Do not fasten off; you will now split the front and back. -
Front
Row 1: Continue from your working yarn, 60 (69, 75, 84, 93) (99, 105, 111, 117) hdc. Ch 1. Turn. [60 (69, 75, 84, 93) (99, 105, 111, 117) sts]
Row 2: Hdc in every st across. Ch 1. Turn. Repeat row 2 until the front section is 3 (3, 4, 5, 5.5) (6, 6.5, 7, 7)" / 7 (8, 10, 12, 14) (15, 16, 17, 17) cm (step 14 picture). Do not fasten off, continue with the pattern section. -
Pattern Section
Note: See the pictures for working it flat on how to make the pattern section.
Row 1 (RS): Dc in the first 2 sts, ch 1. Sk next 2 sts. *4 dc in the ss, ch 1, sk next 2 sts*. Repeat across until two final sts. Dc, dc in the final st. Ch 2. Turn. [95 (110, 120, 135, 150) (160, 170, 180, 190) sts]
Row 2 (WS): Dc in the first 2 sts, ch 2. Sk next st. *Dc4tog, ch 2, sk next st* repeat across until two final sts. Dc, dc in the final st. Ch 2. Turn. [60 (69, 75, 84, 93) (99, 105, 111, 117) sts]
Rows 3–4: Hdc in every st across. Ch 2. Turn.
Rows 5–7: Repeat rows 1–3.
Row 8: Hdc in every st across. Fasten off, leaving a tail of around 16" (40 cm) for sewing the shoulders. -
Back
Row 1: Attach your yarn in the first st next to the front on the body. 60 (69, 75, 84, 93) (99, 105, 111, 117) hdc. Ch 1. Turn. [60 (69, 75, 84, 93) (99, 105, 111, 117) sts]
Follow the instructions for front, including the pattern section.
Sew the shoulders using the mattress stitch, leaving an opening for the neck. It is best to try it on to see the width of the opening (you can use stitch markers first to close it), but between 8 to 9" (20 to 22 cm) is a good opening. -
Sleeves
Attach your yarn to the bottom of the armhole, rs facing out. Ch 1.
Round 1: 48 (51, 58, 64, 68) (71, 73, 77, 77) hdc evenly around the armhole. Join to the first hdc of the round with a sl st. Ch 1. Turn. [48 (51, 58, 64, 68) (71, 73, 77, 77) sts]
Round 2: Hdc in every st around. Join to the first hdc of the round with a sl st. Ch 1. Turn.
Round 3 - Decrease round: Hdc2tog. Hdc in every st around until two final sts. Hdc2tog. Join to the first hdc of the round with a sl st. Ch 1. Turn. [46 (49, 55, 61, 66) (69, 72, 75, 75) sts]
Rounds 4–63: Repeat round 2, adding decrease rounds (as according to round 3) every 5 (5, 4, 3, 3) (3, 3, 3, 3) rounds until your st count is 26 (29, 30, 30, 32) (33, 35, 35, 35) sts. Do not fasten off, continue with the ribbing. -
Ribbing of the Sleeve
Round 1: Sc-BLO in every st around (mark the first st of the round with a sm, if you haven’t yet). You’ll work continuous rounds so do not join or turn.
Rounds 2–4: Sc-BLO in every st around.
Round 5: Sl st in every st around (if this makes the sleeve too tight, then skip it). Fasten off. Weave in all ends. Block to correct measurements.
Credit Line:
Reprinted with permission from The Beginner’s Guide to Crochet Sweaters and Tops by Emilia Johansson. Page Street Publishing Co. 2024. Photo credit: Emilia Johansson.

Read NextSimply Savvy Crochet Ruana Pattern