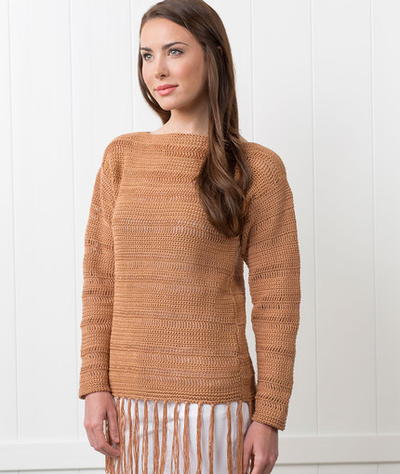
High Seas Crew Neck Top

There is just something about stripes in summer. Probably because it reminds us of sailors, beaches and the sea. The High Seas Crew Neck Top captures the feeling when you stand at the beach looking out longing at the sea, ready to dive in. In this pattern you’ll learn how to change color in a crochet garment project.
Construction
This tee is made in two pieces: front and back. These will then be seamed together, the sleeves added, and you’ll end by adding a neckline. The tee is worked from the bottom up, flat in rows.
Sizing
XS (S, M, L, XL) (2X, 3X, 4X, 5X)
Finished bust: 33 (37, 41, 45, 49) (53, 57, 61, 65)" / 82 (92, 102, 112, 122) (132, 142, 152, 162) cm, blocked.

Materials List
-
Yarn
Rainbow Cotton 8/8 from Hobbii (100% Cotton), 175 yds (160 m) per 50-g skein.
DK / 3-weight yarn.
-
Yardage/Meterage
Color 1 (main color): 8 (9, 10, 11, 12) (13, 13, 15, 15) skeins or 600 (710, 770, 850, 930) (1000, 1040, 1160, 1200) yds / 550 (650, 700, 775, 850) (910, 950, 1060, 1100) m
Color 2 (contrast color): 2 (2, 2, 3, 3) (3, 3, 4, 4) skeins or 110 (130, 150, 170, 190) (220, 240, 270, 270) yds / 100 (120, 140, 160, 175) (200, 220, 250, 250) m
-
Shown In
Natural White (002) and Navy Blue (030) colorway
Any DK / 3-weight yarn can be used for this pattern, as long as it matches gauge. Please note that the sample is made in a yarn marked as light worsted / DK, meaning you might reach gauge with a light worsted yarn as well.
-
Crochet Hook
US 7 (4.5 mm)
or the hook size you meet gauge with
-
Notions
Scissors
Measuring tape
2–4 locking stitch markers
Tapestry needle to sew and weave in ends
-
Gauge
13 hdc x 11 rows = 4 x 4" (10 x 10 cm), blocked.
Abbreviations
Bpdc: back post double crochet
Ch: chain
Dc: double crochet
FPdc: front post double crochet
Hdc: half double crochet
Hdc2tog: half double crochet two stitches together
Rs: right side
Sl st: slip stitch
Sm: stitch marker
St(s): stitch(es)
Yo: yarn over
To Check Your Gauge
We make the gauge swatch wider to avoid measuring the edges.
Ch 19.
Row 1: In the back bump of the 3rd ch from the hook, hdc. Hdc in every st across. Ch 1. Turn. [17 sts]
Row 2: Hdc in every st across. Ch 1.
Turn.
Rows 3–11: Repeat row 2.
Measure your gauge and adjust hook size accordingly.
Notes
Use the hook size you reached gauge with. Stitch count is noted for the first row and then for any changes. Turning chains do not count as stitches.
Sizing Chart
-
Recommended Ease: This tee is designed with approx. 3 inches (8 cm) of positive ease.

INSTRUCTIONS
-
Front
Leave a tail of around 30" (75 cm) and then ch 55 (62, 68, 75, 81) (88, 94, 101, 107) with color 1.
Rows 1–2 are ribbing rows. If you notice that the ribbing is tight, measure it and see if it is close to the width of the sweater. If not, you might need to go up a hook size or two for the ribbing. Note that the ribbing should be slightly tighter than the sweater width. Similarly, if it is too wide, go down a hook size or two.
Row 1: In the back bump of the 3rd ch from the hook, dc. Dc in every st across. Ch 2. Turn. [53 (60, 66, 73, 79) (86, 92, 99, 105) sts]
Row 2: Alternate FPdc and BPdc across the row. Ch 1. Turn
Row 3: Hdc in every st across. Ch 1. Turn.
Note: If you used a larger hook size for the ribbing, change back to the US 7 (4.5 mm) hook.
Row 4: Hdc in every st across until the final st. We will change color on the final st. With color 1, yo, insert your hook in the final st, yo, pull up a loop. Yo with color 2, pull through all 3 loops on the hook with color 2, i.e., you make a hdc and before you pull through all 3 loops on the hook, you change to color 2 and pull through with that. Cut off color 1. Ch 1. Turn.
Row 5: Continue with color 2, hdc in every st across until the final st. Change back to color 1 on the final st (as you did on row 4). Cut off color 2. Ch 1. Turn.
Rows 6–8: Repeat row 3.
Row 9: Repeat row 4.
Row 10: Repeat row 5.
Repeat rows 6–10 until you’ve made a total of 45 rows. From row 46 forward you will only use color 1.
Row 46: Hdc in every st across. Ch 1.
Turn.
Repeat row 46 until you’ve made a total of 52 (53, 53, 57, 57) (59, 59, 59, 59) rows. Do not fasten off, continue with the shoulders.
Place a sm in the 18th (21st, 23rd, 27th, 29th) (32nd, 35th, 38th, 41st) st from each edge. -
Shoulder One
Row 1: Continue from your working yarn. Hdc in every st across until st before the sm. Hdc2tog (the st before the sm and the st with the sm, step 2 picture). Ch 1. Turn. [17 (20, 22, 26, 28) (31, 34, 37, 40) sts]
Row 2: Hdc2tog. Hdc in every st across. Ch 1. Turn. [16 (19, 21, 25, 27) (30, 33, 36, 39) sts]
Row 3: Hdc in every st across. Ch 1. Turn.
Row 4: Hdc2tog. Hdc in every st across. Ch 1. Turn. [15 (18, 20, 24, 26) (29, 32, 35, 38) sts]
Row 5: Hdc in every st across until two final sts. Hdc2tog. Fasten off, leaving a tail of three times the shoulder width for sewing the shoulders. [14 (17, 19, 23, 25) (28, 31, 34, 37) sts] -
Shoulder Two
Row 1: Attach your yarn (color 1) in the st with the 2nd sm with a slip knot, ch 1. Hdc2tog. Hdc in every st across. Ch 1. Turn. [17 (20, 22, 26, 28) (31, 34, 37, 40) sts]
Row 2: Hdc in every st across until two final sts. Hdc2tog. Ch 1. Turn. [16 (19, 21, 25, 27) (30, 33, 36, 39) sts]
Row 3: Hdc in every st across. Ch 1. Turn.
Row 4: Hdc in every st across until two final sts. Hdc2tog. Ch 1. Turn. [15 (18, 20, 24, 26) (29, 32, 35, 38) sts]
Row 5: Hdc2tog. Hdc in every st across. Fasten off, leaving a tail of three times the shoulder width for sewing the shoulders. [14 (17, 19, 23, 25) (28, 31, 34, 37) sts] -
Back
Leave a tail of around 30" (75 cm) and ch 55 (62, 68, 75, 81) (88, 94, 101, 107) with color 1.
Rows 1–2 are ribbing rows. If you notice that the ribbing is tight, measure it and see if it is close to the width of the sweater. If not, you might need to go up a hook size or two for the ribbing. Note that the ribbing should be slightly tighter than the sweater width. Similarly, if it is too wide, go down a hook size or two.
Row 1: In the back bump of the 3rd ch from the hook, dc. Dc in every st across. Ch 2. Turn. [53 (60, 66, 73, 79) (86, 92, 99, 105) sts]
Row 2: Alternate FPdc and BPdc across the row. Ch 1. Turn.
Row 3: Hdc in every st across. Ch 1. Turn.
Note: If you used a larger hook size for the ribbing, change back to the US 7 (4.5 mm) hook.
Row 4: Hdc in every st across until the final st. Change to color 2 on the final st. Cut off color 1. Ch 1. Turn.
Row 5: Continue with color 2, hdc in every st across until the final st. Change back to color 1 on the final st (as you did on row 4). Cut off color 2. Ch 1. Turn.
Rows 6–8: Repeat row 3.
Row 9: Repeat row 4.
Row 10: Repeat row 5.
Repeat rows 6–10 until you’ve made a total of 45 rows. From row 46 forward, you will only use color 1.
Row 46: Hdc in every st across. Ch 1. Turn.
Repeat row 46 until you’ve made a total of 55 (56, 56, 60, 60) (62, 62, 62, 62) rows. Do not fasten off, continue with the shoulders.
Place a sm in the 16th (19th, 21st, 25th, 27th) (30th, 33rd, 36th, 39th) st from each edge. -
Shoulder One
Row 1: Hdc in every st across until st before the sm. Hdc2tog (the st before the sm and the st with the sm). Ch 1. Turn. [15 (18, 20, 24, 26) (29, 32, 35, 38) sts]
Row 2: Hdc2tog. Hdc in every st across. Fasten off. [14 (17, 19, 23, 25) (28, 31, 34, 37) sts] -
Shoulder Two
Row 1: Attach your yarn (color 1) in the st with the second sm. Hdc2tog. Hdc in every st across. Ch 1. Turn. [15 (18, 20, 24, 26) (29, 32, 35, 38) sts]
Row 2: Hdc in every st across until two final sts, hdc2tog. Fasten off. [14 (17, 19, 23, 25) (28, 31, 34, 37) sts] -
Sleeves—Make 2.
Leave a tail (color 1) of around 25" (63 cm) and ch 46 (49, 51, 55, 60) (63, 66, 68, 70).
Rows 1–2 are ribbing rows; use the same hook size as on the body ribbing.
Row 1: In the back bump of the 3rd ch from the hook, dc. Dc in every st across. Ch 2. Turn. [44 (47, 49, 53, 58) (61, 64, 66, 68) sts]
Row 2: Alternate FPdc and BPdc across the row. Ch 1. Turn.
Row 3: Hdc in every st across. Ch 1. Turn.
Note: If you used a larger hook size for the ribbing, change back to the 7 (4.5 mm) hook.
Row 4: Hdc in every st across until the final st. Change to color 2 on the final st. Ch 1. Turn.
Row 5: Continue with color 2, hdc in every st across until the final st. Change back to color 1 on the final st (as you did on row 4). Cut off color 2. Ch 1. Turn.
Rows 6–8: Repeat row 3.
Row 9: Repeat row 4.
Row 10: Repeat row 5. Fasten off after row 10.
Note: If you want longer sleeves, make more rows here. -
Assembly
Place the body sections on top of each other so that the shoulders align, rs facing out. This pattern doesn’t have a specific right or wrong side. You choose which one to have out. Use the tails you left for sewing.
Begin with the sides. Place a sm 7 (7, 7.5, 8, 9) (9.5, 10, 10, 10.5)" / 17 (18, 19, 20.5, 22.5) (23.5, 24.5, 25.5, 26) cm from the shoulder down the side; this will be your opening for the sleeve. Starting from the bottom up, sew the sides using the mattress stitch, until the sm. Do not fasten off in case you need to adjust the seam when attaching the sleeves.
Sew the shoulders using the mattress stitch. -
Neckline
Round 1: Attach your yarn (color 1) in the shoulder seam of the neckline, rs facing out, with a slip knot, ch 1.
Dc in every st and the side rows around the neckline. Join to the first dc of the round with a sl st. Ch 2. Turn.
Round 2: Alternate FPdc and BPdc around the neckline. Join to the first st of the round with a sl st. Fasten off after round 2. -
Attaching the Sleeves
Begin by sewing and attaching one of the sleeves. That way it is easy to adjust the other if you need to. Fold the sleeves in half, lengthwise, and sew the sides from the bottom up using the tail you left in the beginning.
Attach your sleeve to the body section by sewing around the sleeve opening (use the tail you left from sewing the sleeve). Do you find the sleeves to be too short or too long? Detach the sleeves and open a bit of the seam you’ve made. Add or remove rows before you sew that part, and attach the sleeve to the tee again.
Weave in all ends. Block to correct measurements.
Credit Line:
Reprinted with permission from The Beginner’s Guide to Crochet Sweaters and Tops by Emilia Johansson. Page Street Publishing Co. 2024. Photo credit: Emilia Johansson.

Read NextEasy Collar Crochet Dress