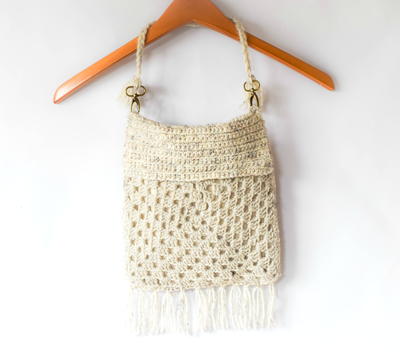
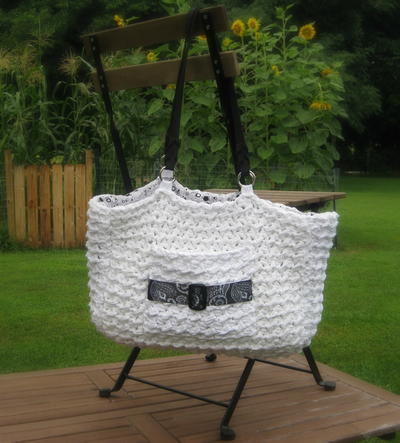
Hip Hobo Crochet Bag Pattern
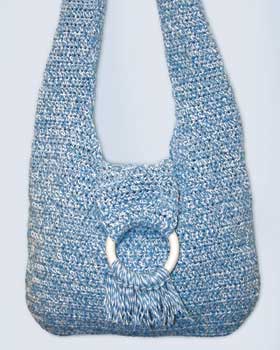 Crochet a Hip Hobo Crochet Bag Pattern with shoulder strap and ring accent. This free crochet purse pattern is easy, fun and creates the perfect size bag. It's big enough to carry all of your essentials and even more. Free crochet bag patterns are a great option for anyone who is looking for a new type of project to try. If you aren't a crochet expert, rest assured that you can complete this project with no problem at all. If you've ever asked "What is a hobo bag?" now you have the answer - it's longer than an average purse and features wide straps.
Materials:
- Yarn: Lily Sugar’n Cream Twists (56.7 g/2 oz) 6 balls of #20117 (Denim Twists)
- Crochet Hook: Size 4 mm (U.S. G/6) crochet hook or size needed to obtain gauge
- Plastic ring 3 ins [7.5 cm] in diameter for decoration
Size: Approx 14 ins [35.5 cm] wide x 25 ins [63.5 cm] tall.
Gauge: 15 hdc and 11 rows = 4 ins [10 cm].
There's no reason spend money when you can save big with the free eBook, 25 Quick and Thrifty Free Crochet Patterns. This downloadable collection features crochet tutotials for hats, flowers and of course free purse patterns. You'll never be bored or run out of ideas when you have this free craft eBook on hand.
Instructions:
Note: Ch 2 at beg of row does not count as st.
FRONT and BACK (make alike).
Ch 40.
1st row: (RS). 2 hdc in 2nd ch from hook. 1 hdc in each ch to last ch. 2 hdc in last ch. Turn. 40 hdc.
Next 6 rows: Ch 2. 2 hdc in first hdc. 1 hdc in each hdc to last hdc. 2 hdc in last hdc. Turn. 52 hdc at end of last row.
Next row: Ch 2. 1 hdc in each hdc to end of row. Turn.
Rep last row for 10 ins [25.5 cm], ending with a WS row.
**Shape strap: Next row: (RS). Ch 2. 1 hdc in each of next 17 hdc. (Yoh and draw up a loop in next st) twice. Yoh and draw through all loops on hook - Hdc2tog made. Turn. Leave rem sts unworked. 18 sts.
Next row: Ch 2. Hdc2tog over first 2 sts. 1 hdc in each hdc to end of row. Turn.
Next row: Ch 2. 1 hdc in each hdc to last 2 sts. Hdc2tog over last 2 sts. Turn.
Rep last 2 rows once more. 14 sts.
Next 3 rows: Ch 2. 1 hdc in each hdc to end of row. Turn.
Next row: Ch 2. Hdc2tog over first 2 sts. 1 hdc in each hdc to end of row. Turn.
Rep last 4 rows 7 times more. 6 sts.
Next row: Ch 2. 1 hdc in each hdc to end of row. Turn.
Rep last row until strap measures 16 ins [40.5 cm], ending with a WS row. Fasten off.**
With WS of work facing, join yarn with sl st to first st.
Work from ** to ** as given above, noting RS becomes WS.
FINISHING
With WS of Front and Back tog, sew bottom and side seams to top of Straps.
Decorative Flap: Ch 17.
1st row: (RS). 1 hdc in 2nd ch from hook. 1 hdc in each ch to end of ch. 15 hdc.
Next row: Ch 2. 1 hdc in each hdc to end of row. Turn.
Rep last row for 6 ins [18 cm], ending with a WS row.
Fold ¾ inch [2 cm] of Flap around ring and sew in position. Sew Flap to Back.
Fringe: Cut yarn, 5 ins [12.5 cm] long. Taking 2 strands tog, knot into fringe around Ring. Trim fringe evenly (see picture).
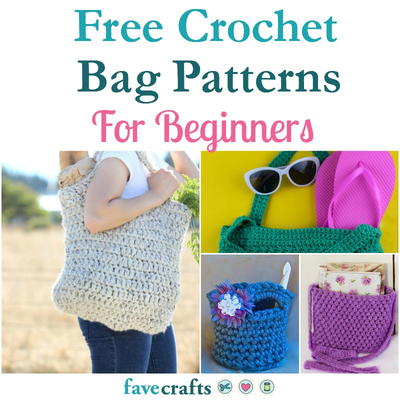
Don't get stuck making the same crochet purse pattern over and over again. Expand your crochet knowledge and stretch your skills with this collection of 13 Free Crochet Bag Patterns For Beginners You'll Want to Take Everywhere. You'll find tons of simple crochet patterns to work on right now. Once you learn how to crochet a purse, you may never buy another bag again.


Thanks for your comment. Don't forget to share!
Chaligal
Jun 08, 2021
I've made a very similar hobo bag and found that if I extend the strap on one end and do not join straps with crochet in the middle, I can use 2 wood "cabone" rings to make an adjustable strap (same idea as a fabric belt with 2 "D" rings where you can cinch it tight.) This way, the bag can be worn either as a shoulder or cross-body bag and no worries about the yarn stretching. Also, to reinforce the body, combine main color yarn with a thinner acrylic yarn in a complementary color for a cool tweed/woven effect. (I used a color change yarn with a solid yarn, crocheted as one strand together).
princess6860504
Jan 08, 2017
Yes, the hobo bag is a timeless fashion statement. Yes, this pattern seems very easy, what with just crocheting up two exact same pieces and then sewing together. Yes,not he handle will stretch after your first few uses of you haul anything other than a light wallet. It's the nature of the beast. May I suggest using an actual purse handle purchased at your craft store and then crochet around the handle if you like the look of the crocheted handle? You'll have good "bones" beneath the surface and nobody has to know. I would make this for myself in an oatmeal and taupe colorway, with a faux wooden buckle ring.
lcarr
Dec 31, 2016
This is so cute, and I really need a new purse! I see that others have pointed out that the handle stretches out over time. I think I would use a twine or yarn that is less likely to do that, or maybe change the stitches used for the strap. Slip stitches usually work well for handles and straps. Another option is lining the inside of the handle with fabric. That way the bag will look the same, but the fabric lining will prevent it from being stretched out. I will definitely be making this soon!
Yarn Maven
Jan 30, 2011
I made this last summer, but didn't like it. Like all crocheted straps (and knitted), the strap kept getting longer, and the flap was annoying. I did get lots of compliments, however I ripped it out and am modifying it to use a cloth belt as a strap and a regular fold over flap with a magnet closer.
dnd 7469719
Apr 07, 2012
I thought the same thing so was wondering if one could line the handle with another fabric or crochet around a stiffer fabric to give it body?
BeckySue
Apr 08, 2016
I've used double yarn with a synthetic, non-stretch cord in with my yarn, so bags don't stretch. You only need a thin, narrow one to do the job. You can also use cotton cording or a trim pipping in the sewing dept, but it does give a little more than a plastic cord. You just crochet with it in the middle.
jniblett
Jan 29, 2011
I'm haveing trouble understanding how to do the straps. It says to sew bottom and sides up to the top of the straps. Then what??? I don't get it? Do you attach the yarn to the mouth of the bag, then make the decorative flap? HELP!!!! Someone needs to do an update on this design.. Love the bag and I think the idea to use a shower ring is a useable idea. And lining is good , too. jniblett
kellyrj
Jan 10, 2011
Hello< does anyone know how to make the opennig bigger? It looks kinda narrow! thanks Happy Crochet
shedevil2359 36886 44
Jan 08, 2011
can any one help with how to sew this bag together, I am having a little trouble comprehending how it should be sewn together. Debbie
disco dotty
Jul 16, 2010
look in the macrame area of the craft store for rings or the sewing section. i live in boston and windsor button has plastic and metal rings.
Crafter 0057191
Jul 09, 2010
I made this bag but can't find a 3" white plastic ring. Any suggestions?
Leanita
Jun 30, 2010
I have made two of these bags....understanding the instructions easier the second time. My comment is about the straps. My concern is stitching the front to back pieces. The front and the back pieces include straps. I stitched the second bag I made along the bottom, sides to end (narrow) of the straps. On the first bag I thought the straps should be sewn together (double thickness) from top to bag opening. Any ideas? Thanks, Leanita in Texas. BTW: Using the shower curtain hook is a clever idea!
Crafter 1946686
May 30, 2010
Can anyone who has made this bag help me? I am ready to start handles but am confused because what I perceive to be the bottom of the bag is smaller(in width) than the top. You start with 40 sts and end up with 52 sts in width. Seems it should be the other way around with wider at bottom. Is this correct? I am usuing recycled sari yarn and it looks really nice. Thanks Rebecca
Webspinner
Mar 13, 2010
I've made three of these bags so far I reduced the size of the bottom of the bag by reducing the number of beginning stitches You can also reduce the length of the handle by doing less rows I also line mine Make two of the bottom pieces you can make the handles later Cut two pieces of cloth using the bottom piece as your pattern Sew a piece right side out to each side of the bottom and then with right sides facing stitch the two bottom pieces together then turn them outside in I do this because otherwise small items like keys pen points rat tail combs etc will poke out of the bag I also use shower rings for the ring on the front These will undo and you can hang your car keys to the outside of the purse I've made a squared tab for decoration on…Read More the front and have sewn three very large buttons to the tab that match one of the colors in the yarn Really fun and quick bags to make
kate59
Feb 18, 2010
Eloise, the instructions say to make back and front alike, so i would think that means yes, make straps for both sides. I haven't made it yet,,but I'm looking forward to making one for me and one for my daughters.
Eloise
Feb 18, 2010
Has anyone made this bag yet? I'm a little confused. I have one side done complete with straps. For the other side of the bag, do you just do the bottom part or do the straps for this side too?
Member 15922
Sep 27, 2009
I have been looking for a bag like this, for a very long time now. I am going to but the yarn for this tomarrow. I can't wait to get started on this bag. Thank you so very much. You always have such useful things to crochet in your news letters.
Report Inappropriate Comment
Are you sure you would like to report this comment? It will be flagged for our moderators to take action.
Thank you for taking the time to improve the content on our site.