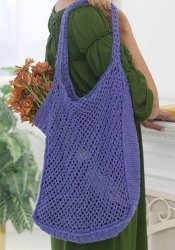
Easy Mesh Market Bag
Use this free crochet pattern from Red Heart Yarn to make an easy mesh market bag. You can take it anywhere you want and it's great for those small groceries you buy. This pattern calls for fine yarn.

Bag measures 14” x 14”.
Materials:
- RED HEART® “LusterSheen®”: 2 skeins 824 Medium Blue.
- Crochet Hook: 3.75mm [US F-5].
- Yarn needle.
- GAUGE: 21 sts = 4”; 10 rows = 4” in dc. CHECK YOUR GAUGE. Use any size hook to obtain the gauge.
NOTES:
Gauge is not crucial for this project but will affect the finished size. The Front and Back are worked corner to corner in filet crochet turned on the bias. Leave long tails to use for finishing.
BAG
Front and Back (Make 2)
Increase Rows
Row 1 (Right Side): Ch 9, dc in first ch to make a square; turn.
Row 2: Ch 7, dc in dc, ch 2, skip 2 ch, (dc, ch 2, dtr) all in next ch; turn – 3 squares.
Rows 3-23: Ch 7, dc in dtr, * ch 2, dc in next dc; repeat from * to last ch-space; ch 2, skip next 2 ch, (dc, ch 2, dtr) all in last ch; turn – 45 squares at end of Row 23.
Decrease Rows
Row 24: Ch 1, slip st in dtr and next 2 ch and dc, ch 5, dc in next dc, * ch 2, dc in next dc; repeat from * to last dc; dtr in last dc; turn – 43 squares.
Rows 25-42: Ch 5, skip first dc, dc in next dc, * ch 2, dc in next dc; repeat from * to last dc; dtr in last dc; turn.
Row 43: Ch 5, skip first dc, dc in next dc; do NOT turn – 1 square.
Edging Rnd: Ch 3, 2 dc around post of last dc, work 3 dc in each space around and work 9 dc in next 3 corners and
6 more dc in last corner; join with a slip st in top of ch-3.
Fasten off.
Sides and Bottom (Make 1)
Row 1 (Right Side): Ch 35; dc in 4th ch from hook and each ch across; turn – 33 sts.
Row 2: Ch 3, skip first dc, dc in next dc and in each dc across, dc in top of ch-3; turn.
Repeat Row 2 until 42” from beginning. Fasten off.
Finishing
With wrong sides together, pin the Side and Bottom strip to 3 sides of bag Front. Attach yarn at top of strip; ch 1, working through both layers, sc around the 3 sides of the bag, taking care to keep work flat by working extra sts in the lower corners. Fasten off. Repeat for the back.
Handles
Attach yarn 1¼” in from seam on top edge of Front of the bag.
Row 1: Ch 1, sc in same st as joining, skip 2 dc, (3 dc, ch 2, 3 dc) all in next dc, skip 2 dc, sc in next dc; turn.
Row 2: Ch 3, (3 dc, ch 2, 3 dc) all in ch-2 space, dc in next sc; turn.
Row 3: Ch 3, (3 dc, ch 2, 3 dc) all in ch-2 space, dc in top of ch-3; turn.
Repeat Row 2 about 33 more times or to desired length of handle.\ Join Top of Handle: Hold last row of handle at top of bag 1¼” in from opposite seam of Front, taking care that handle is not twisted; ch 3, slip st in next 3 dc of bag, sc through ch-2 space of handle and next dc of bag together, slip st in next 3 dc of bag, dc in top of ch-3 of handle.
Fasten off.
Repeat on Back for other handle. Weave in ends.
Read NextWashed Ashore Crochet Handbag

Thanks for your comment. Don't forget to share!
princess6860504
Mar 02, 2017
Interesting choice of yarn for a market bag. But I guess it's gotta be a fine enough weight to get that "netting" or mesh effect. I hope it is washer/dryer easy care. I love the look of the design on the bias. Haven't seen too many like this. To me it feels like a great beach or pool bag because the water or sand will sift right out of it. Nice!
Report Inappropriate Comment
Are you sure you would like to report this comment? It will be flagged for our moderators to take action.
Thank you for taking the time to improve the content on our site.
![Battenberg Crochet Granny Square Bag Pattern [Free]](http://irepo.primecp.com/2022/08/532101/Battenberg-Bag-02_Category-CategoryPageDefault_ID-4857588.png?v=4857588)