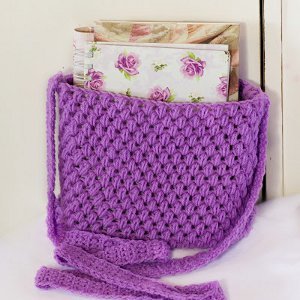
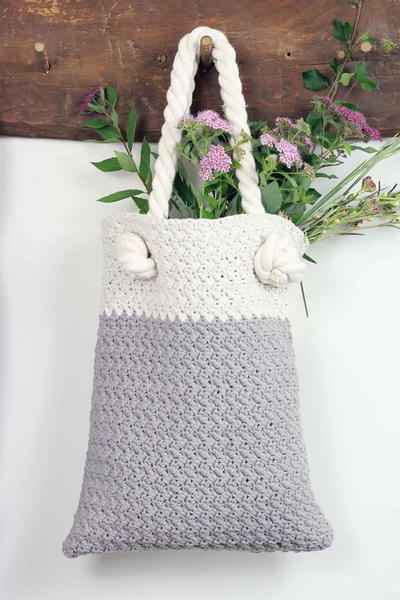
Mega Bulky Crochet Tote Bag Pattern
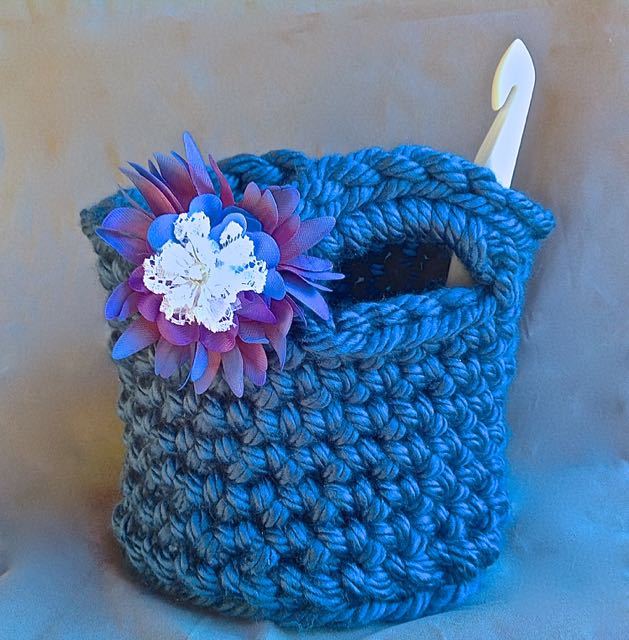
You only need one skein of yarn to complete this Mega Bulky Crochet Tote Bag Pattern. Free tote bag patterns are always practical and make great gifts for any person in your life. Best of all, this tote bag can be made in two hours, so you can work on it while you watch a movie on your couch, binge-watch your favorite television show or sit in a waiting room. This bag is small in size but big in excitement. You can throw in a couple skeins of yarn, a hook and a few other crochet accessories. One of the best possible uses for this bag is carrying yarn. Now you can work on free easy crochet patterns no matter where you go.

Crochet HookN/15 or 10 mm hook
Yarn Weight(6) Super Bulky/Super Chunky (4-11 stitches for 4 inches)
Materials List
- 1 skein Bernat Mega Bulky Yarn
- 15 mm crochet hook
- Little B pull flowers
Instructions
Ch 2.
-
1st rnd: 6 sc in 2nd ch from hook. Join with sl st in first sc.
-
2nd rnd: Ch 1. 2 sc in each sc around. Join with sl st in first sc. 12 sc.
-
3rd rnd: Ch 1. *2 sc in next sc. 1 sc in next sc. Rep from * around. Join with sl st in first sc. 18 sc.
-
4th rnd: Ch 1. *2 sc in next sc. 1 sc in each of next 2 sc. Rep from * around. Join with sl st in first sc. 24 sc.
-
5th rnd: Ch 1. *2 sc in next sc. 1 sc in each of next 3 sc. Rep from * around. Join with sl st in first sc. 30 sc.
-
6th rnd: Ch 1. *2 sc in next sc. 1 sc in each of next 4 sc. Rep from * around. Join with sl st in first sc. 36 sc.
-
Next rnd: Ch 1. Working into both loops, 1 sc in each sc around. Join with sl st in first sc.
-
Rep last rnd until work is the size you want,. Do not fasten off.
Handles:
-
1st rnd: Ch 1. 1 sc in each of next 9 (12-15) sc. Ch 6. Skip next 6 sc.1 sc in each of next 18 (24-30) sc. Ch 6. Skip next 6 sc. 1 sc in each of next 9 (12-15) sc. Join with sl st in first sc.
-
2nd rnd: Ch 1. 1 sc in each of next 9 (12- 15) sc. 10 sc in next ch-6 sp. 1 sc in each of next 18 (24-30) sc. 10 sc in next ch-6 sp. 1 sc in each of next 9 (12-15) sc. Join with sl st to first sc.
-
3rd rnd: Ch 1. 1 sc in each sc around. Join with sl st to first sc.
-
Fasten off.
-
56 (68-80) sc.
Additions
-
Add some Little B flowers or other embellishments by sewing them on with the thread yo use to create the flowers.
-
All you do to make the Little B flowers, is pull the thread!
-
I dyed these with ink on my craft sheet and added a piece of lace and a diamond.
Read NextCrochet Bag
Your Recently Viewed Projects

Thanks for your comment. Don't forget to share!
Stephanie Hantz
Feb 09, 2017
I saw one of these already made up at Joann's and Immediately thought of the ones I could make and actually use. They don't necessarily have to be done for crocheting projects but would be good for storage if you are short on space. I could totally see these bags under the cabinet especially in the bathrooms.
nanrob719 2124246
Apr 21, 2016
I could not pull up instructions. Please help. I would love to make this. Thank you.
Kaylee
Apr 25, 2016
@nanrob719 2124246 all the instructions are available above on the page. Plus, you can look below for some more clarification. Hope that helps! -Kaylee, Editor of FaveCrafts.com
plumleyt1 0533971
Apr 06, 2015
please let me know asap if the designer will be able to clarify the instructions on the handles. I have completed the basket to the beginning for the handles.
FaveCrafts Editor JL
Apr 07, 2015
Hi there - I have reached out to the designer and will update the pattern with addition instructions ASAP. Thanks!
FaveCrafts Editor JL
Apr 08, 2015
Hi there - here is more information from the pattern designer, Robyn: "What the instructions are doing is setting up where the handles are placed on the bag. You can ignore the stitch numbers, and start anywhere, chain the number of stitches that give you the length of handle you want( I did 6), slip stitch, and then single crochet around till you get to where you want the next handle, chain the same amount of stitches(6), slip stitch and single crochet till you come back to the first handle. The second round, single crochet around, including the handle, and slip stitch to end." Hope that helps - Julia from FaveCrafts
plumleyt1 0533971
Apr 06, 2015
I don't understand the final part for the handles. Please clarify
Report Inappropriate Comment
Are you sure you would like to report this comment? It will be flagged for our moderators to take action.
Thank you for taking the time to improve the content on our site.
![Battenberg Crochet Granny Square Bag Pattern [Free]](http://irepo.primecp.com/2022/08/532101/Battenberg-Bag-02_Category-CategoryPageDefault_ID-4857588.png?v=4857588)