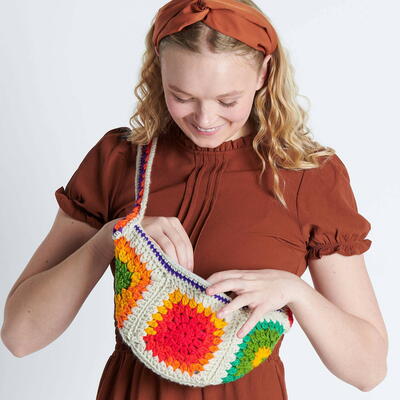
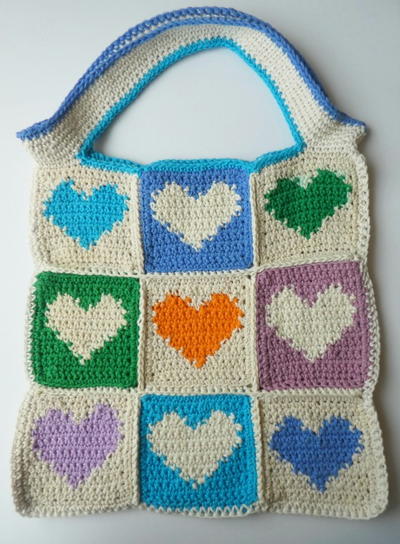
Crochet Fanny Pack Pattern (Free)
You'll be ready for any adventure with this granny square fanny pack pattern!

Wherever your travels take you this season, make sure you've got your trusty crochet fanny pack! This cute rainbow-colored granny square project is both fun and functional, with plenty of space for your essentials like keys, phone, and hand sanitizer. You can keep your hands free for taking photos, carrying purchases at a market, or walking the dog. This crochet bag is perfect for all kinds of activities! Self-striping yarn from Red Heart makes this project easy to work up, and the bright colors are sure to be a hit for any occasion.
If you love what you're reading, let us know by signing up for one of our crochet newsletters!
Sign up for FaveCrafts
Crochet HookH/8 or 5 mm hook
Yarn Weight(4) Medium Weight/Worsted Weight and Aran (16-20 stitches to 4 inches)
Crochet Gauge1 Motif = 5½" [14 cm] square
Finished SizeApprox 14" [35.5 cm] wide x 6" [15 cm] deep, excluding handles
Materials List
- 1 ball Red Heart® Super Saver Stripes® (5 oz/141 g; 236 yds/215 m) Contrast A Favorite Stripe (4965)
- 1 ball Red Heart® Super Saver® (7 oz/198 g; 364 yds/333 m) Contrast B Aran (313)
- Size U.S. H/8 (5 mm) Susan Bates® Silvalume crochet hook or size needed to obtain gauge
- Susan Bates® yarn needle
- Anchor® zipper, 12" [30.5 cm] long
- Coats® sewing thread
- Coats® sewing needle
Instructions
Abbreviations
- Beg = Beginning
- Ch = Chain(s)
- Cluster = (Yoh and draw up a loop. Yoh and draw through 2 loops on hook) twice in same stitch. Yoh and draw through all loops on hook.
- Cont = Continue(ity)
- Dc = Double crochet
- Hdc = Half double crochet
- Rep = Repeat
- Rnd(s) = Round(s)
- RS = Right side
- Sc = Single crochet
- Sl st = Slip stitch
- Sp(s) = Space(s)
- St(s) = Stitch(es)
- Tog = Together
- WS = Wrong side
- Yoh = Yarn over hook
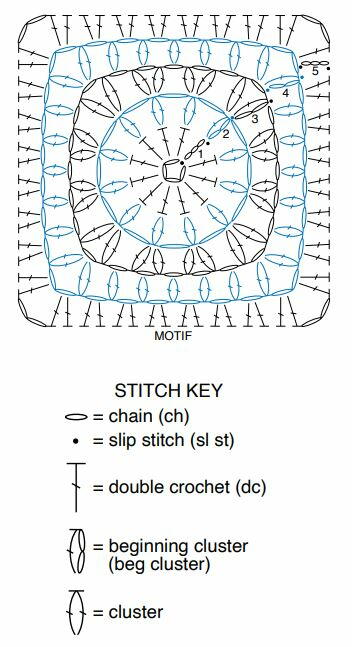
Motif
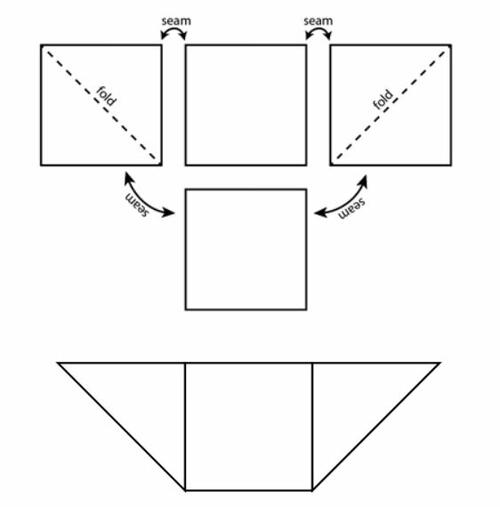
(Make 4) See diagram below.
With A, ch 4. Join with sl st to first ch to form ring.
-
1st rnd: Ch 3 (counts as dc). 11 dc in ring. Join with sl st to top of ch 3. 12 dc
-
2nd rnd: Ch 2. Yoh and draw up a loop in same sp as sl st. Yoh and draw through 2 loops on hook. Yoh and draw through rem loops on hook – beg cluster made. *Ch 1. Cluster in next st. Rep from * around. Ch 1. Join with sl st to top of beg cluster. (12 clusters, 12 ch-1 sps).
-
3rd rnd: Sl st in next ch-1 sp. Ch 2. (Beg cluster. Ch 1. Cluster) in same sp as sl st. Ch 1. *(Cluster. Ch 1. Cluster) in next ch-1 sp. Ch 1. Rep from * around. Join with sl st to top of first cluster.
-
4th rnd: Sl st in next ch-1 sp. Ch 2. (Beg cluster. Ch 2. Cluster) in same sp as sl st (corner made). Ch 1. *(Cluster in next ch-1 sp. Ch 1) 5 times. (Cluster. Ch 2. Cluster) in next ch-1 sp. Ch 1. Rep from * twice more. (Cluster. Ch 1) in each of next 5 ch-1 sps. Join with sl st to top of beg cluster. Fasten off.
-
5th rnd: Join B with sl st to any corner ch-2 sp. Ch 3 (counts as dc). (1 dc. Ch 2. 2 dc) in same sp as sl st. *2 dc in each ch-1 sp to next corner ch-2 sp. (2 dc. Ch 2. 2 dc) in corner ch-2 sp. Rep from * twice more. 2 dc in each ch-1 sp to end of rnd. Join with sl st to top of ch 3. Fasten off.

Assembly
-
Join Motifs: Hold WS of 2 Motifs tog with sts aligned. Join B with sl st in ch-2 corners of aligned Motifs at top right. Ch 1. Working in back loops only, work 1 sc in each dc through both thicknessess. Fasten off. Join Motifs as shown in diagram:
-
Top edging: 1st rnd: (RS). Join B with sl st to top edge of Bag at right corner. Ch 1. Work 1 sc in each hdc around. Do not break B. Join A with sl st to first sc
-
2nd rnd: With A, ch 1. 1 sc in each sc around. Break A. Join B with sl st to first sc.
-
3rd rnd: With B, as 2nd rnd. Fasten off.
Strap
With A, ch 109.
-
1st rnd: 2 dc in 4th ch from hook. *Skip next 2 ch. 3 dc in next ch. Rep from * to last 3 ch. Skip next 2 ch. (3 dc. Ch 2. 3 dc) in last ch. Working along opposite side of ch, work 3 dc in each ch-2 sp (working around foundation ch), to last ch. 3 dc in first ch of rnd (same ch as first 2 dc). Ch 2. Join B with sl st to top of ch 3. Break A.
-
2nd rnd: With B, ch 1. 2 sc in same sp as joining sl st. 1 sc in each dc around, working 2 dc in each center dc of each 3 dc. Join with sl st to first sc. Fasten off.
Sew Strap to Bag along top edge at either end as shown.
Finishing
-
Using sewing thread and needle, sew in zipper along top edge opening.
Crochet Fanny Pack Pattern PDF
Want to save this pattern for later or print it out in an easy-to-follow format? Get the free printable PDF from Red Heart.
Click Here to Download the Crochet Fanny Pack PDF
How to Print the PDF:
Printing this is as easy as 1-2-3! If you're not familiar with printing PDFs, here's the step-by-step, along with a few tips.
- Click the red button right above that reads, "Click Here to Download the Crochet Fanny Pack PDF."
- Find and open the PDF.
Pro tip: You may see the download appear at the bottom of your browser window, and you can open it from there. Or check wherever your downloads are set to save to (the Downloads folder is often a default location).
- Click the "Print File" button, choose the printer, choose how many copies you want, make any additional adjustments needed for personal preference, and click the "Print" button.
- Grab your hook, yarn, and any other supplies needed and you'll be ready to crochet this beauty!
Read NextCrochet Market Tote Pattern