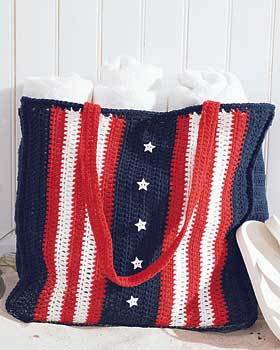
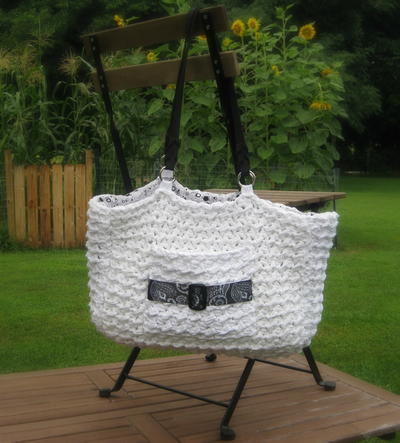
Cable Purse
Crochet an attractive handbag with cable pattern, which resembles many classic cable knitting patterns. This purse crochet pattern also calls for embroidered stars between the cross-sections of the cables.

Materials:
- Caron International's Simply Soft Tweed (96% acrylic, 4% rayon; 3 oz/85 g, 150 yds/137 m ball): 1 ball A.
- Caron International's Simply Soft (100% acrylic; 6 oz/170 g, 315 yds/288 m skein): 1 skein B. Shown in: #0002 Off White (A), #9750 Chocolate (B)
- One size US H-8 (5mm) crochet hook, or size to obtain gauge.
- Sewing needle and matching thread
- 1 set (2 handles) plastic clutch purse handles—6–7"/15–18 cm
- Yarn needle
- 12 x 27"/30.5 x 68.5 cm piece of fabric (for lining) (optional)
Gauge: In pattern stitch, using US H-8 (5mm) hook, 18 sts and 23 rows = 4"/10 cm
Terms:
FPdc: Front-post double crochet: (RS)Yarn over, insert hook from right-hand side of stitch to WS of piece, return to RS at left-hand side of stitch indicated, yarn over and pull up a loop, complete as dc.
FPtr: Front-post treble crochet: (RS)[Yarn over] twice, insert hook from right-hand side of stitch to WS of piece, return to RS at left-hand side of stitch indicated, yarn over and pull up a loop, complete as tr.
FPdc2tog: Front-post double crochet 2 together: (RS)[Yarn over, insert hook from right-hand side of next stitch to WS of piece, return to RS at left-hand side of stitch indicated, yarn over and pull up a loop, yarn over and draw through two loops on hook] twice, yarn over and draw through all three loops on hook.
sc2tog: Single crochet 2 together – Insert hook in next stitch, yarn over and pull up a loop, (two loops on hook), insert hook in next stitch, yarn over and pull up a loop, yarn over and draw through all three loops on hook.
Notes:
- To create the cables, front-post stitches are worked into the stitches 2 rows below (skipping over the row immediately below), while single crochets are worked into the stitches in the row immediately below (into which stitches are usually worked).
- When working front-post stitches, always skip the stitches behind the front-post stitches. For example, when working front-post stitches in the next 2 front-post stitches 2 rows below, skip the next 2 stitches in the row immediately below before proceeding.
- Working a front-post stitch around another front-post stitch 2 rows below often requires the stitch to be slanted slightly backward (to reach a stitch that is slightly behind the current position) or slightly forward (to reach a stitch that is slightly ahead of the current position).
Instructions:
FRONT AND BACK (make 2)
With A, chain 45.
Row 1: Sc in second ch from hook and in each remaining ch across, turn—44 sc.
Row 2 (RS): Ch 1, sc in next 5 sc, skip next sc, dc in next sc; working in front of last dc made dc in skipped sc, [sc in next 6 sc, skip next sc, dc in next sc, dc in skipped sc] 4 times, sc in last 5 sc, turn.
Row 3: Ch 1, sc in each st across, turn.
Row 4: Ch 1, [sc in next 4 sc; working in dc 2 rows below (Row 2), 2 FPdc around next 2 dc (take care to skip the next 4 sc in the previous row, behind the FPdc)] 5 times, sc in last 4 sc, turn.
Row 5: Ch 1, sc in each st across, turn.
Row 6: Ch 1, sc in next 3 sc, [FPdc around next 2 FPdc (2 rows below), sc in next 2 sc] 10 times, sc in last sc, turn.
Note: From here onwards, all front-post stitches are worked around stitches 2 rows below, rather than in the stitches of the row immediately below. Take care to skip the corresponding number of stitches in the row immediately below (behind the front-post stitches) before working the next single crochet stitches.
Row 7: Ch 1, sc in each st across, turn.
Row 8: Ch 1, sc in next 2 sc, FPdc around next 2 FPdc 2 rows below, [sc in next 4 sc, FPdc around next 4 FPdc 2 rows below] 4 times, sc in next 4 sc, FPdc around next 2 FPdc 2 rows below, sc in last 2 sc, turn.
Row 9: Ch 1, sc in each st across, turn.
Row 10: Ch 1, sc in next 2 sc, FPdc around next 2 FPdc 2 rows below, [sc in next 4 sc, skip next 2 FPdc 2 rows below, FPtr around next 2 FPdc 2 rows below; working in front of 2 FPtr just made FPtr around 2 skipped FPdc 2 rows below] 4 times, sc in next 4 sc, FPdc around next 2 FPdc 2 rows below, sc in last 2 sc, turn.
Row 11: Ch 1, sc in each st across, turn.
Row 12: Ch 1, sc in next 3 sc, FPdc around next 2 FPdc 2 rows below, sc in next 2 sc, [FPdc around next 2 FPtr 2 rows below, sc in next 2 sc] 8 times, FPdc around next 2 FPdc 2 rows below, sc in last 3 sc, turn.
Row 13: Ch 1, sc in each st across, turn.
Row 14: Ch 1, [sc in next 4 sc, FPdc around next 4 FPdc 2 rows below] 5 times, sc in last 4 sc, turn.
Row 15: Ch 1, sc in each st across, turn.
Row 16: Ch 1, sc in next 4 sc, FPdc around next 4 FPdc 2 rows below, [sc in next 4 sc, skip next 2 FPdc 2 rows below, FPtr around next 2 FPdc 2 rows below, working in front of 2 FPtr just made FPtr around 2 skipped FPdc 2 rows below] 3 times, sc in next 4 sc, FPdc around next 4 FPdc 2 rows below, sc in last 4 sc, turn.
Row 17: Ch 1, sc in each st across, turn.
Row 18: Ch 1, sc in next 5 sc; [working around next 2 front-post sts 2 rows below FPdc2tog] twice; *sc in next 4 sc, FPdc around next 2 FPtr 2 rows below, sc in next 2 sc, FPdc around next 2 FPtr 2 rows below, sc in next 4 sc; [working around next 2 front-post sts 2 rows below FPdc2tog] twice; repeat from * once more, sc in last 5 sc, turn.
Row 19: Ch 1, sc in each st across, turn.
Row 20: Ch 1, sc in next 5 sc, skip next FPdc2tog 2 rows below, FPdc around next FPdc2tog 2 rows below, FPdc around skipped FPdc2tog 2 rows below, [sc in next 3 sc, FPdc around next 2 FPdc 2 rows below, sc in next 4 sc, FPdc around next 2 FPdc 2 rows below, sc in next 3 sc, skip next FPdc2tog 2 rows below, FPdc around next FPdc2tog 2 rows below, FPdc around skipped FPdc2tog 2 rows below] twice, sc in last 5 sc, turn.
Row 21: Ch 1, sc in each st across, turn.
Row 22: Ch 1, sc in next 5 sc, FPdc around next 2 FPdc 2 rows below, [sc in next 4 sc, FPdc around next 2 FPdc 2 rows below, sc in next 2 sc, FPdc around next 2 FPdc 2 rows below, sc in next 4 sc, FPdc around next 2 FPdc 2 rows below] twice, sc in last 5 sc, turn.
Row 23: Ch 1, sc in each st across, turn.
Row 24: Ch 1, sc in next 5 sc, skip next FPdc 2 rows below, FPdc around next FPdc 2 rows below, FPdc around skipped FPdc 2 rows below, [sc in next 5 sc, FPdc around next 4 FPdc 2 rows below, sc in next 5 sc, skip next FPdc 2 rows below, FPdc around next FPdc 2 rows below, FPdc around skipped FPdc 2 rows below] twice, sc in last 5 sc, turn.
Row 25: Ch 1, sc in each st across, turn.
Row 26: Ch 1, sc in next 5 sc, FPdc around next 2 FPdc 2 rows below, *sc in next 6 sc; [working around next 2 front-post sts 2 rows below FPdc2tog] twice, sc in next 6 sc, FPdc around next 2 FPdc 2 rows below; repeat from * once more, sc in last 5 sc, turn.
Row 27: Ch 1, sc in each st across, turn.
Row 28: Ch 1, sc in next 4 sc, 2 FPdc around next 2 FPdc 2 rows below, sc in next 6 sc, FPdc around next 2 FPdc2tog 2 rows below, sc in next 4 sc, FPdc around next FPdc 2 rows below, sc in next 2 sc, FPdc around next FPdc 2 rows below, sc in next 4 sc, FPdc around next 2 FPdc2tog 2 rows below, sc in next 6 sc, 2 FPdc around next 2 FPdc 2 rows below, sc in last 4 sc, turn.
Row 29: Ch 1, sc in each st across, turn.
Row 30: Ch 1, sc in next 3 sc, FPdc around next 2 FPdc 2 rows below, sc in next 2 sc, FPdc around next 2 FPdc 2 rows below, sc in next 6 sc, FPdc around next 2 FPdc 2 rows below, sc in next 4 sc, FPdc around next 2 FPdc 2 rows below, sc in next 4 sc, FPdc around next 2 FPdc 2 rows below, sc in next 6 sc, FPdc around next 2 FPdc 2 rows below, sc in next 2 sc, FPdc around next 2 FPdc 2 rows below, sc in last 3 sc, turn.
Row 31: Ch 1, sc in each st across, turn.
Row 32: Ch 1, sc in next 2 sc, FPdc around next 2 FPdc 2 rows below, sc in next 4 sc, FPdc around next 2 FPdc 2 rows below, sc in next 6 sc, FPdc around next 2 FPdc 2 rows below, sc in next 3 sc, skip next FPdc 2 rows below, FPdc around next FPdc 2 rows below, FPdc around skipped FPdc 2 rows below, sc in next 3 sc, FPdc around next 2 FPdc 2 rows below, sc in next 6 sc, FPdc around next 2 FPdc 2 rows below, sc in next 4 sc, FPdc around next 2 FPdc 2 rows below, sc in last 2 sc, turn.
Row 33: Ch 1, sc in each st across, turn.
Row 34: Ch 1, sc in next 3 sc, FPdc around next 2 FPdc 2 rows below, sc in next 2 sc, FPdc around next 2 FPdc 2 rows below, sc in next 8 sc, FPdc around next 2 FPdc 2 rows below, sc in next 2 sc, FPdc around next 2 FPdc 2 rows below, sc in next 2 sc, FPdc around next 2 FPdc 2 rows below, sc in next 8 sc, FPdc around next 2 FPdc 2 rows below, sc in next 2 sc, FPdc around next 2 FPdc 2 rows below, sc in last 3 sc, turn.
Row 35: Ch 1, sc in each st across, turn.
Row 36: Ch 1, sc2tog, sc in next 2 sc, FPdc around next 4 FPdc 2 rows below, sc in next 10 sc, FPdc around next 2 FPdc 2 rows below, sc in next sc, skip next FPdc 2 rows below, FPdc around next FPdc 2 rows below, FPdc around skipped FPdc 2 rows below, sc in next sc, FPdc around next 2 FPdc 2 rows below, sc in next 10 sc, FPdc around next 4 FPdc 2 rows below, sc in next 2 sc, sc2tog, turn—42 sts.
Row 37: Ch 1, sc in each st across, turn.
Row 38: Ch 1, sc2tog, sc in next sc, skip next 2 FPdc 2 rows below, FPtr around next 2 FPdc 2 rows below, FPtr around 2 skipped FPdc 2 rows below, sc in next 11 sc, FPdc around next 6 FPdc 2 rows below, sc in next 11 sc, skip next 2 FPdc 2 rows below, FPtr around next 2 FPdc 2 rows below, FPtr around 2 skipped FPdc 2 rows below, sc in next sc, sc2tog, turn—40 sc.
Row 39: Ch 1, sc in each st across, turn.
Row 40: Ch 1, sc2tog, sc in next sc, [working around next 2 front-post sts 2 rows below FPdc2tog] twice, sc in next 13 sc, FPdc around next FPdc 2 rows below, [working around next 2 front-post sts 2 rows below FPdc2tog] twice, FPdc around next FPdc 2 rows below, sc in next 13 sc, [working around next 2 front-post sts 2 rows below FPdc2tog] twice, sc in next sc, sc2tog, turn—38 sc.
Row 41: Ch 1, sc in each st across, turn.
Row 42: Ch 1, sc2tog, skip next FPdc2tog 2 rows below, FPdc around next FPdc2tog 2 rows below, FPdc around skipped FPdc2tog 2 rows below, sc in next 14 sc, [working around next 2 front-post sts 2 rows below FPdc2tog (take care, one of the 2 front-post sts 2 rows below is an FPdc2tog)] twice, sc in next 14 sc, skip next FPdc2tog 2 rows below, FPdc around next FPdc2tog 2 rows below, FPdc in skipped FPdc2tog 2 rows below, sc2tog, turn—36 sts.
Row 43: Ch 1, sc in each st across, turn.
Row 44: Ch 1, sc2tog, sc in next 15 sc, skip next FPdc2tog 2 rows below, FPdc around next FPdc2tog 2 rows below, FPdc around skipped FPdc2tog 2 rows below, sc in next 15 sc, sc2tog, turn—34 sts.
Row 45: Ch 1, sc in each st across, turn.
Row 46: Ch 1, sc2tog, sc in next 30 sc, sc2tog—32 sts. Fasten off, leaving a long tail for sewing.
BASE
With B, chain 43.
Row 1: Sc in second ch from hook and in each remaining ch across, turn—42 sc.
Rows 2–8: Ch 1, sc in each sc across, turn.
Row 9: Ch 1, 3 sc in first sc, sc in each sc across to last sc, 3 sc in last sc; pivot to work in ends of rows along side, work 6 sc evenly spaced along side; pivot to work along opposite side of foundation ch, 3 sc in first ch, sc in each ch across to last ch, 3 sc in last ch; pivot to work in ends of rows along side, work 6 sc evenly spaced along side; join with slip st in first sc—104 sc. Fasten off, leaving a long tail for sewing.
SIDE (make 2)
With B, chain 11.
Row 1: Sc in second ch from hook and in each remaining ch across, turn—10 sc.
Row 2: Ch 1, sc in next 4 sc, skip next sc, dc in next sc, dc in skipped sc, sc in next 4 sc, turn.
Row 3: Ch 1, sc in each st across, turn.
Row 4: Ch 1, sc in next 3 sc, 2 FPdc around next 2 dc 2 rows below, sc in last 3 sc, turn.
Row 5: Ch 1, scin each st across, turn.
Row 6: Ch 1, sc in next 2 sc, FPdc around next 2 FPdc 2 rows below, sc in next 2 sc, FPdc around next 2 FPdc 2 rows below, sc in last 2 sc, turn.
Row 7: Ch 1, sc in each st across, turn.
Row 8: Ch 1, sc in next sc, FPdc around next 2 FPdc 2 rows below, sc in next 4 sc, FPdc around next 2 FPdc 2 rows below, sc in last sc, turn.
Row 9: Ch 1, sc in each st across, turn.
Row 10: Ch 1, sc in next 2 sc, FPdc around next 2 FPdc 2 rows below, sc in next 2 sc, FPdc around next 2 FPdc 2 rows below, sc in last 2 sc, turn.
Row 11: Ch 1, sc in each st across, turn.
Row 12: Ch 1, sc in next 3 sc, FPdc around next 4 FPdc 2 rows below, sc in last 3 sc, turn.
Row 13: Ch 1, sc in each st across, turn.
Row 14: Ch 1, sc in next 3 sc, skip next 2 FPdc 2 rows below, FPtr around next 2 FPdc 2 rows below, FPtr around 2 skipped FPdc 2 rows below, sc in last 3 sc, turn.
Row 15: Ch 1, sc in each st across, turn.
Row 16: Ch 1, sc in next 2 sc, FPdc around next 2 FPtr 2 rows below, sc in next 2 sc, FPdc around next 2 FPtr 2 rows below, sc in last 2 sc, turn.
Rows 17–36: Repeat Rows 7–16.
Rows 37–44: Repeat Rows 7–14.
Rows 45 and 46: Ch 1, sc in each st across, turn.
Fasten off, leaving a long tail for sewing.
FINISHING
Using yarn needle, weave in all ends.
Fabric Lining (optional)
Trace the purse pieces onto fabric and cut out, leaving a 1/2"/1 cm seam allowance around all edges. Sew front and back pieces to bottom piece. Sew side pieces to bottom, front and back pieces.
Assembly
Sew front and back to bottom of purse. Sew sides of purse to bottom, front and back. Insert lining into bag and sew lining to upper inside edge and tack to inside seams of purse.
With B, embroider stars on front of purse, in between crossing sections of cables, as shown in photograph.
Handles
Thread 2 strands of A or B (whichever is appropriate for handles) onto needle and sew handles centered on upper edge of bag.
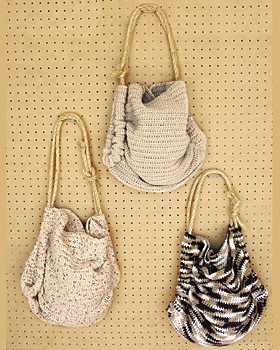
Looking for more free purse patterns? Try our 26 Fashionable Free Bag Patterns
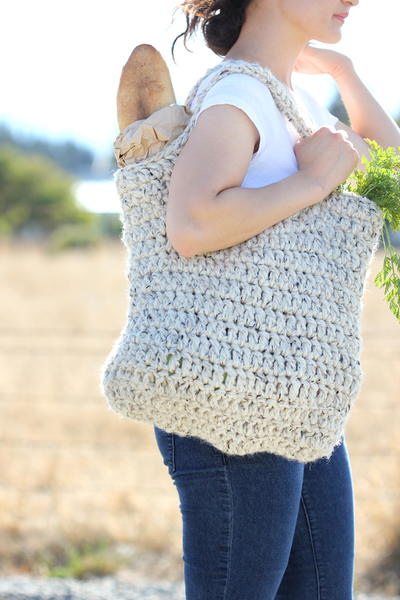
Read NextBring Home the Baguette Tote
Your Recently Viewed Projects

Thanks for your comment. Don't forget to share!
Sweet Linda
Feb 19, 2012
I would make this Cable Purse before the Tone Tote as I feel I would use it more often than the Tote. However, I find both of them attractive and could put either of them to good use.
bcase567 8944231
Feb 15, 2012
I definitely like this one the best. I love the look of the cable and that it has a nice squared off shape. It looks a little smaller which I like too.
Teariana Designs
Feb 10, 2012
I like this purse for 3 reasons. 1. It has a nice shape to it, I really like squared up edges. I made a purse like this that was supposed to be slouchy, but since it had such a beautiful geometric shape I seamed it and lined it to emphasize that shape. 2. Also like the purse I made, I really like the texture created by the cabling on it. It is more interesting to crochet because of that too. 3. My other purse was a knit, I like to change back and forth between knit and crochet because it is easier on my hands and arms.
donnawoytovich 964 3425
Feb 10, 2012
Love this one. Definitely my favorite. Just the right size and has a more intricate look. The cables add so much to the pattern.
arodgers67 9023564
Feb 10, 2012
I love this pattern it is stylish and well made. It is one you can carry with any outfit. Looks like it would fun to make
slucas 7897976
Feb 09, 2012
This is much better than the other oner one. It is the right size and soo cute! I like it so very much!
nsusanroberts 4668 176
Feb 09, 2012
I like this one better. It would be a different way to use the cable stitch. Can you imagine it with a cable sweater and jeans!
shelleymcelhiney 0 587358
Feb 09, 2012
I like this one better, the design is more interesting & has a feminine, retro feel. (the other one looks simpler to make, though)
Oregon Dot
Feb 09, 2012
This purse is one of very few I would consider making because it's smart and elegant, and has interest in the pattern. I wouldn't even look at the other one. It's boring, to me, and I don't really care for it's shape.
Roseanne
Feb 09, 2012
I like both purses. But I would make this one first (if not only). It is a pattern that will keep my interest and use new stitches.
vikyharry 9877362
Feb 09, 2012
This one has so much character. You can see the talent and effort.
BarPurple
Mar 23, 2010
Is anyone else having problems at row 28? I'm following the pattern fine up to row 27 and am happy with the results, but when I get to row 28 it all goes wrong. There doesn't seam to be enough stitches and the pattern goes all wrong. Help please.
Crafter 6720439
Feb 14, 2010
I have been looking for a bag to make for my grandaughter who will be 13 in July.........THIS is it! Instead of using the plastic handles, I'm going to extend the sides to create straps that will tie at the top, which is what she wants.
Report Inappropriate Comment
Are you sure you would like to report this comment? It will be flagged for our moderators to take action.
Thank you for taking the time to improve the content on our site.