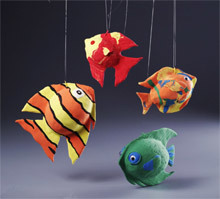
Magic Molded Fish
By wrapping air-dry molding compound around foam eggs, you and your kids can create all their favorite under the sea stars! These fun fish craft projects are a great opportunity to teach your kids about undersea life or just have a good time.

Materials:
- STYROFOAM Brand Foam:
- Egg, size of choice (2 1/2", 3" and 4" shown here)
- Air-dry modeling compound, two or more colors (your choice)
- Two wiggle eyes, 10mm
- Pony beads, color of choice, two (for larger fish)
- Plastic-coated paper clip
- Scissors
- Rolling pin
- Pencil
- Wire cutters
- Ruler
- White, thick craft glue
- Fishing line, Nylon
Steps:
Note: Read all instructions before beginning project. Adult supervision required.
- For small fish, use rolling pin to roll two 2" balls of modeling compound ("clay") into 1/8" thick, 5" diameter circles. For larger fish, use two 3" balls rolled to 1/8" thick, 6" diameter circles. One circle will cover each half of fish. Turn circles over several times while rolling to prevent sticking. Use one color (fish shown at bottom, accented with second color) or several colors depending upon desired effect:
- Marbled Fish (shown at top)
For each circle, roll equal amounts of two colors into long ropes. Twist ropes together, fold in half, and roll to 1/8" thickness. Repeat.
- Striped Fish (shown at left)
Roll two large circles of different colors to 1/4" thickness. Cut each circle into 1"-wide strips. Re-form circles, alternating colors. Press seams together and roll again to 1/8" thickness.
- Multicolored Fish (shown at right)
Place thin strips of additional colors on top of main color while rolling out circles. - Drape one circle over one lengthwise half of foam egg, with wide end of egg 1/4" from circle edge. Matching seams at center and aligning stripes/colors, cover remaining egg half with second circle. Press circles together around egg, pressing out air bubbles.
- Using photo as guide, gently mark nose, fins, and tail with pencil. Use scissors to cut away excess clay. Press seams together. If desired, use clay scraps to create side fins; press to body.
- For small fish, glue and press wiggle eyes directly into clay. For large fish, glue wiggle eyes to pony bead before gluing into clay.
- Add very thin strips of contrasting color to separate stripes or accent fins. Use pencil to imprint clay surface with gill, mouth, and fin lines. Use fingernail to imprint scales, working from gills to tail.
- Use wire cutters to cut coordinating paper clip in half. Insert cut clip ends into top of fish to mark placement, then remove. Glue clip ends into holes. Let fish dry completely.
- Cut 12" length from fishing line for hanger. Insert line into clip; knot ends to secure
®™ Trademark of The Dow Chemical Company ("Dow") or an affiliated company of Dow.
For more project ideas, please see styrofoamstyle.com.
Your Recently Viewed Projects
Thanks for your comment. Don't forget to share!
joyhandymceuen 222 0338
Jan 06, 2012
LOVE, LOVE, LOVE IT, ABSOLUTLY CHARMING, AND PLAYFUL, AND FUN!!!!!
Report Inappropriate Comment
Are you sure you would like to report this comment? It will be flagged for our moderators to take action.
Thank you for taking the time to improve the content on our site.