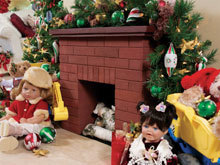
Santa's Hot Fireplace
Even if your home doesn't have a chimney, you can still create a simple fireplace for Santa to use! Easy Christmas crafts like this are great for doing with the whole family. So gather everyone together and create a lovely soot-free fireplace! This is also a great craft idea for a kids room or nursery. Young kids can hang stockings from this fireplace and decorate the mantel however they'd like!

Materials:
- 3 36"x12"x2" sheets of STYROFOAM* Brand Foam
- 1 6" x 12" x 1" sheet of STYROFOAM* Brand Foam
- 1 cup fine sand
- 2/3 yard black fabric or felt, 45" wide
- Acrylic paints: iron oxide; burnt sienna; raw umber; dark brown
- 1 pint acrylic spackling mix
- Serrated knife
- Candle stub or paraffin
- Fine-line black permanent marker
- Disposable mixing bowl
- Stiff bristle brush
- Foam brush
- Old sponges
- Disposable palette
- Wooden yardstick with metal edge
- Toothpicks
- Water basin
- Skewer
- Paper towels
- Fine-grit sandpaper
- Low-temp glue gun and glue sticks
- Thick, white craft glue
- Small logs (optional)
- Pattern
Instructions:
-
Wax serrated knife with candle stub or paraffin. Cut following front pieces from 2"-thick foam sheets: two 6" x 12"; one 9" x 22". Cut four 6" x 21" side pieces from remaining 2"-thick foam sheets.
-
Cut following pieces from 1"-thick foam sheet: 9-1/2" x 25" mantel; one 1/2" x 24-3/4" trim strip; two 1/2" x 8" trim strips.
-
To assemble fireplace, use glue gun and toothpicks to join pieces. Refer to photo to place front pieces flat on work surface with 6" x 12" "legs" at bottom and 9" x 22" section lengthwise above them. Apply glue to toothpick ends before inserting into foam edges, then apply line of glue along seam before pressing foam pieces together; let dry.
-
With assembled fireplace front flat on work surface, refer to diagram to glue narrow edges of upright 6" x 21" side pieces to back of fireplace front, aligning outside and opening edges. Let dry completely.
-
Cut several 3" blocks from scrap foam. Glue foam scraps between side pieces at back of fireplace to add strength.
-
Position mantel on center top of fireplace; do not glue yet. Be sure back edge of mantel is flush with back edge of fireplace. Glue trim pieces to bottom of mantel, flush with fireplace; let dry. Remove mantel; carefully set aside.
- Using yardstick and marker, refer to photo to draw "mortar lines" on front of fireplace, about 2" apart. Note staggered spacing of bricks, as well as vertical row at top of opening. Extend lines around sides of fireplace. Carefully score mortar lines with ruler edge; do not gouge foam surface. Be sure lines are deep enough to be visible from several feet away.
-
Follow manufacturer's instructions to mix several cups of acrylic spackling until smooth. Add several handfuls of sand for rough texture.
-
Use stiff brush to spread thin, smooth coat of spackle/sand mixture over foam surface. Use wooden skewer to remove spackling from mortar lines and top edge of fireplace; let dry. Wash tools and dispose of excess mixture somewhere other than household sink.
-
Use stiff brush to paint entire fireplace, excluding mantel, iron oxide; let dry. Mix small amounts iron oxide and dark brown. Sponge paint some areas of bricks with this mixture and other areas with raw umber for realistic color variation. Let dry.
-
Mix several cups of acrylic spackling until smooth. Use foam brush to spread mixture over all outer surfaces of mantle and trim pieces. Dip brush in water occasionally for smoother finish. Let dry completely. Sand spackling and remove dust with damp paper towel. Repeat if necessary for smooth finish.
-
Paint mantel and trim dark brown; let dry. Glue mantel to top of fireplace.
- Cut 22"x30" piece from black fabric. Glue fabric to back and bottom of fireplace. Add small logs, if desired.
Read NextBuffalo Plaid Christmas Hoop Wreath
Your Recently Viewed Projects


Thanks for your comment. Don't forget to share!
Melissa Ryan
Oct 19, 2012
What a great project! Would you make this faux fireplace for your home?
Report Inappropriate Comment
Are you sure you would like to report this comment? It will be flagged for our moderators to take action.
Thank you for taking the time to improve the content on our site.