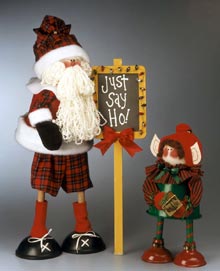
Plunger Pals Santa and Elf
Do you have a backed up toilet? Don't worry about it. Santa and his elf are trained for the job. Create this cute plunger pals craft, it'll get used year-round.
Materials:
-
STYROFOAM* Brand Foam:
- Balls: 6", one for Santa; 3-1/2", one for elf
- Block, 2" x 2" x 2"
Other Materials for Santa:
- Standard household plungers, two
- 8" plastic flowerpot, one
- Gloss enamel paints: black; holiday rose; hot rod red; white
- 7" x 9" chalkboard
- Wood: 5/8" plug; 1" x 24" slat, one each
- Child-size clothing: Size 10 boy's red plaid pajamas; black mittens, one pair; red socks, one pair
- White shoelaces, one pair
- Unbleached muslin, 20" square
- 45" white plush felt, 1 yd.
- 1-1/2" red ribbon, 2/3 yd.
- Black soutache cord, 2/3 yd.
- Polyester fiberfill, small amount
- White chenille yarn, approx. 1/2 skein
- 1/2" gold jingle bell, one
- Miniature Christmas lights
- Wood stain (optional)
Other Materials for Elf:
- 11" mini household plungers (or drain openers), two
- 6" white or green plastic flowerpot, one
- Gloss enamel paints: beachcomber beige; black; holiday rose; hot rod red; real green; white
- Child-size clothing: red sock, one (reserved from Santa); red stocking cap, one
- Cotton fabric: unbleached muslin, 14" square; red/green Christmas pinstripe, 1/4 yd.
- Ribbon: 1/8" green, 3 yd.; 1/4" green, 20"; 1/4" red, 1 yd.
- Polyester fiberfill, small amount
- Brown wavy doll hair
- White craft foam, 3" x 6"
- 1/2" gold jingle bells, three
- Gold foil gift wrap, 8" square
- Green curling ribbon
Other Tools:
- 1-1/2" wood screws with metal washers, four
- 16-gauge wire
- Fabric glue
- Wire cutters
- Drill with small bit
- Screwdriver
- Awl or ice pick
- Sewing needle and matching thread
- Pencil
- Scissors
- Tape measure
- Compass
- Tape: masking; transparent
- Fine-line black permanent marking pen
- Paintbrushes: 1" foam; medium flat; small round
- Paper towels
- Disposable palette
- 8" cardboard square
- Small household sponge
- Rubber band
- Pattern
Instructions:
For Santa:
-
Paint flowerpot red and let dry.
-
Wrap muslin square tightly around foam ball for head. Smooth any wrinkles from face area and then secure excess muslin with a sewing needle and doubled thread. Stitch back and forth through gathered fabric several times until secure; knot thread and trim.
-
Dip wood end of paintbrush handle in black paint to dot eyes 1/2" apart on center of face. Using rose, paint wood plug and drybrush 1-1/2" circles for Santa's cheeks. Allow to dry.
-
Cut legs from pajama bottoms 12" from waistband for knickers. Note: Reserve pajama legs. Trim side seams from knickers until waistband measures 20" across. With fabric right sides together, glue sides using 1/2" seam allowance. Let dry and then turn. Position plungers side by side and place knickers on wood handles (see photo). Glue waistband to top of handles, gathering fabric as needed.
-
For shoes, unscrew rubber plungers from handles. Mark three dots in a vertical row on each plunger, evenly spaced 1" apart. Mark a second row 1" to right of first row. Use awl or ice pick to poke holes at dots for shoelace eyelets. Lace shoelaces through holes and tie in small bows at top. Cut foot portion from each red sock and then slide cuffs onto bottom of wood handles. Note: Reserve sock feet for elf. Screw rubber plunger shoes onto bottom of handle legs.
-
Cut two 26" lengths of wire for arms. Bend each wire in half, shaping a loop at center for hands. Turn flowerpot body upside-down. Insert wire ends through drainage hole and pull approx. 5" to inside, leaving 8" arms on outside. Bend wires in large loops on inside to secure.
-
Place upside-down flowerpot body on top of wood handle legs. Drill vertically through pot and into top of each handle. Slide a washer on each screw and then drive screws into handles, securing body to legs.
-
Lightly stuff each mitten with fiberfill and place on wire loop hands. Cut two 8" x 6" rectangles from pajama fabric. Glue 6" edges right sides together to form two tubes. Let dry and turn. Place sleeve tubes on wire arms. Gather fabric at top of each sleeve with your fingers and then tightly tie with a 6" length of black cord. Glue gathered end of sleeves to top of pot. Tuck opposite ends inside mittens. Cut two 7" x 2" strips of plush felt. Glue strips centered over bottom of sleeves and top of mittens, overlapping ends on inside of arm next to body.
-
Measure height of flowerpot. Using this measurement, cut a 3" wide strip from pajama fabric. Glue strip vertically to center front of pot. Cut a 30" x 2-1/2" strip and a 9" circle of white plush felt. Glue felt strip around bottom of flowerpot, overlapping ends at center back. Glue circle to top of pot for collar.
-
Glue muslin-covered head to top of flowerpot; glue rose wood plug to face for nose. Wrap yarn around 8" cardboard square 18 times. Use scrap of yarn to tie off yarn at center front of cardboard; do not trim. Carefully slide loops from cardboard and then wrap center tie around remainder of wraps. Glue center of yarn bundle just below nose for a mustache. Wrap yarn around cardboard 100 times for beard. Tie off yarn at edge of cardboard. Slide loops from cardboard and glue tied end just under center of mustache for beard.
-
Cut cardboard in half. Wrap yarn widthwise around one 4" x 8" rectangle. Make two yarn bundles with 12 wraps and one with six wraps, tying each off at edge of cardboard. Glue longer bundles to sides of face for hair and shorter bundle to top for bangs.
-
For hat, measure circumference at cut end of a reserved pajama leg. Using this measurement plus 1/2", cut a 1-1/2 wide strip of plush felt. Glue felt around raw edge, overlapping ends. Glue hat on Santa's head with felt trim just above his eyes. String jingle bell centered on 12" length of black cord. Wrap cord around top of hat and tie in small bow on front to close.
- Using photo as a guide, paint "Just Say Ho!" on chalkboard with white. If desired, apply stain to chalkboard frame and wood slat and let dry. Glue Christmas lights around chalkboard frame. Tie a small red ribbon bow and glue to center bottom of frame. Glue wood slat vertically to back of chalkboard, letting one end peek above top of sign and opposite end extend at bottom for post. Wrap a mitten around post to hold sign.
For Elf:
-
Unscrew rubber plungers from wood handles. Paint wood handles and flowerpot green. Sponge paint rubber plungers red, applying additional coats as needed until opaque. Let dry after each coat.
-
Cut red ribbon in half. Spiral-wrap a red ribbon around each green handle and glue to secure (see photo). Screw rubber plungers onto bottom of handles for elf's legs and shoes. Cut two 18" lengths of 1/8" green ribbon. String a bell on center of each ribbon. Wrap ribbon around top of each rubber plunger and tie in a small bow, positioning bells at front.
-
Follow Steps 2-3 of Santa to cover 3-1/2" foam ball with muslin, to dot eyes, and to paint 1-1/8" circle cheeks.
-
Using pattern, cut ears from white craft foam just inside traced outlines. Paint foam beige and allow to dry. Draw detail lines with black marking pen, reversing direction of one ear. Glue ears to opposite sides of head 1/2" from cheeks (see photo). Glue curly doll hair framing top and sides of face in front of ears. Note: Remainder of head will be covered by hat.
-
Follow Step 6 of Santa to form wire arms, using two 20" lengths of wire. Lightly stuff sock feet reserved from Santa and place over loop ends of wire arms for mittens. Tightly gather tops of socks around wire arms and then tack with needle and thread, using same method as for muslin head.
-
Cut two 6 x 7-1/2" rectangles of Christmas fabric with pinstripes running lengthwise. Glue 7-1/2" edges right sides together to form two tubes. Let dry and turn. Place sleeve tubes on wire arms. Tuck and glue top of mittens inside bottom of sleeves. Wrap 1/8" green ribbon around each sleeve 1" from the bottom and tie in small bows, forming ruffled cuffs. Gather fabric at top of each sleeve with your fingers and then tightly tie with 1/8" green ribbon. Glue gathered end of sleeves to top of pot.
-
Glue muslin-covered head to top of pot. Cut a 45" x 3-1/2" strip of Christmas fabric with pinstripes running widthwise. Wrap strip around neck for collar with ends at center back and then place rubber band over fabric to temporarily secure. Arrange gathers evenly, positioning 1-1/4" of fabric above rubber band. Wrap 1/8" green ribbon over rubber band and tie in small bow at center front. Cut Vs in ribbon ends. Carefully cut and remove rubber band.
-
Arrange and glue stocking cap to elf's head. String a jingle bell on center of 1/4" green ribbon. Wrap ribbon around tip of hat and tie in a small bow.
- Wrap foam block with gold foil and tie with curling ribbon. Glue mini gift package between elf's mittens.
Read NextCrochet Gnome Earrings