Advent Calendar Quilt

Create a festive Advent Calendar Quilt this year. Fill the calendar pockets with some goodies for you and the family to discover during your countdown to Christmas.
HolidayChristmas
Materials List
-
FABRIC Requirements
- One panel (2/3 yard) Panel-C8653 Natural
- 1/3 yard Holiday-C8659 Natural (borders)
- 1/3 yard Mix-C7200 Pine (binding)
- 3/4 yard Comfort & Joy Collection backing fabric of your choice
- 27" × 27" batting
CUTTING
-
From Panel-C8653 Natural:
• Cut the calendar panel 1/4" outside the outermost red border lines. Save the gift tags for another project.
From Holiday-C8659 Natural:
• Cut four 2 1/2" × width-of-fabric (WOF) strips.
From Mix-C7200 Pine:
• Cut three 2 1/2" × WOF strips for binding.
CONSTRUCTION
All seam allowances are 1/4" and pieces are sewn right sides together.
-
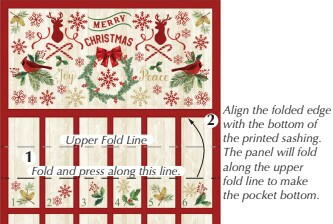
To create the calendar pockets, fold and press each lower fold line on the numbered pocket rows. Then align each fold with the lower edge of the printed red “sashing” line above it. Pin in place across the panel width. Baste along each side edge.
-
Sew a 2 1/2" × WOF C8659 Natural border strip to each side of the pinned panel; trim the extra length. Sew a 2 1/2" × WOF Natural strip to the top and the other to the bottom on the panel; square and trim the extra length.
-
Layer the wall hanging, batting, and backing, and stitch a line of quilting through all layers on each side edge of the printed pockets, stitching from top to bottom of the pocket area in the red vertical sashing. This holds the pocket folds in place. Quilt as desired in the border areas and upper panel (above the pockets). Do not quilt the pockets. If you quilt in the red horizontal sashing areas, be sure to leave the upper pocket edges open for inserting small gifts for the holiday countdown.
-
Stitch the 2 1/2" × WOF C7200 Pine binding strips together end to end using diagonal seams. Fold and press the resulting long strip in half lengthwise with wrong sides together. Stitch to the wall hanging front, matching raw edges and mitering the corners.
-
Fold the binding to the wall hanging underside and hand-stitch the folded edge to the back. Add some hanging loops, if desired.
Read NextElf Christmas Cards