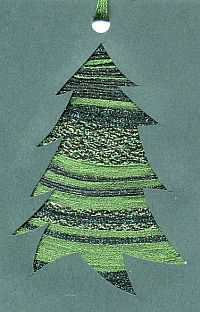
Metallic Christmas Tree Tag
Make it a cool yule with colorful, glittery gift tags and ornaments like this one. It's so easy with our double-sided tape and metallic threads-and this is a great way to use up little bits and half-spools of Kreinik thread you may have leftover from other projects.
Materials:
- Green 1/8" Ribbon like 008C, 5982, 009
- Green colors of #12 Braid like 008C, 009
- Green 1/16" ribbon like 009HL
- Dark green cardstock, cut to be a 3" x 4" tag
- Green printed holiday paper, cut to be 3" x 4"
- Round hole punch
- Xacto knife
- Cutting board or mat
- 4" x 6" Treasure Tape
- Christmas tree outline (a rubber stamp, a cookie cutter, freehand drawing, die cut, etc)
- Pencil
Steps:
- On the dark green cardstock, create your tree outline. If not using a die cut, carefully cut out the tree shape using the Xacto knife. Discard the tree or use for another project. Lightly trace the shape of the opening onto the back of your decorative cardstock (this will give you line guides).
- Cut a 3" x 4" piece of Treasure Tape. Remove the white backing and lay the piece on the back of your 3" x 4" decorative paper. Remove the red liner to expose the sticky top.
- Decorate this sticky area with thread: lay the 1/8" Ribbon first, in a slightly curved pattern. Fill in with metallic braid shades of green. Press the thread onto the tape to adhere. Make sure the thread extends from side to side over your line-drawn tree image, so that it will be completely behind your cut-out.
- When thread decorating is done, lay strips of Treasure Tape along the sides, remove the red liner to expose the top sticky part, and attach the dark green 3" x 4" card with the tree image. Press firmly to make sure it adheres.
- Punch a hole in the top, and string an extra piece of ribbon through the hole.
Kreinik threads available through needlework stores or www.kreinik.com.
Read NextDIY Daily December Photo Diary


