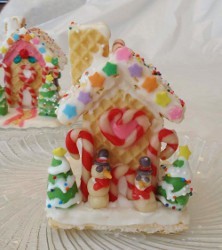
Christmas Cookie House
The best Christmas crafts are the ones that look great and taste great, too! Make a Christmas Cookie House and flex your creative muscles. These adorable cookie houses are great for kids, and they make fabulous gifts for friends and neighbors. Using all kinds of fun yummy snacks, these cookie houses take food crafting to a whole new level! Get your kids involved in the kitchen with these sweet Christmas Cookie Houses!

Materials:
- Rectangle cookies of any variety
- Wilton Cookie Icing and/or Cake Mate Writing Icing
- A sharp knife
- Candy sprinkles, stars and whatever else you like
- Tootsie Roll Fruit Flavor Midgies and Frooties (Stick these in your pocket to warm them up, it makes them much easier to work with)
Instructions:
- Lay out your cookies. The side walls will sit horizontally, while the front and back will stand vertically. Lay your wall on both sides of the front and cut the top of the front into a point, starting at the level of the walls.

- Cut the walls as short as you want. Mine are about square. If they’re too long they will look funny.

- Using a small amount of icing (ALWAYS SMALL AMOUNTS, OR IT WILL BE TOO WET TO WORK) stick the end of one wall to the outer edge of the back of the front piece. Look at the photo, it will make sense. Repeat for the other wall and back of the house. You may need to hold it for a moment.

- I used whole cookies for the roof pieces and carefully beveled the edges at the peak to give them a tight fit.

- Hold it for a moment so they don’t slide off.

- I used two whole cookies for the base. You can use as many as you like. Building a yard can be is extra fun! Grab a plate or whatever surface you house will sit on and lay the base cookies on, sticking them together with what? A SMALL AMOUNT OF ICING. I also cut two identical pieces to form a chimney. You may have to play with the angle to get it just right.

- Cover the top of your base with icing and carefully set your house on it. This is where I walk away for a half hour or so. You’ll need for the house to be able to hold together when you pick it up to decorate.

- Get your Tootsie Rolls out of your pockets and make some design decisions! Here I have pieces of vanilla and fruit punch to make candy canes; vanilla, vanilla to make snowmen, blueberry/cranberry to make hats and eyes, tiny bits of orange for carrot noses and fruit punch to make scarves and bands for the hats; lime for the trees.

- Start you candy cane roll by twisting the red and white together. They won’t want to stick to each other so gently persuade them by rolling and twisting and rolling and twist…You get the idea.

- Stick the chimney to the roof and drizzle icing all over the roof. Quickly shake sprinkles on the icing.

- Lay your house on it’s back to add decorations to the front of the house. Let them set for a few minutes.

- This photo shows how the snowman and his hat go together.

- The trees got a few spots of icing, some sprinkles and stars on top.
Your Recently Viewed Projects
Thanks for your comment. Don't forget to share!
Report Inappropriate Comment
Are you sure you would like to report this comment? It will be flagged for our moderators to take action.
Thank you for taking the time to improve the content on our site.