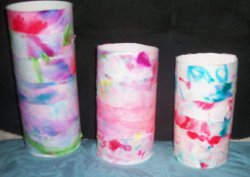
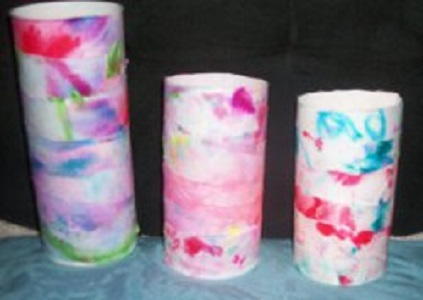
Tie-Dyed Luminaries
Luminaries can be used to go outside candles or as a cute little night-light, but when not used as such, they can be a great place to put all of your child's pens and pencils. Check out this cute project for Tie-Dyed Luminaries--this free tie dye pattern is a great one to craft with kids.
Materials:
- Any powder drink container. For the middle size (I usually cut 1.5" from the top).
- Any kind of lightweight fabric (preferably white)
- Colored markers
- Water
- Tacky glue
- Scissors
Instructions:
- For each luminary, get a piece of fabric, about a square for each one that you will cut strips later.
- Using colored markers, make any kind of designs you want on the fabric. The more colors you use, the better it will come put.
- Dip the material in water till all the colors seep through the fabric. Squeeze thoroughly till all the excess water goes out. Wait till the fabric dries.
- Cut strips of fabric to wrap around the container (6" strips are good for this).
- Using Aileen's tacky glue every now and then wrap the fabric around the cylinder until you get down to the bottom. Cut if you need to when you have excess material. You should see different patterns on each luminary.
- Put a tea light inside of each luminary and at night you can put each one at your nightstand or end table.
Your Recently Viewed Projects
Thanks for your comment. Don't forget to share!
jadeana42
May 26, 2016
O.K.... I have HUNDREDS of pens, and I'm ALWAYS looking for a way to store them and still have easy access... These would make cute Luminaries... But I opted to use them as MY pen cups... LOL,,, Forget the kids!! -p FavCraftsTieDie
Report Inappropriate Comment
Are you sure you would like to report this comment? It will be flagged for our moderators to take action.
Thank you for taking the time to improve the content on our site.