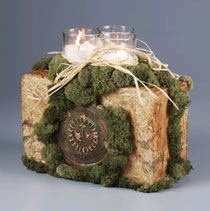
Clay Medallion Candleholder
Borrow this look from ancient times today - moss represents life, "stone" represents strength, and the sun face represents wisdom. What more do you need?

Materials:
- STYROFOAM Brand Foam:
- Block, 18" x 12" x 2"
- Acrylic paints: black; metallics: pearl-finish green, bronze, and copper
- Brown antiquing gel
- Metallic gold rub-on finish
- Air-dry modeling compound, one package
- Rubber stamp, "Circle with Face"
- Fern-print tissue paper, two sheets
- Light green reindeer moss, one bag
- Natural raffia
- Clear glass votive holders with tea light candles, three
- Serrated knife
- Candle stub or paraffin
- Pencil
- Ruler
- Small bowl and spoon
- Rolling pin or clay roller
- Plastic wrap
- Medium flat paintbrush
- Disposable palette
- Water basin
- Paper towels
- Scissors
- Low-temp glue gun and glue sticks
- Thick, white craft glue
- Optional: Disposable gloves
- Optional: Hair dryer
Steps:
- Wax serrated knife with candle stub or paraffin. Measure and mark two 8" x 5" rectangles on foam block; cut out. Glue foam pieces together to make 8" x 5" x 4" block for base.
- Tear several medium-sized pieces from tissue. Mix one part white glue to two parts water in small bowl; stir. Put on gloves, if desired.
- Carefully dip one piece of tissue into glue/water mixture then press to foam. Continue until entire foam surface is covered with tissue. Overlap tissue pieces and allow wrinkling for added character.
- Place foam block over rim of jar or drinking glass to dry overnight, turning once, or speed drying with hair dryer.
- Apply small amount antiquing gel to paper towel and rub over tissue-covered foam; let dry.
- Roll small amount of air-dry modeling compound to 1/4" thickness on plastic wrap, to area slightly larger than stamp image. Stamp face. Carefully remove medallion from plastic wrap. Repeat to create second medallion. Let dry, following manufacturer's instructions.
- Paint medallions black; let dry. Following manufacturer's instructions, use fingers to gently apply gold rub-on finish over paint.
- Gently shake metallic paints and open. Lightly touch fingertip to paint in green lid; remove excess on paper towel. Use fingers to rub paint over medallions in random fashion. Repeat for each metallic color. If too much metallic paint is applied, repaint area with black, and then reapply metallics as needed. Let dry completely.
- Glue votive holders to center top of block as shown. Tie several strands of raffia into bow around votives; repeat, creating bow on opposite side. Trim ends as desired, keeping them clear of flame areas.
- Glue medallions to front and back of base. Glue moss around medallions and votives, and to base and seams of block.
®™ Trademark of The Dow Chemical Company ("Dow") or an affiliated company of Dow. For more project ideas, please see styrofoamstyle.com.